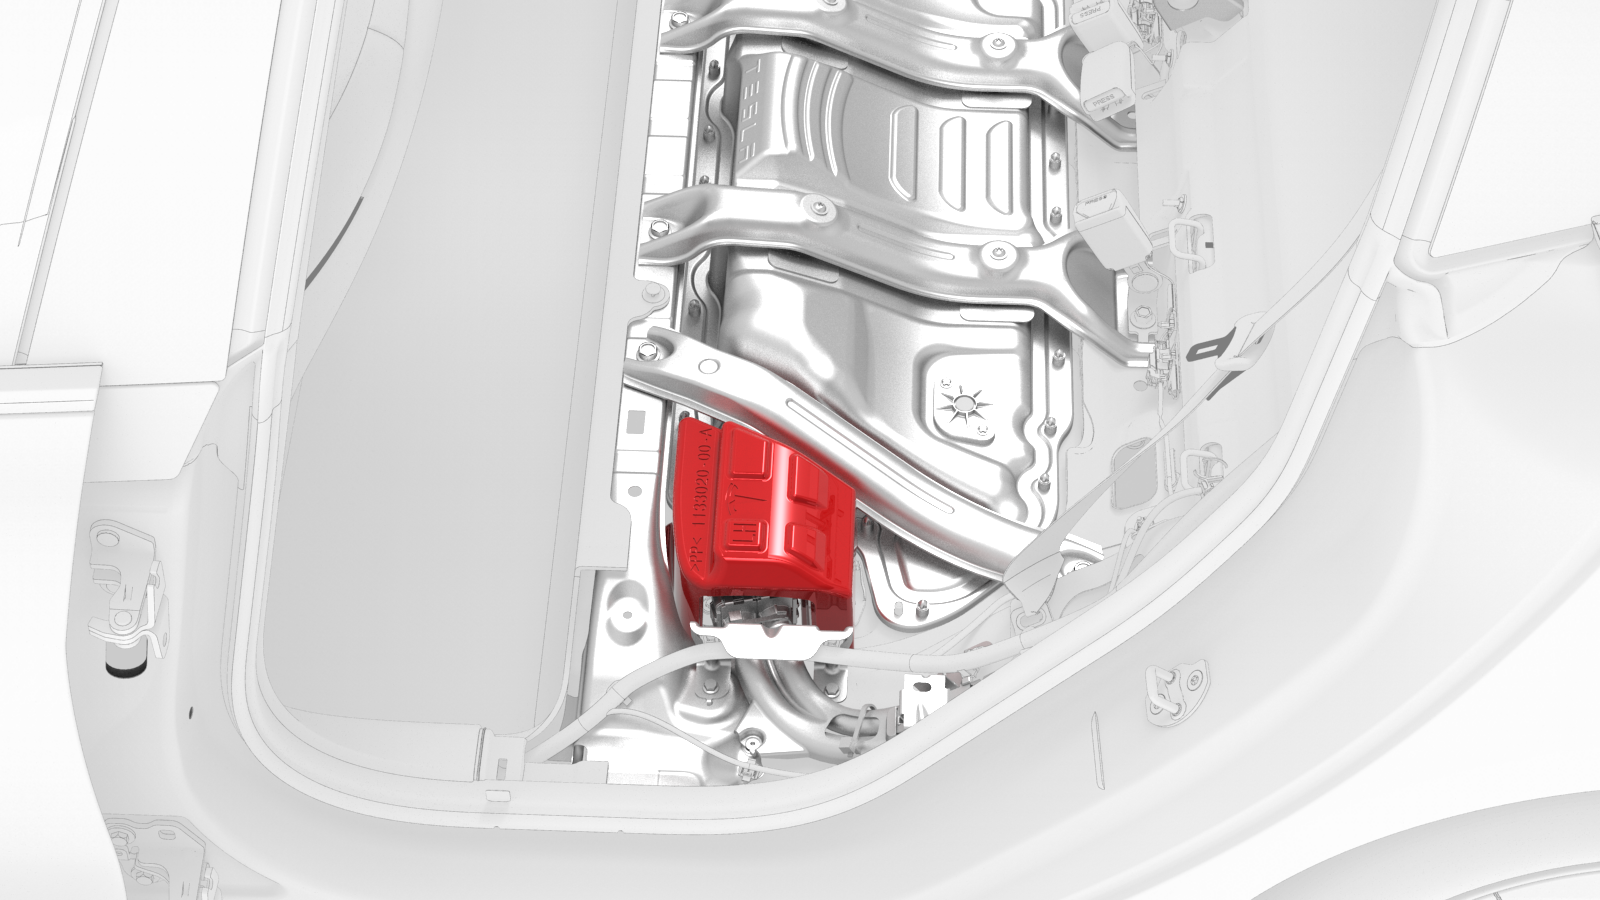
Heater - PTC (Remove and Replace)
Correction code 1810630218106302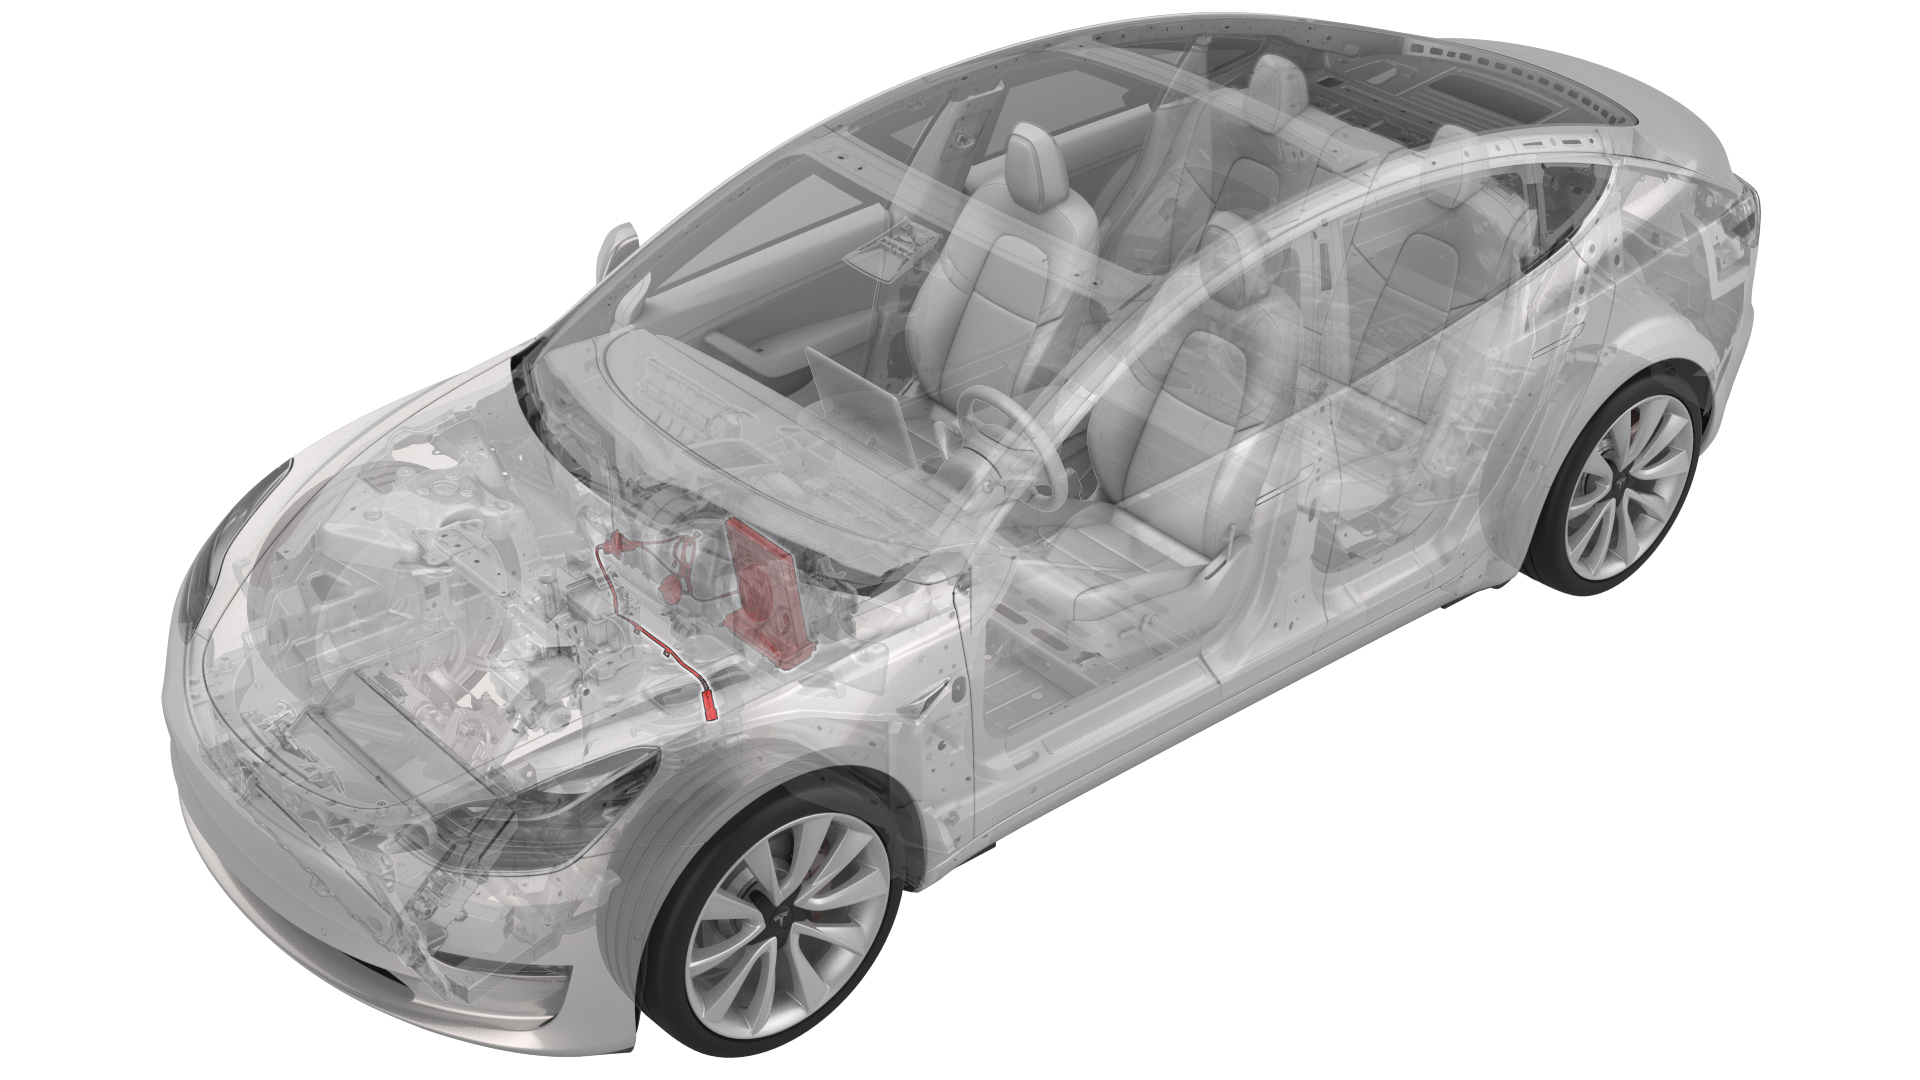
Remove
-
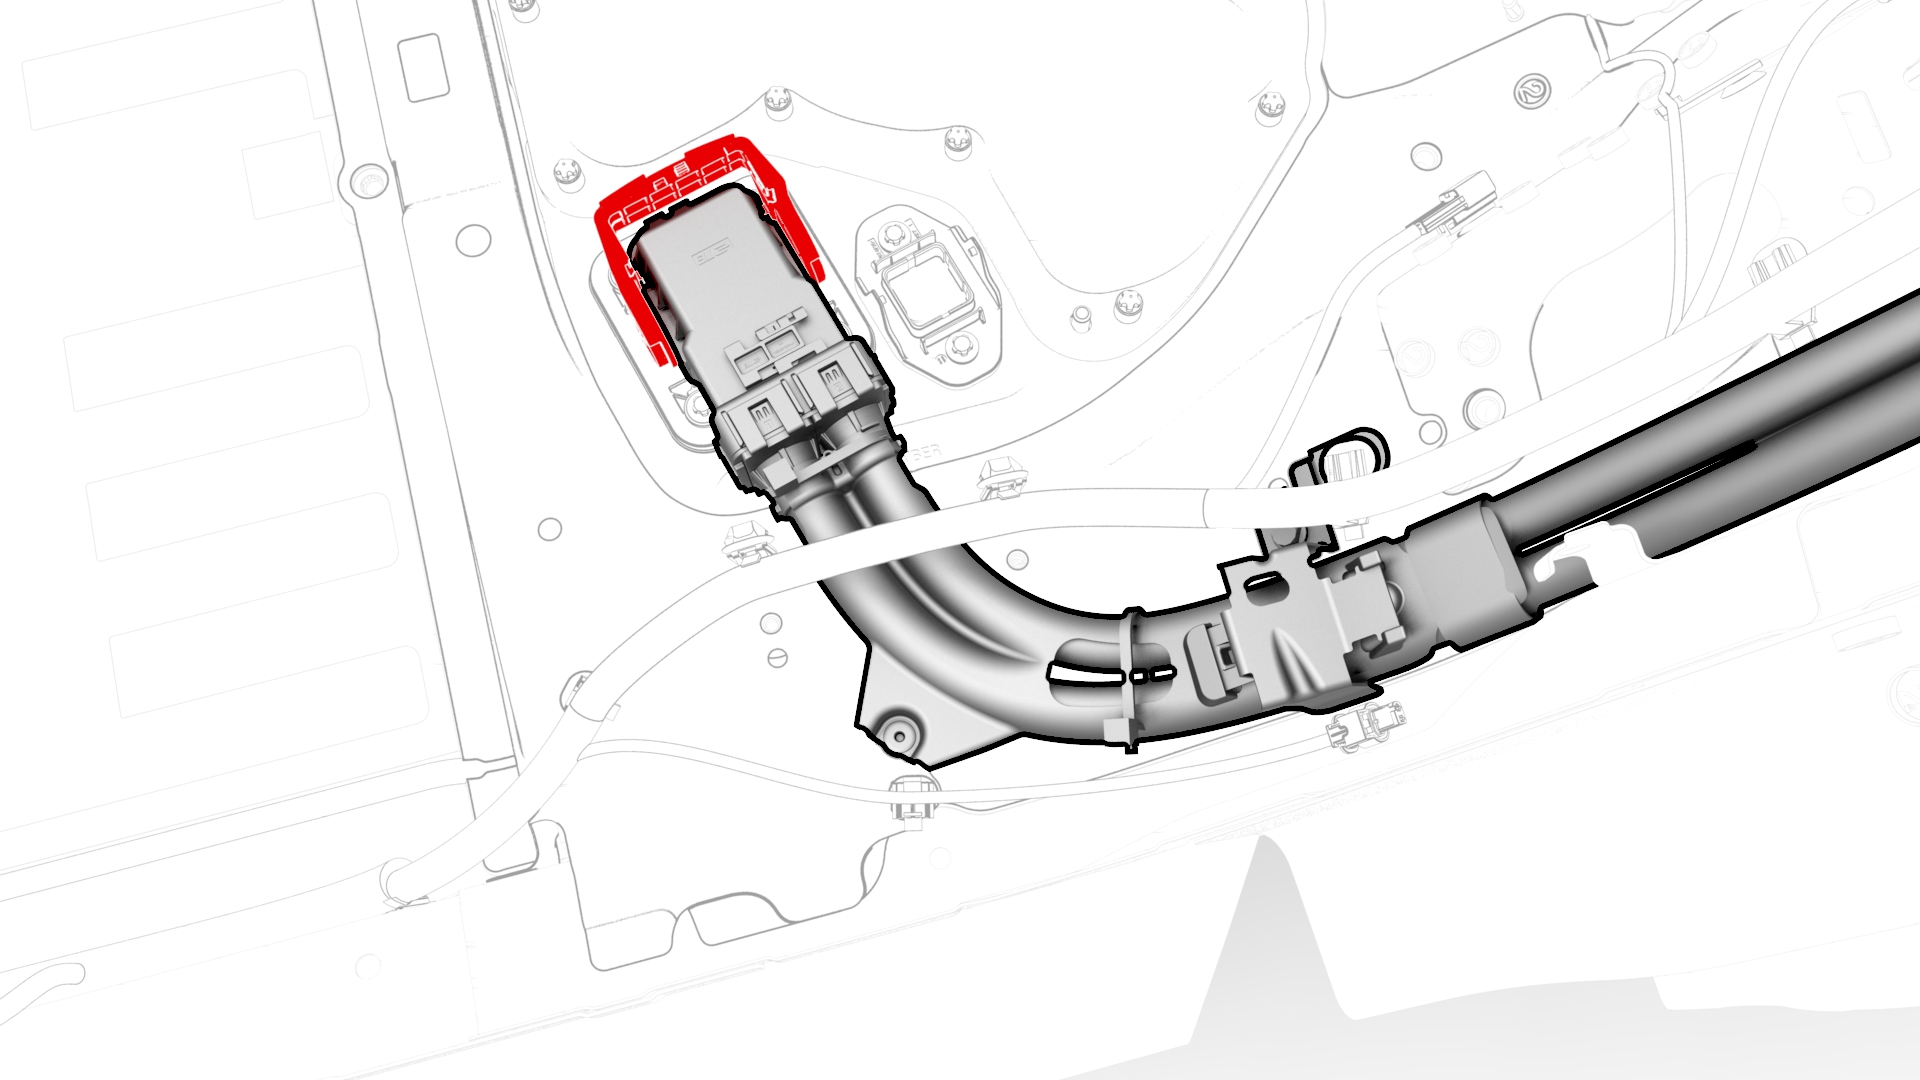
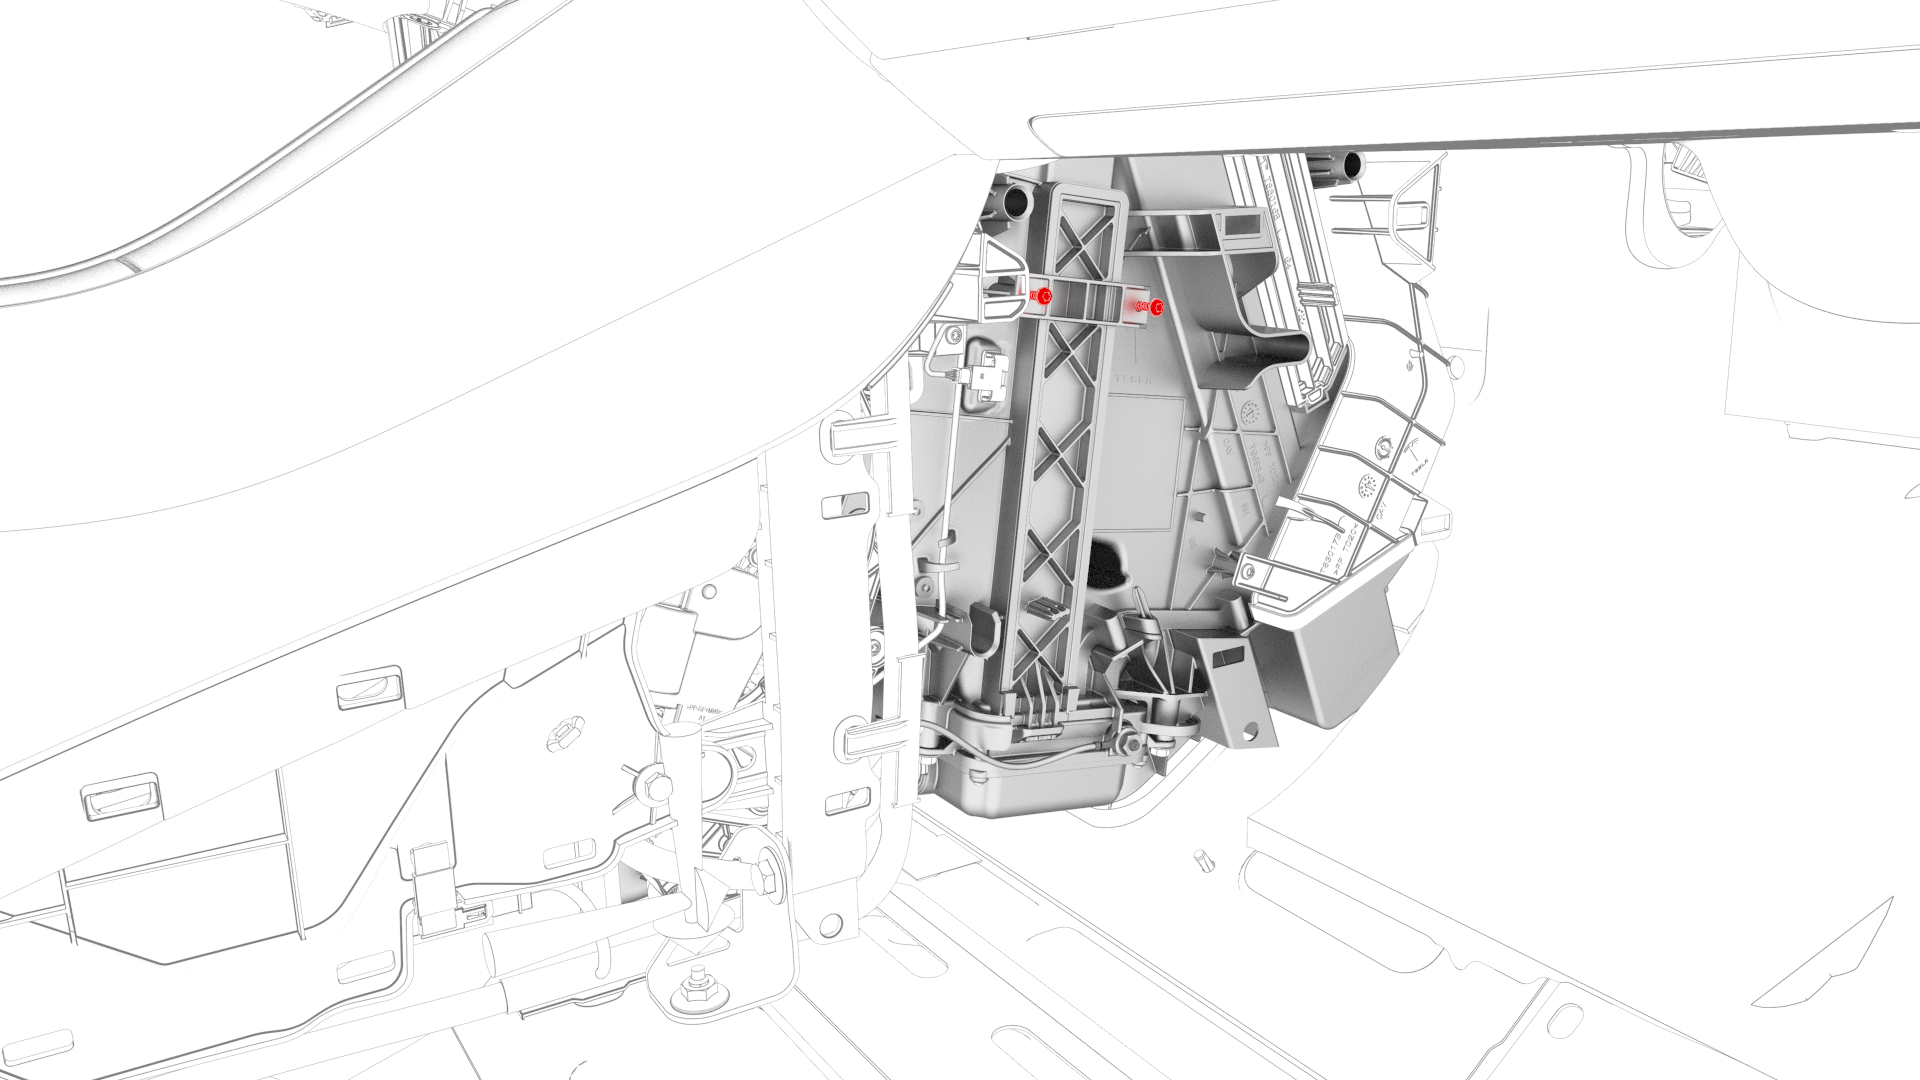
Remove the HV cap that covers the HV harness located on the LH side of the penthouse.
-
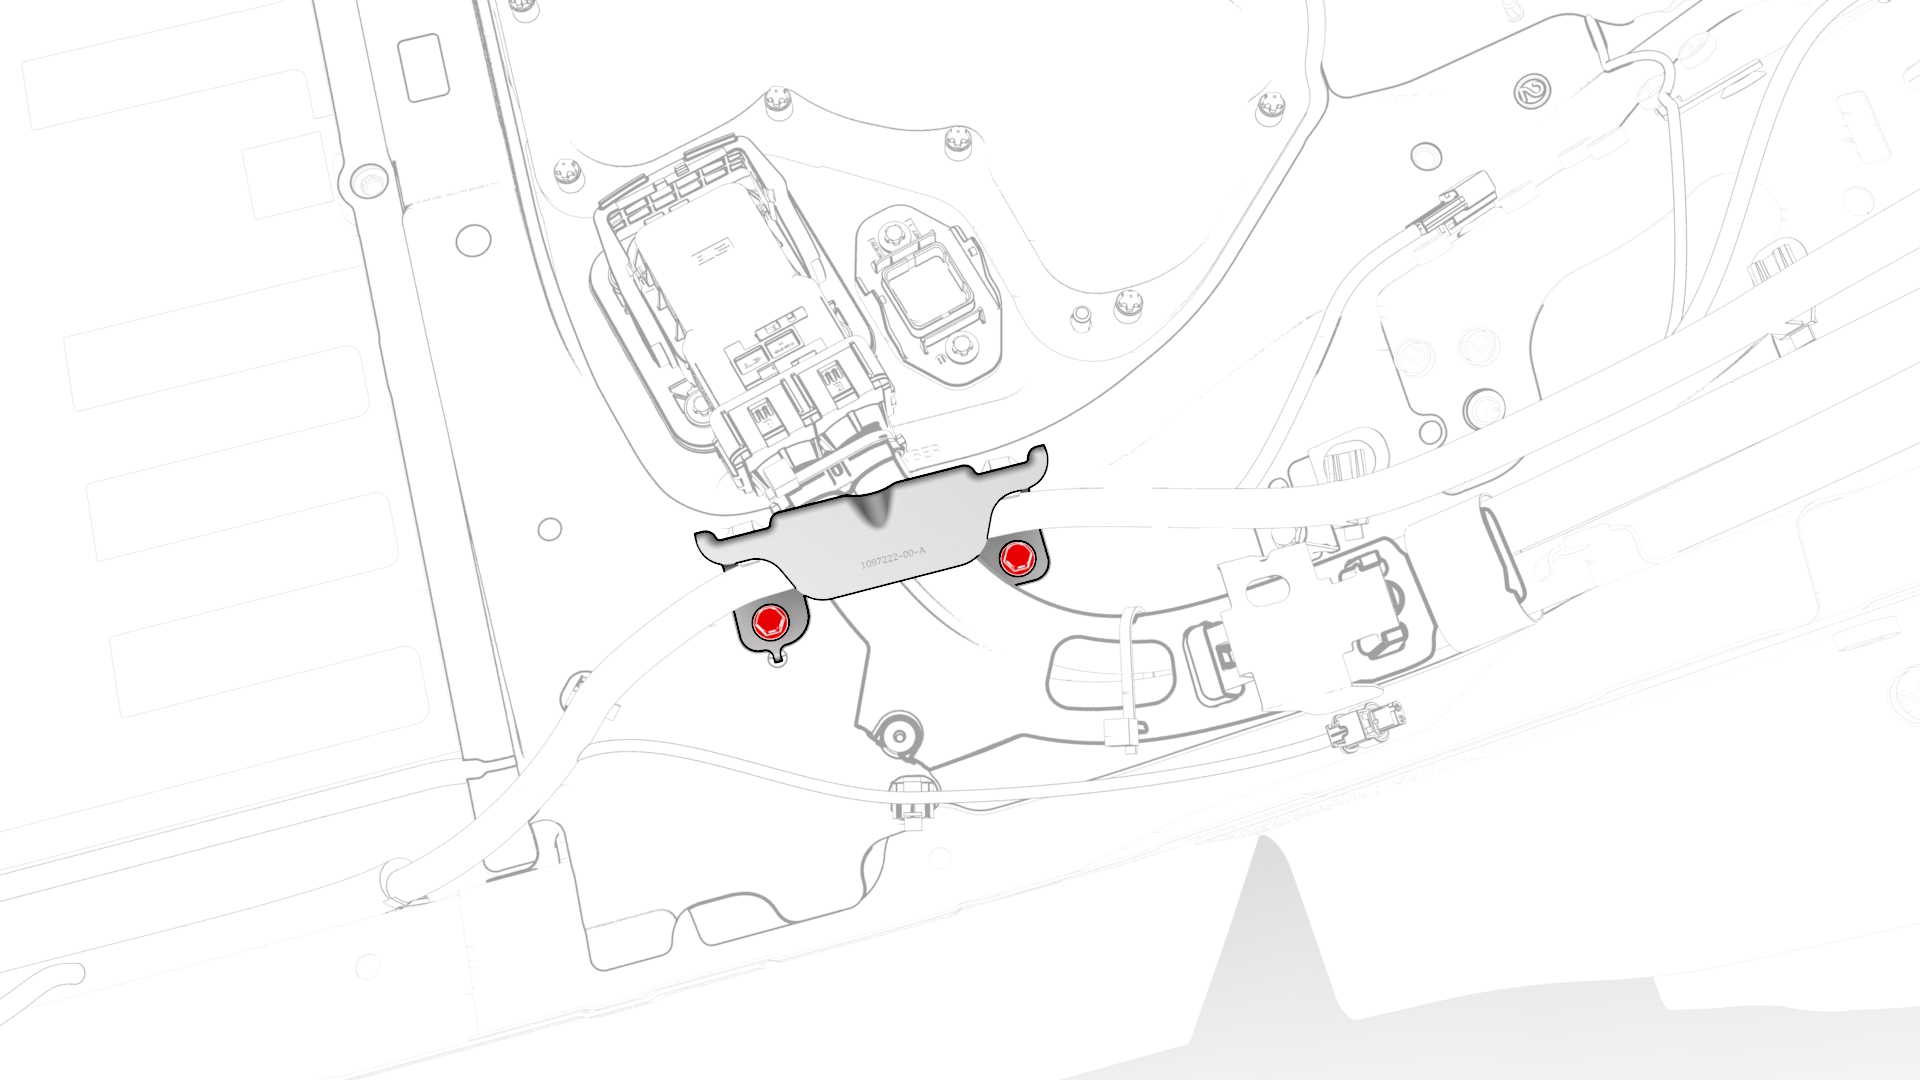
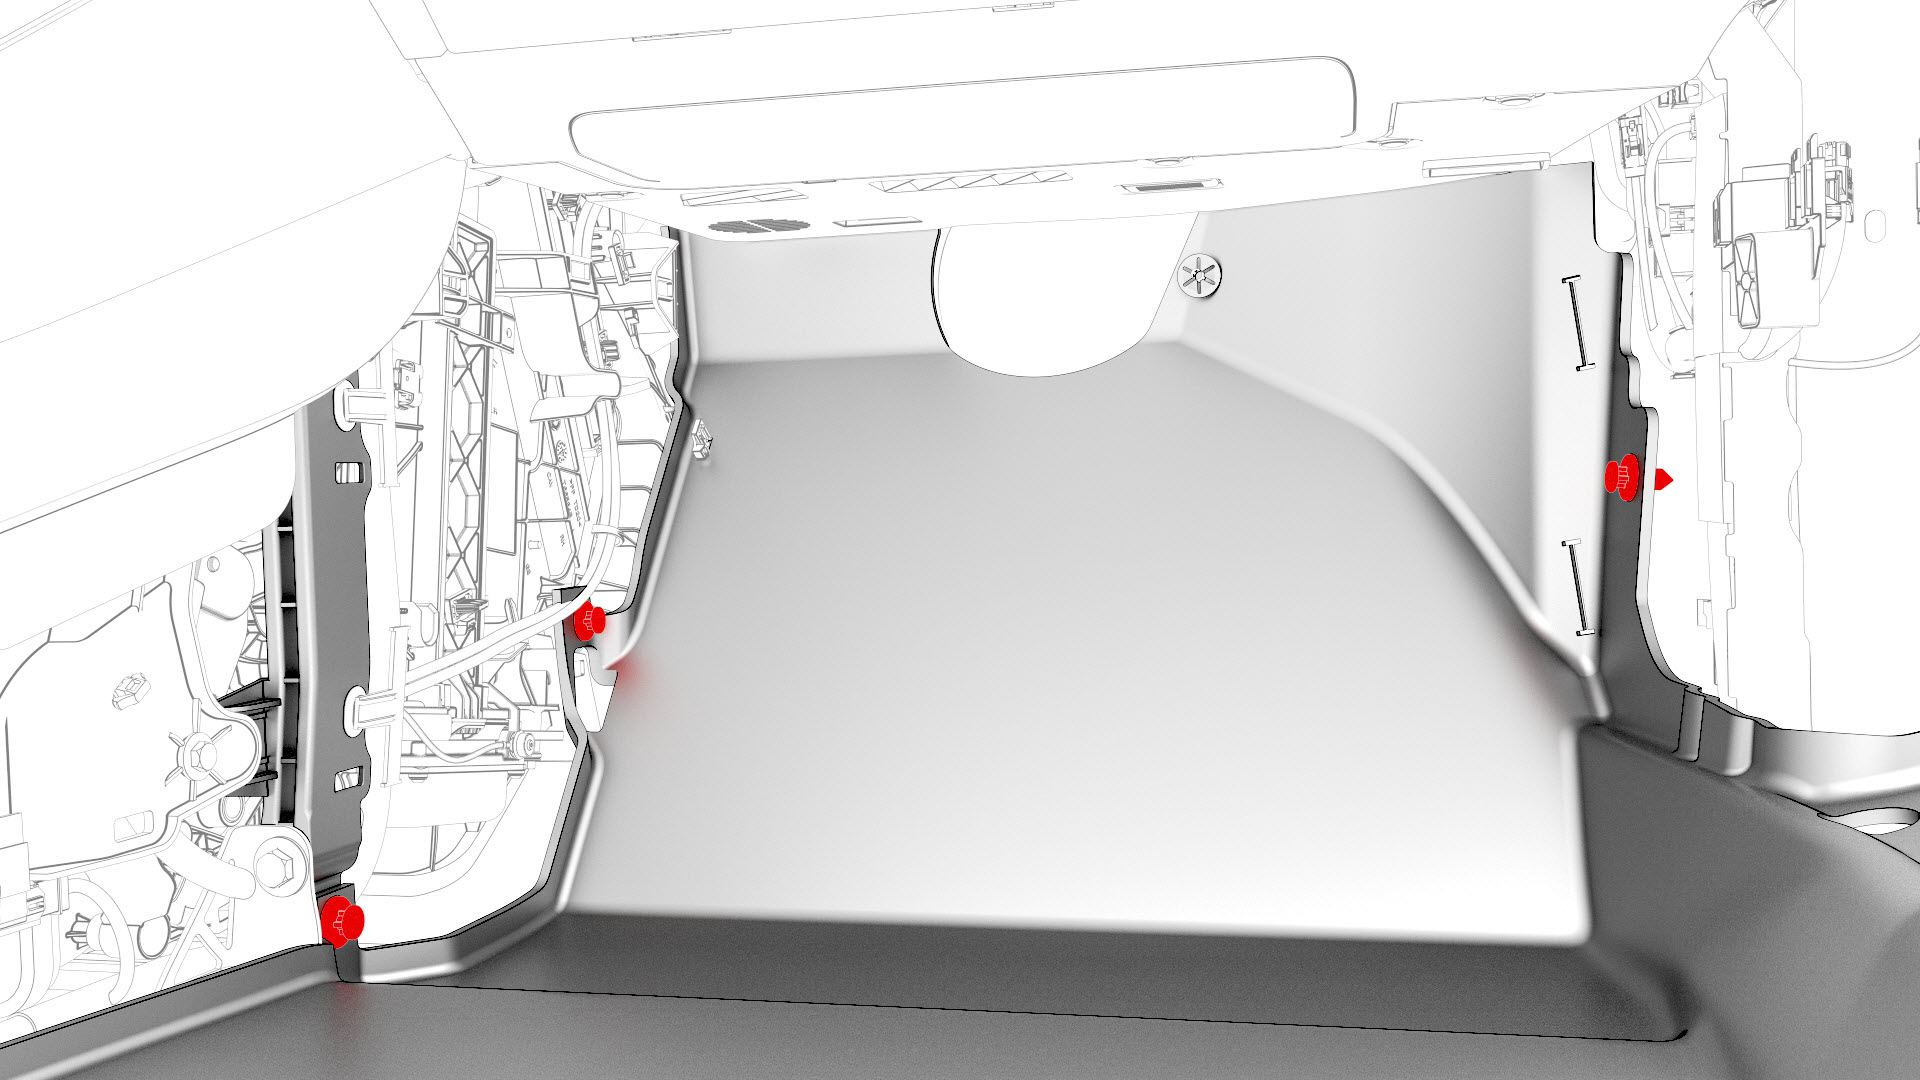
Remove the bolts that attach the wiring harness bracket at the penthouse.
-
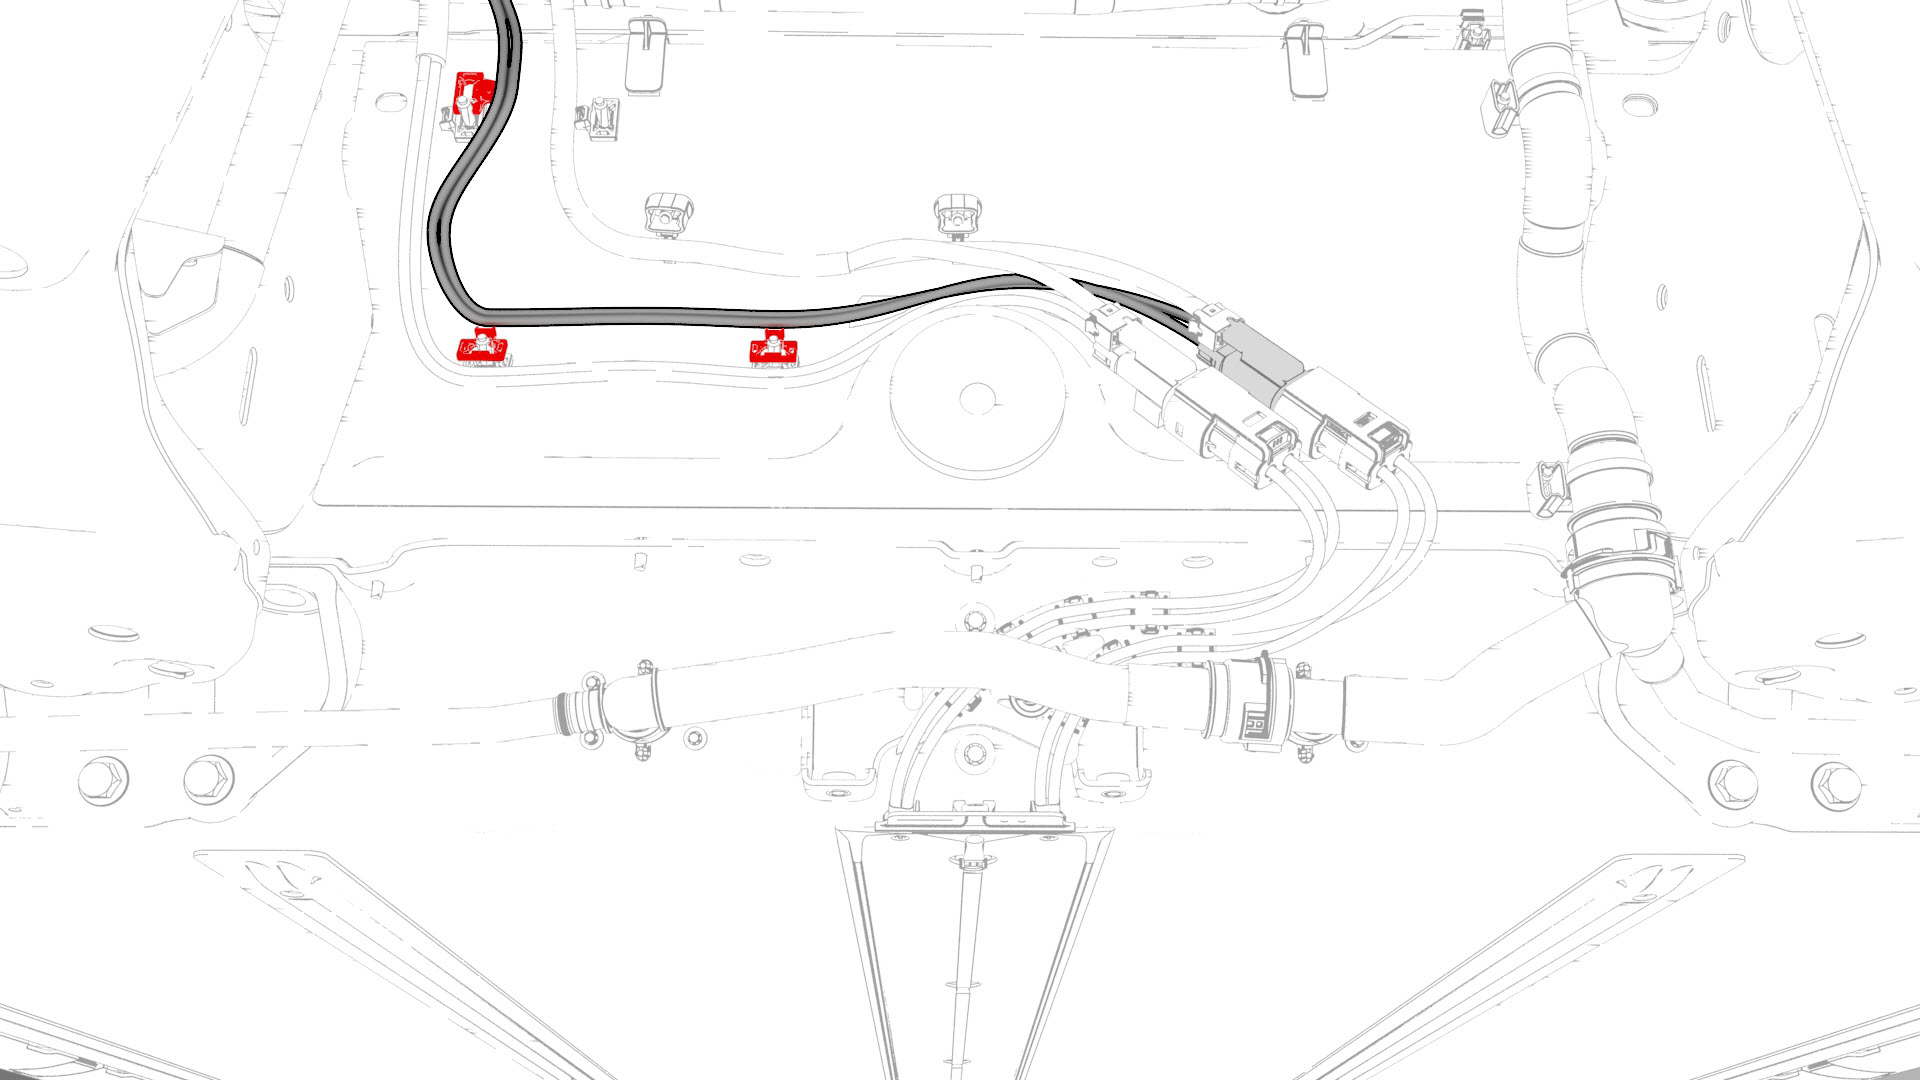
Release the clip that attaches the wiring harness to the LH lower C-pillar.
-
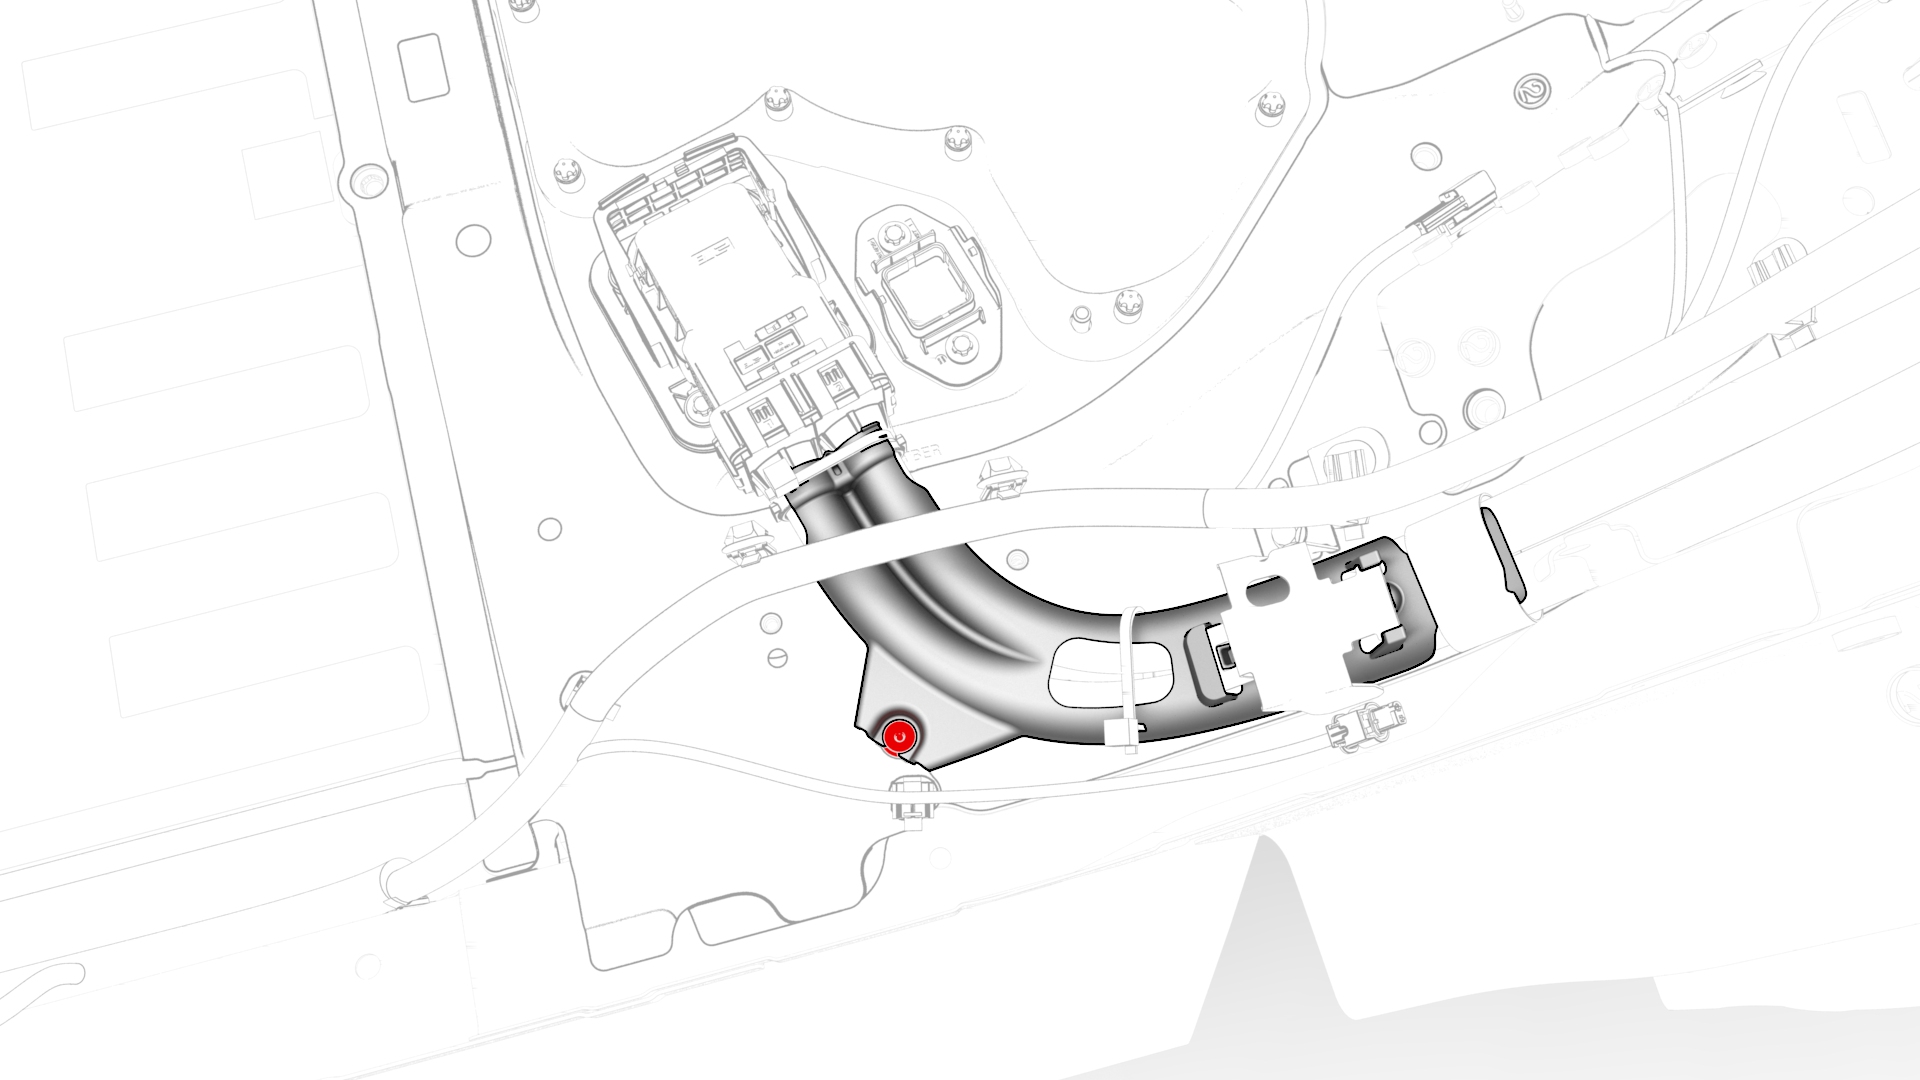
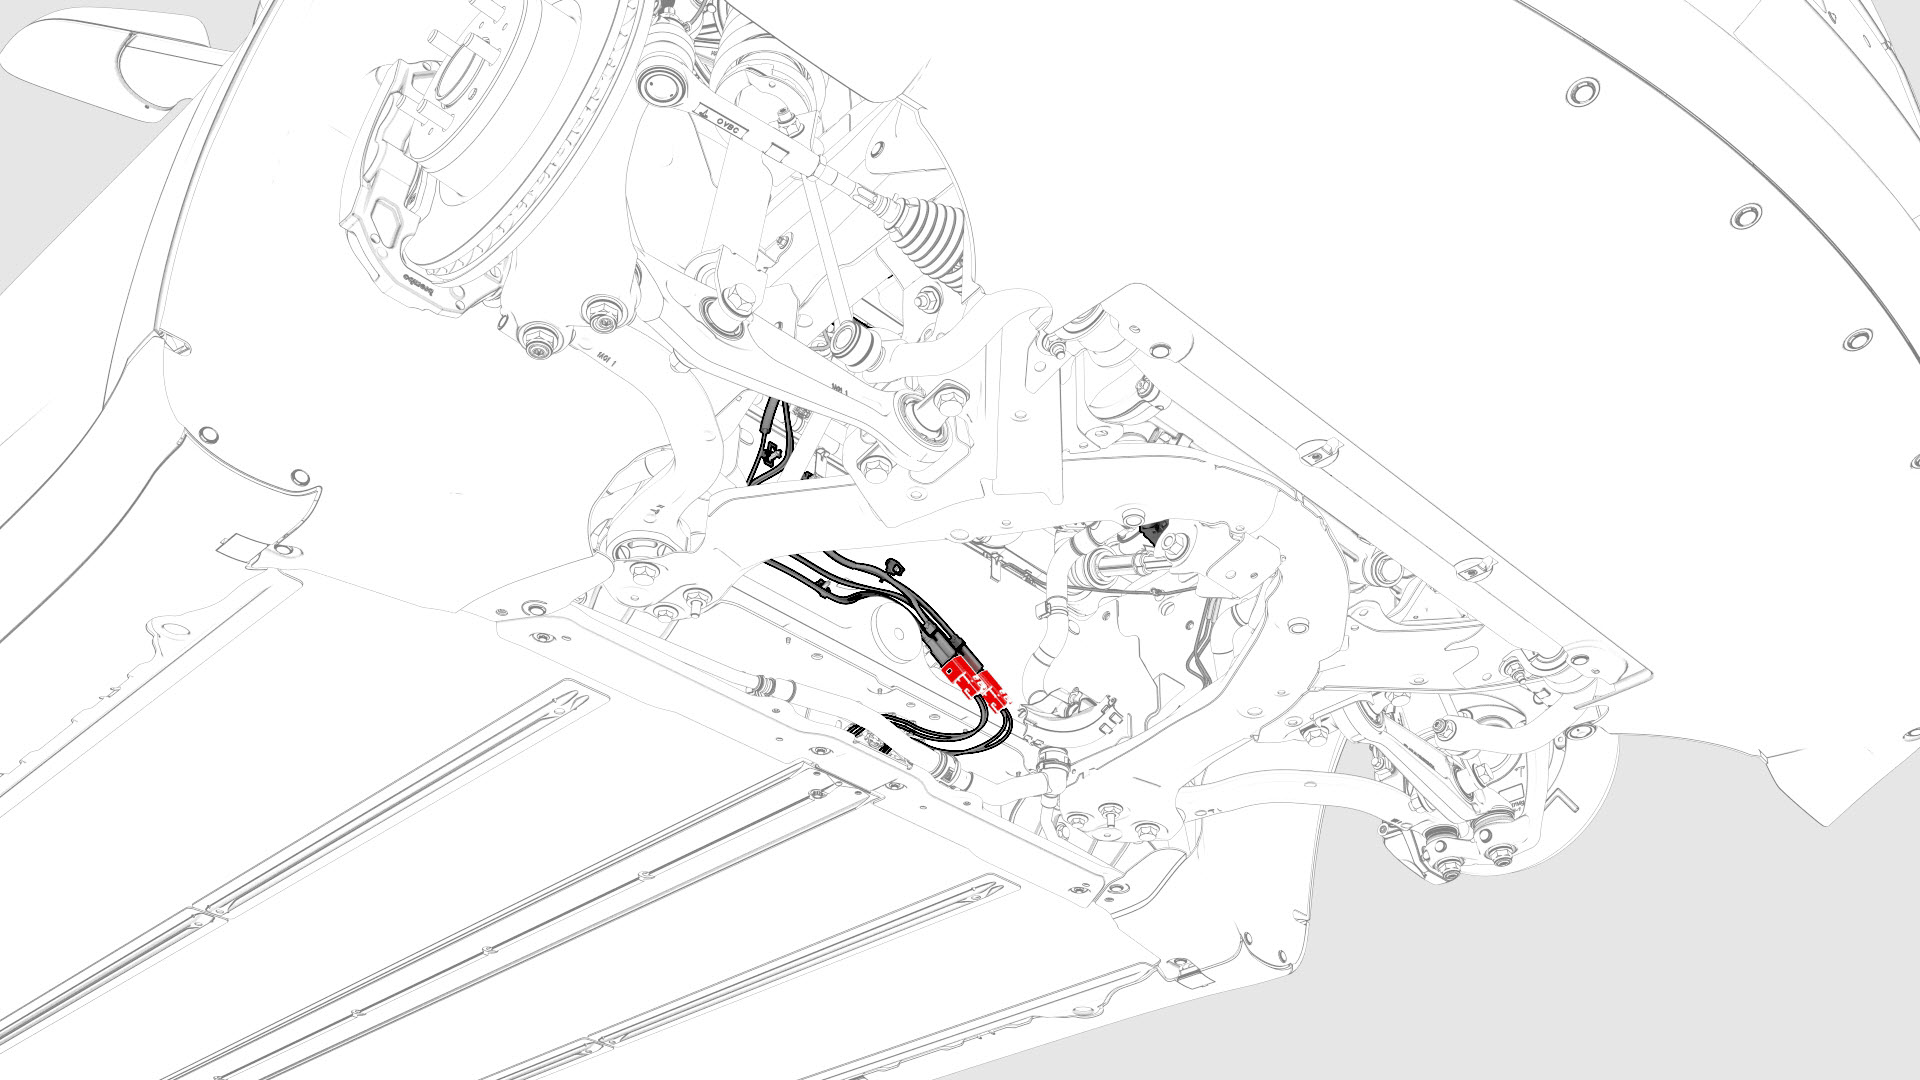
Raise the handle to disconnect the electrical harness from the DC Input assembly.
-
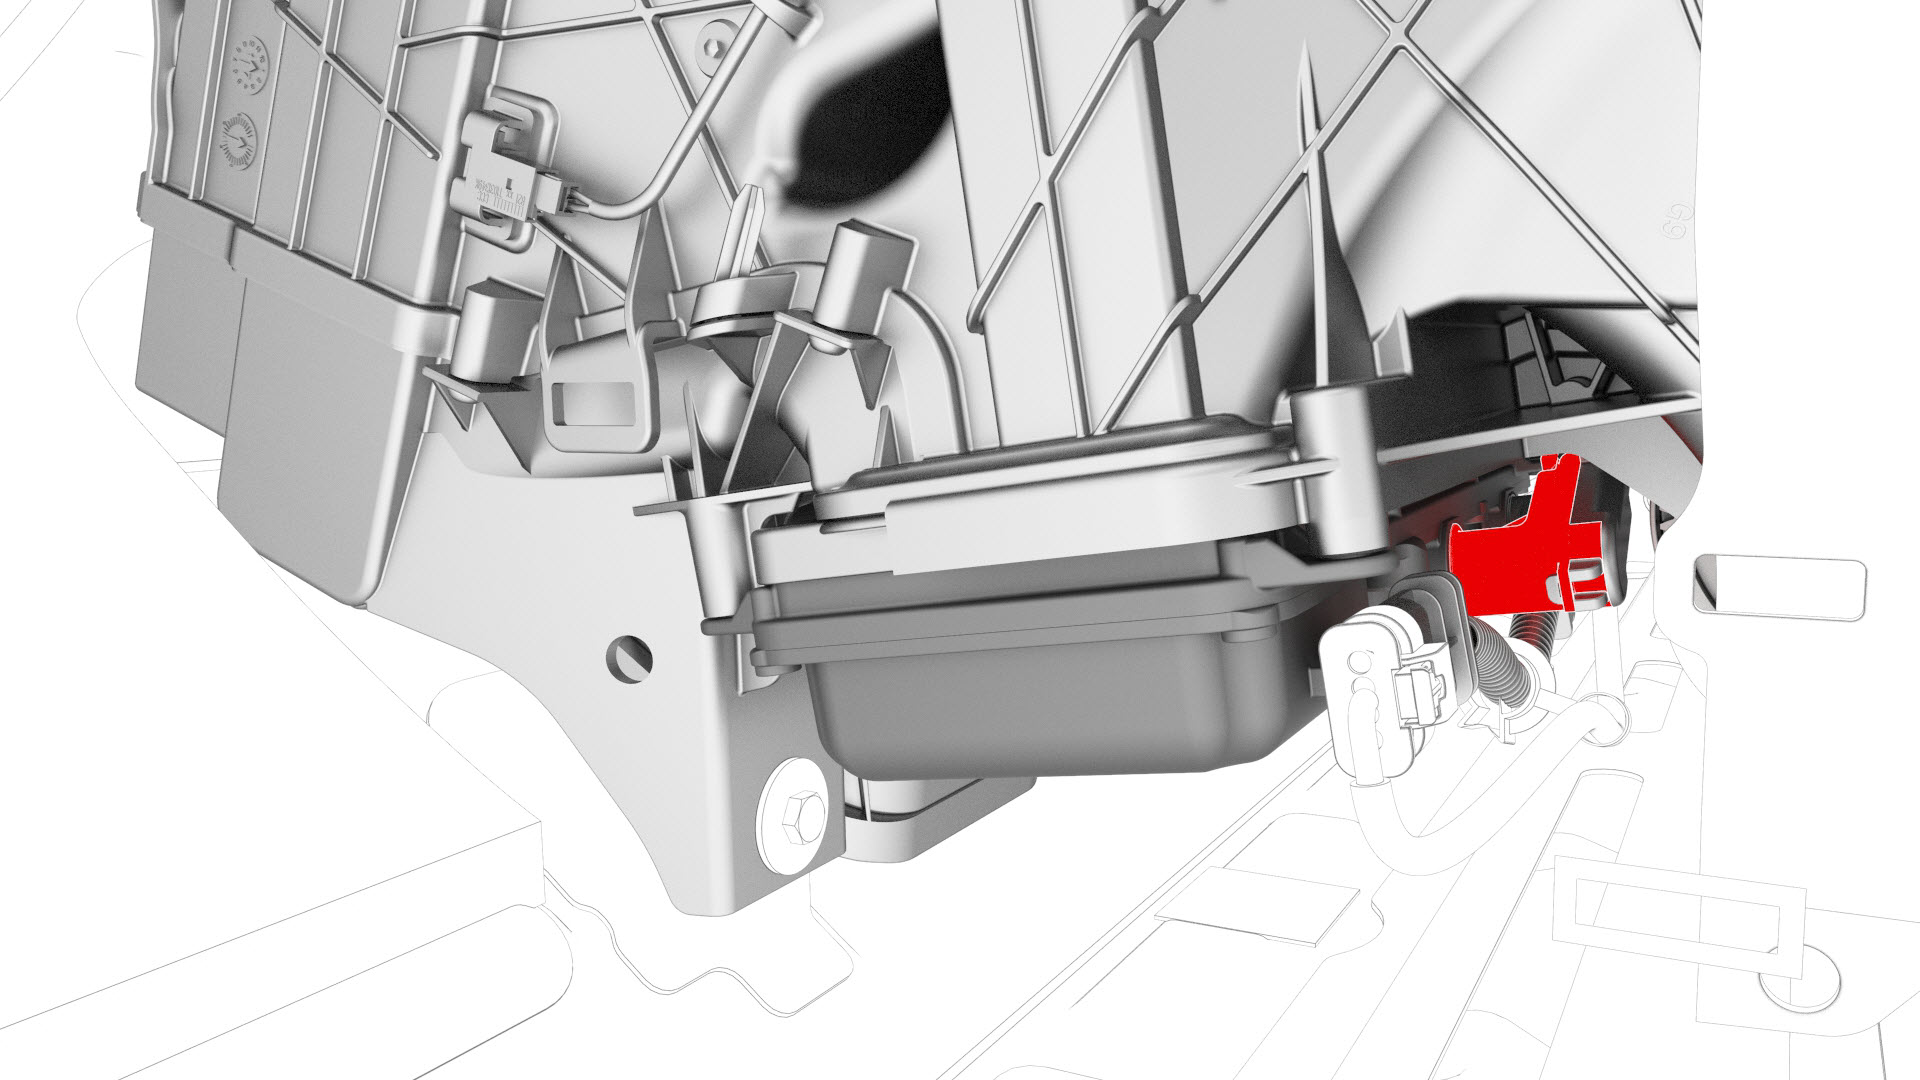
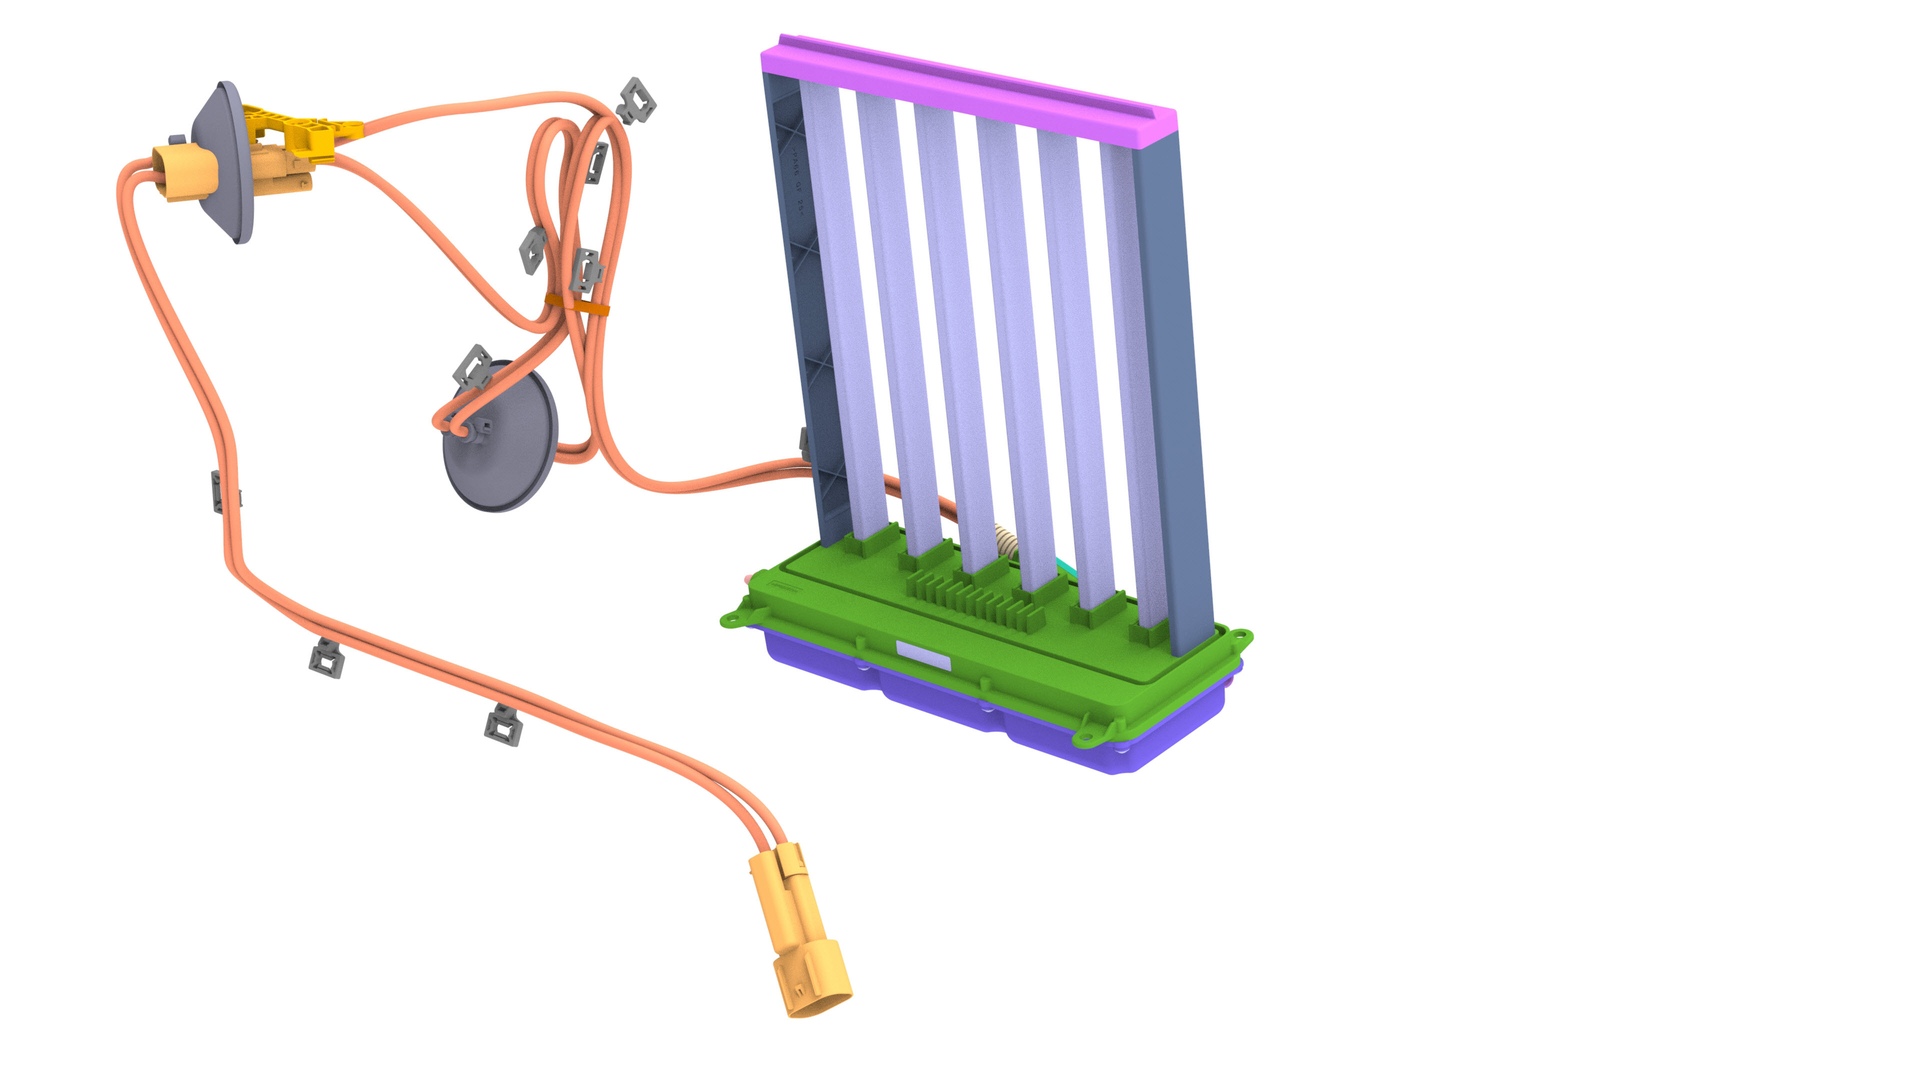
Disconnect the HV harness connector from the PTC heater.
 Note: Release the bracket from the body for better access to the connector.
 -
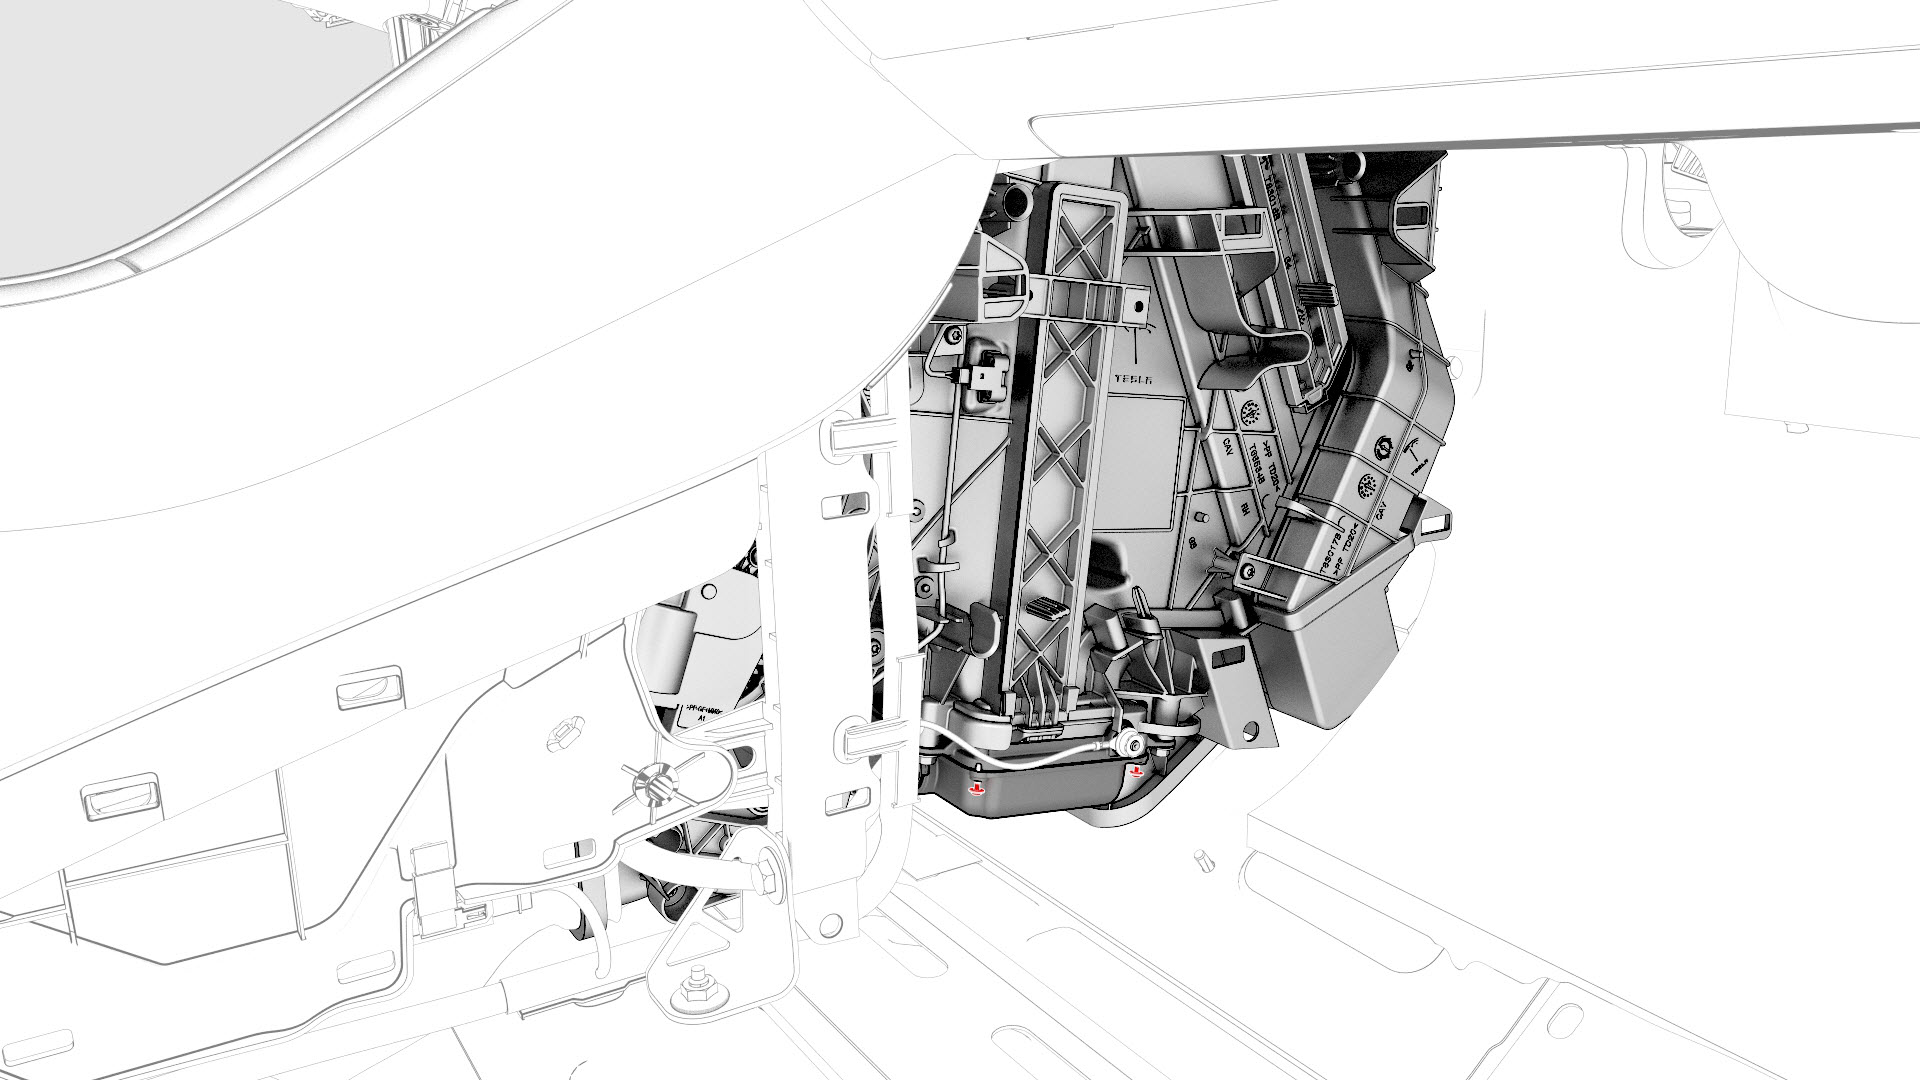
Release the clips that attach the PTC heater electrical connector to the body.
-
Release the clips that attach the front RH carpet to the vehicle, and then fold the front RH carpet rearwards.
-
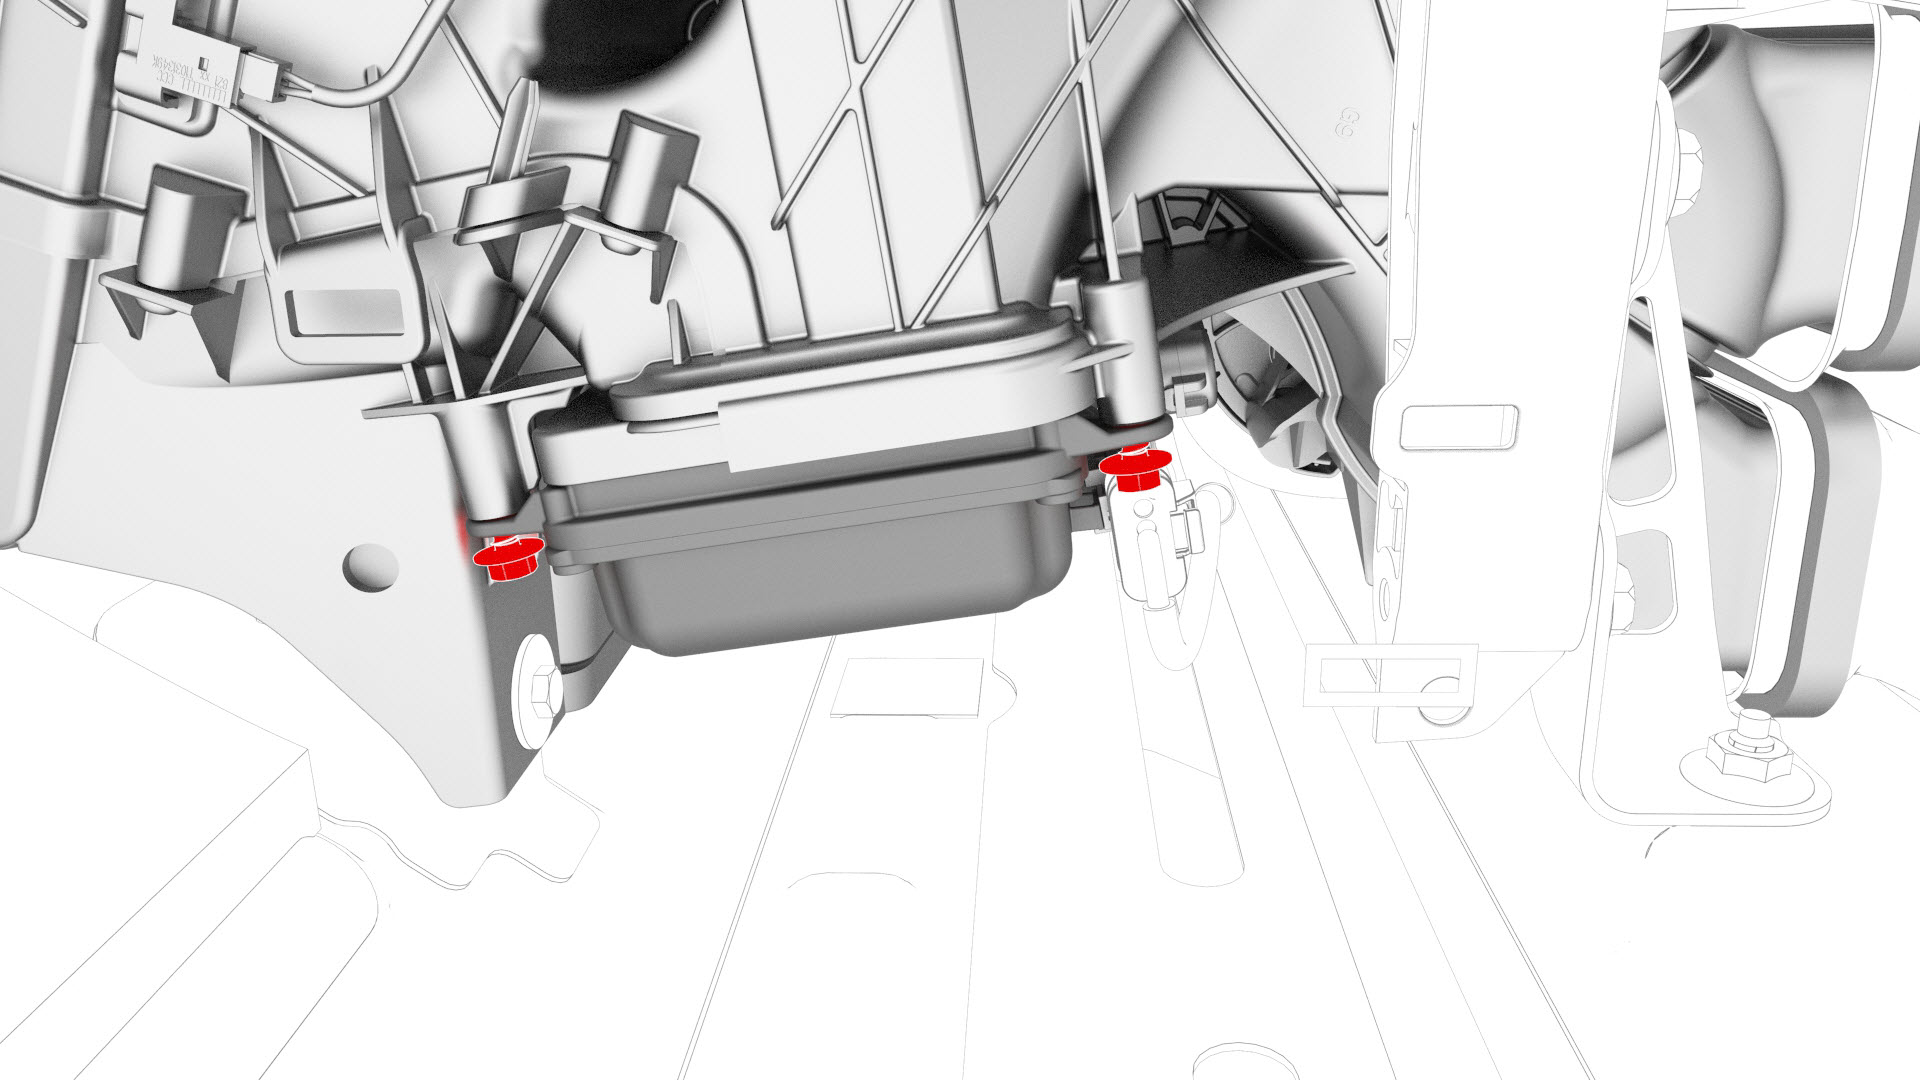
Disconnect the 12V electrical connector from the PTC heater.

-
Release the clip that attaches the PTC heater electrical harness to the HVAC assembly.
-
Remove the bolts that attach the LH side of the PTC heater to the HVAC assembly.
-
Remove the clips that attach the PTC heater electrical harness to the HVAC assembly.
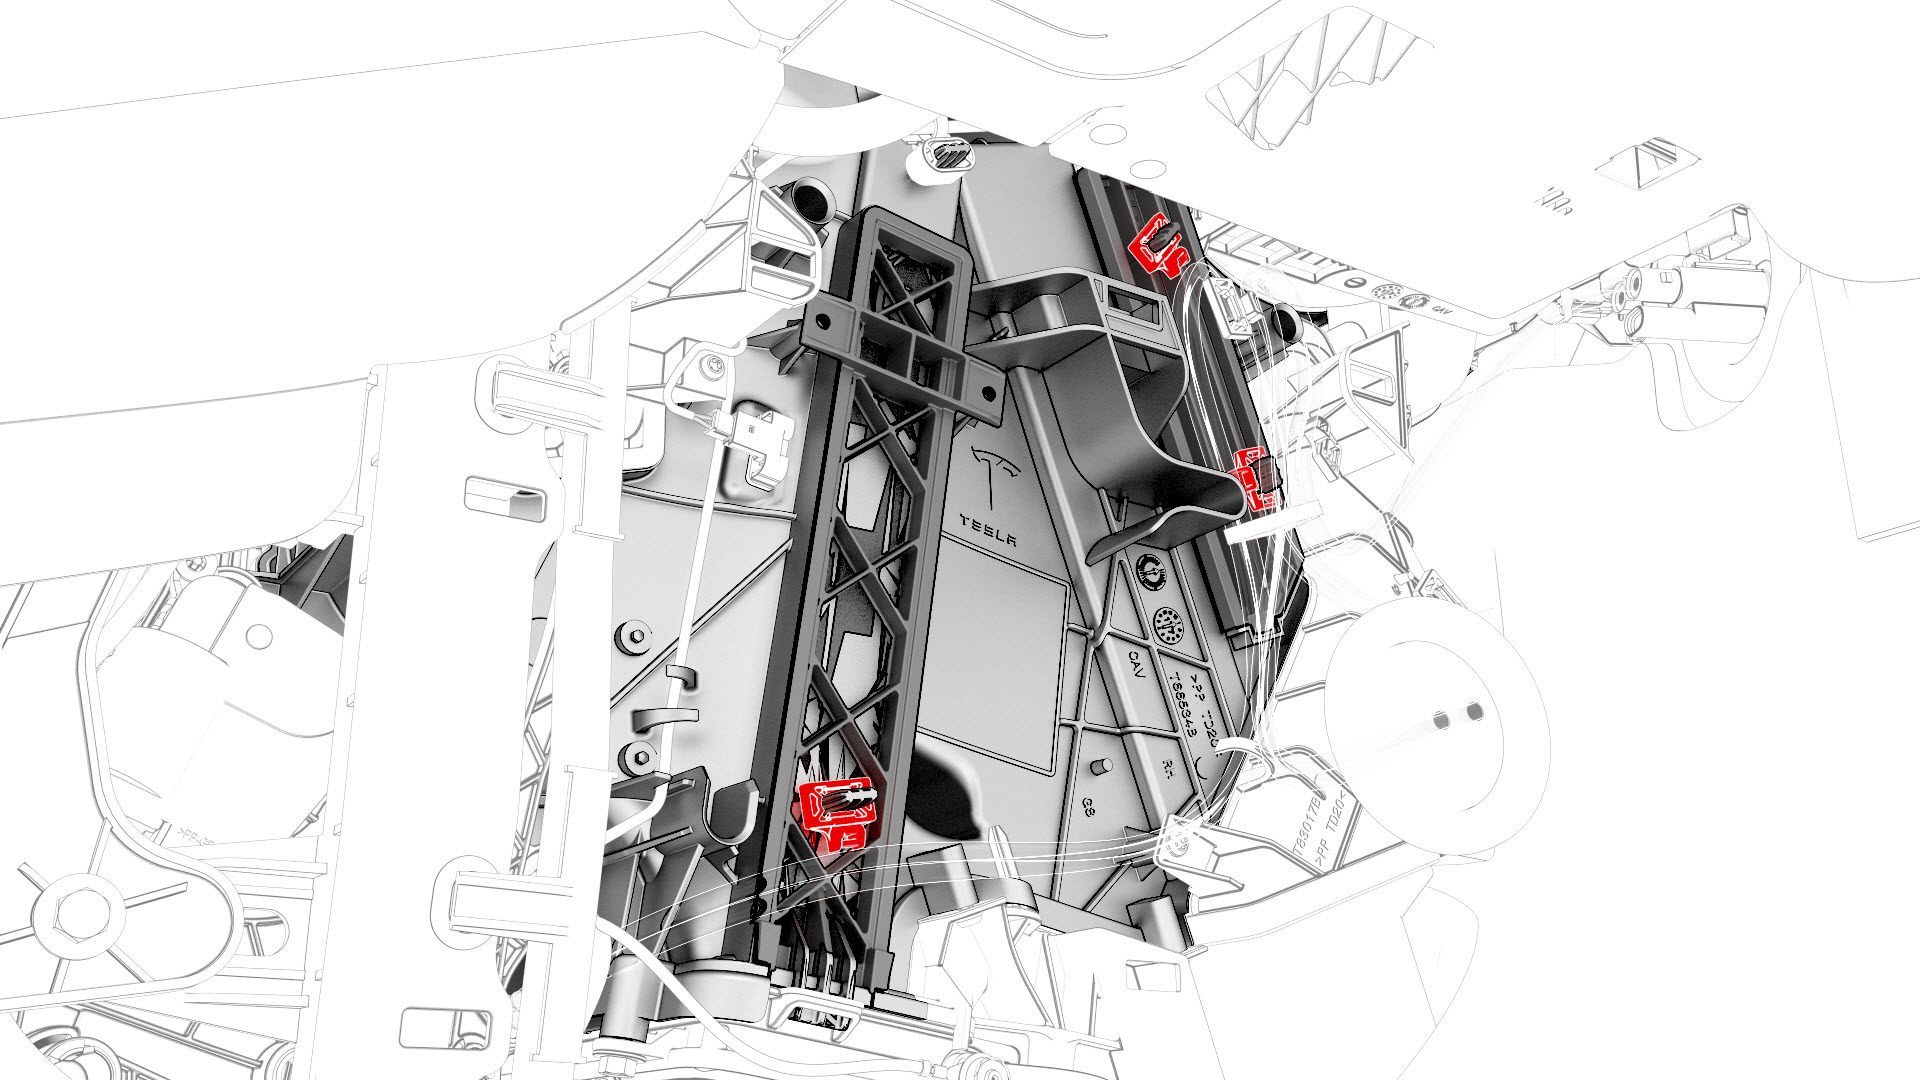
-
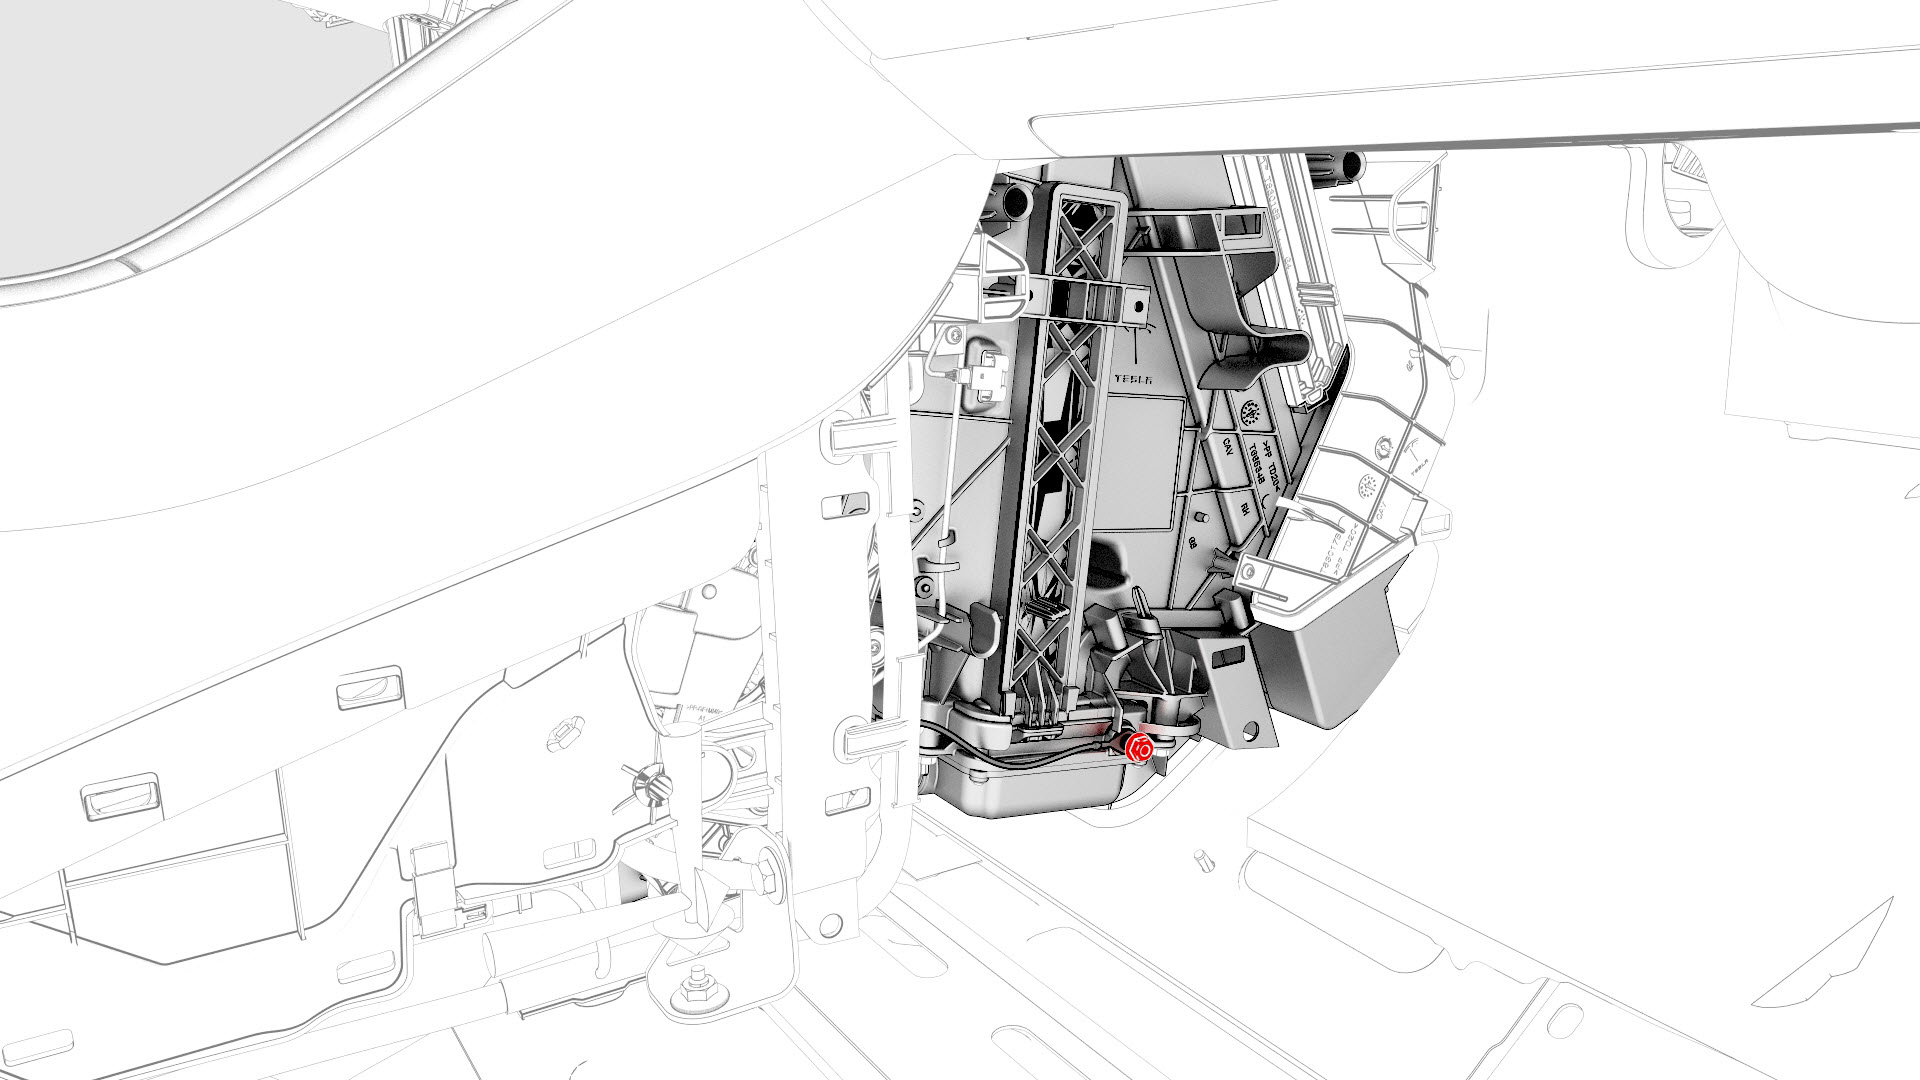
Remove the nut that attaches the instrument panel harness ground strap to the PTC heater.
-
Remove the grommet, and then carefully pull the HV cable through the bulkhead.
 Caution:Do not damage the HV cable while feeding through the bulkhead.
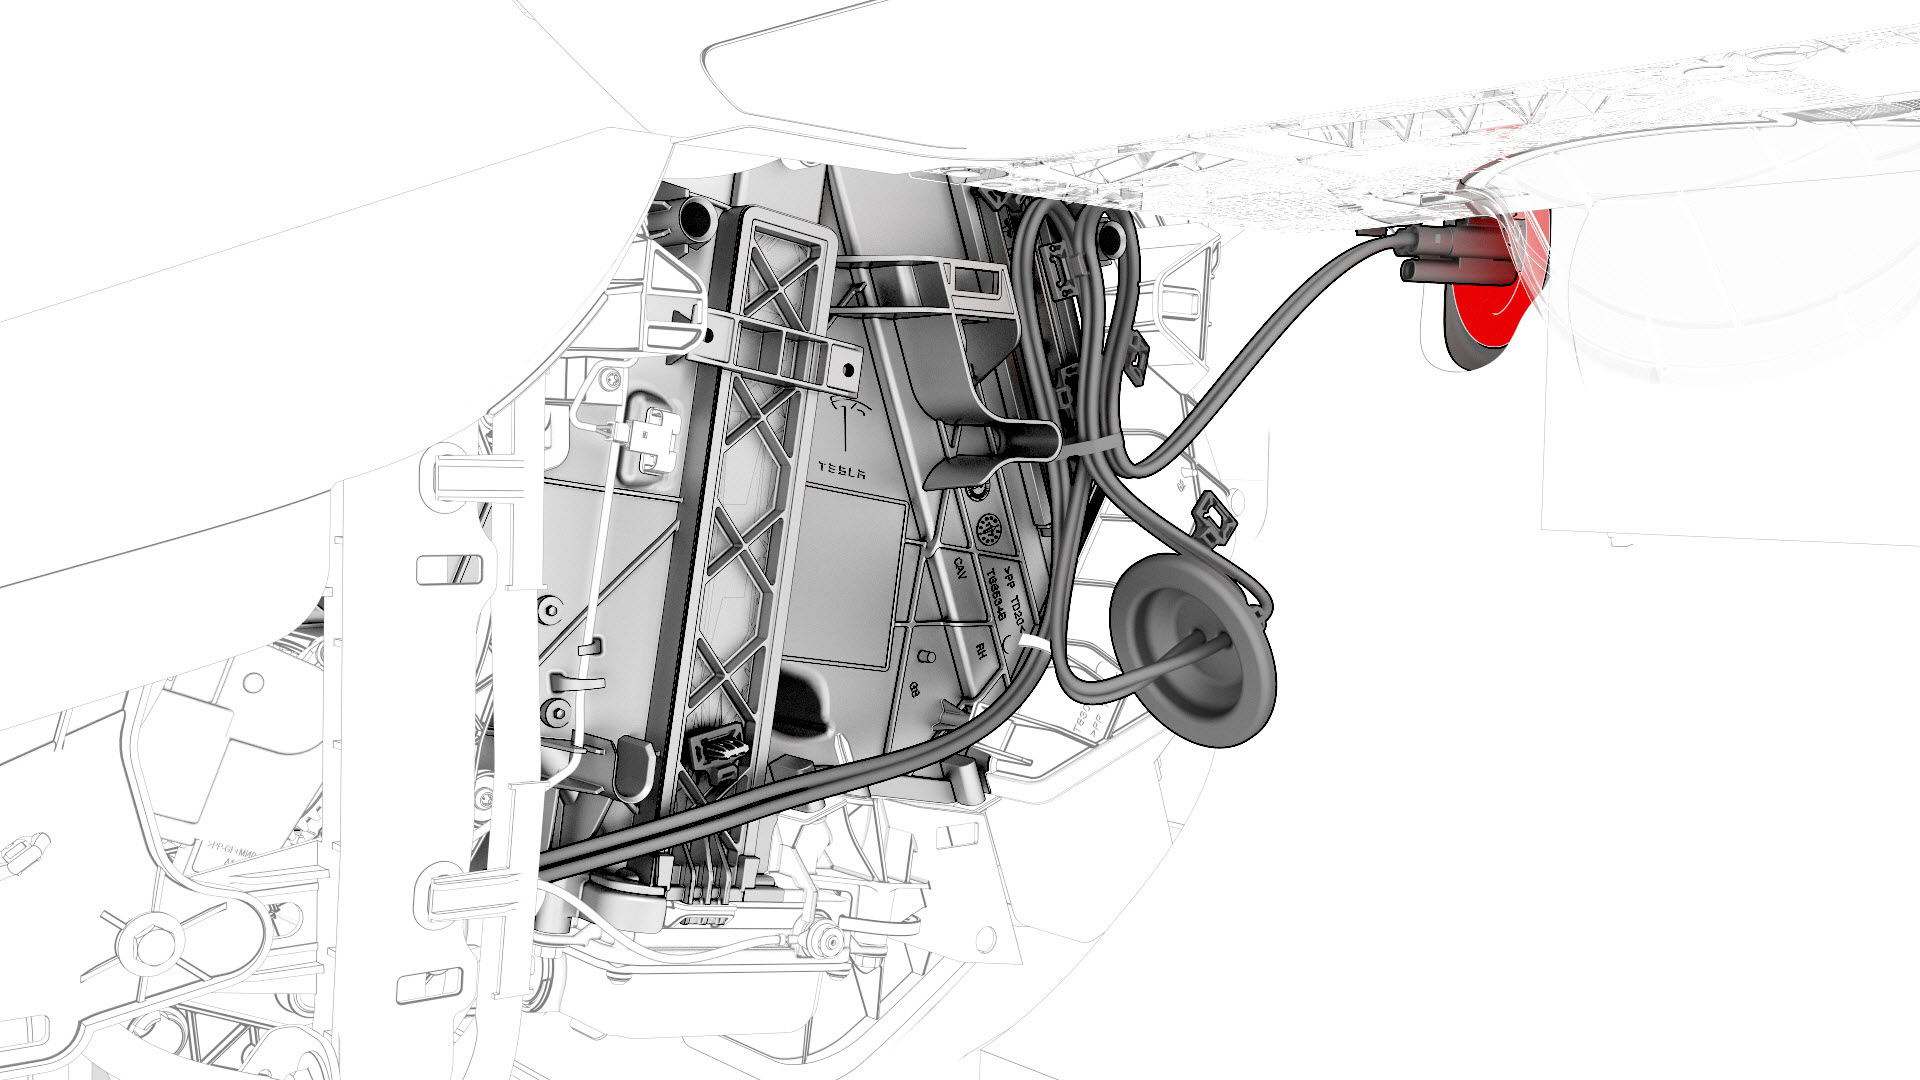
-
Remove the bolts that attach the RH side of the PTC heater to the HVAC assembly, and then lower the PTC heater from the HVAC assembly.
-
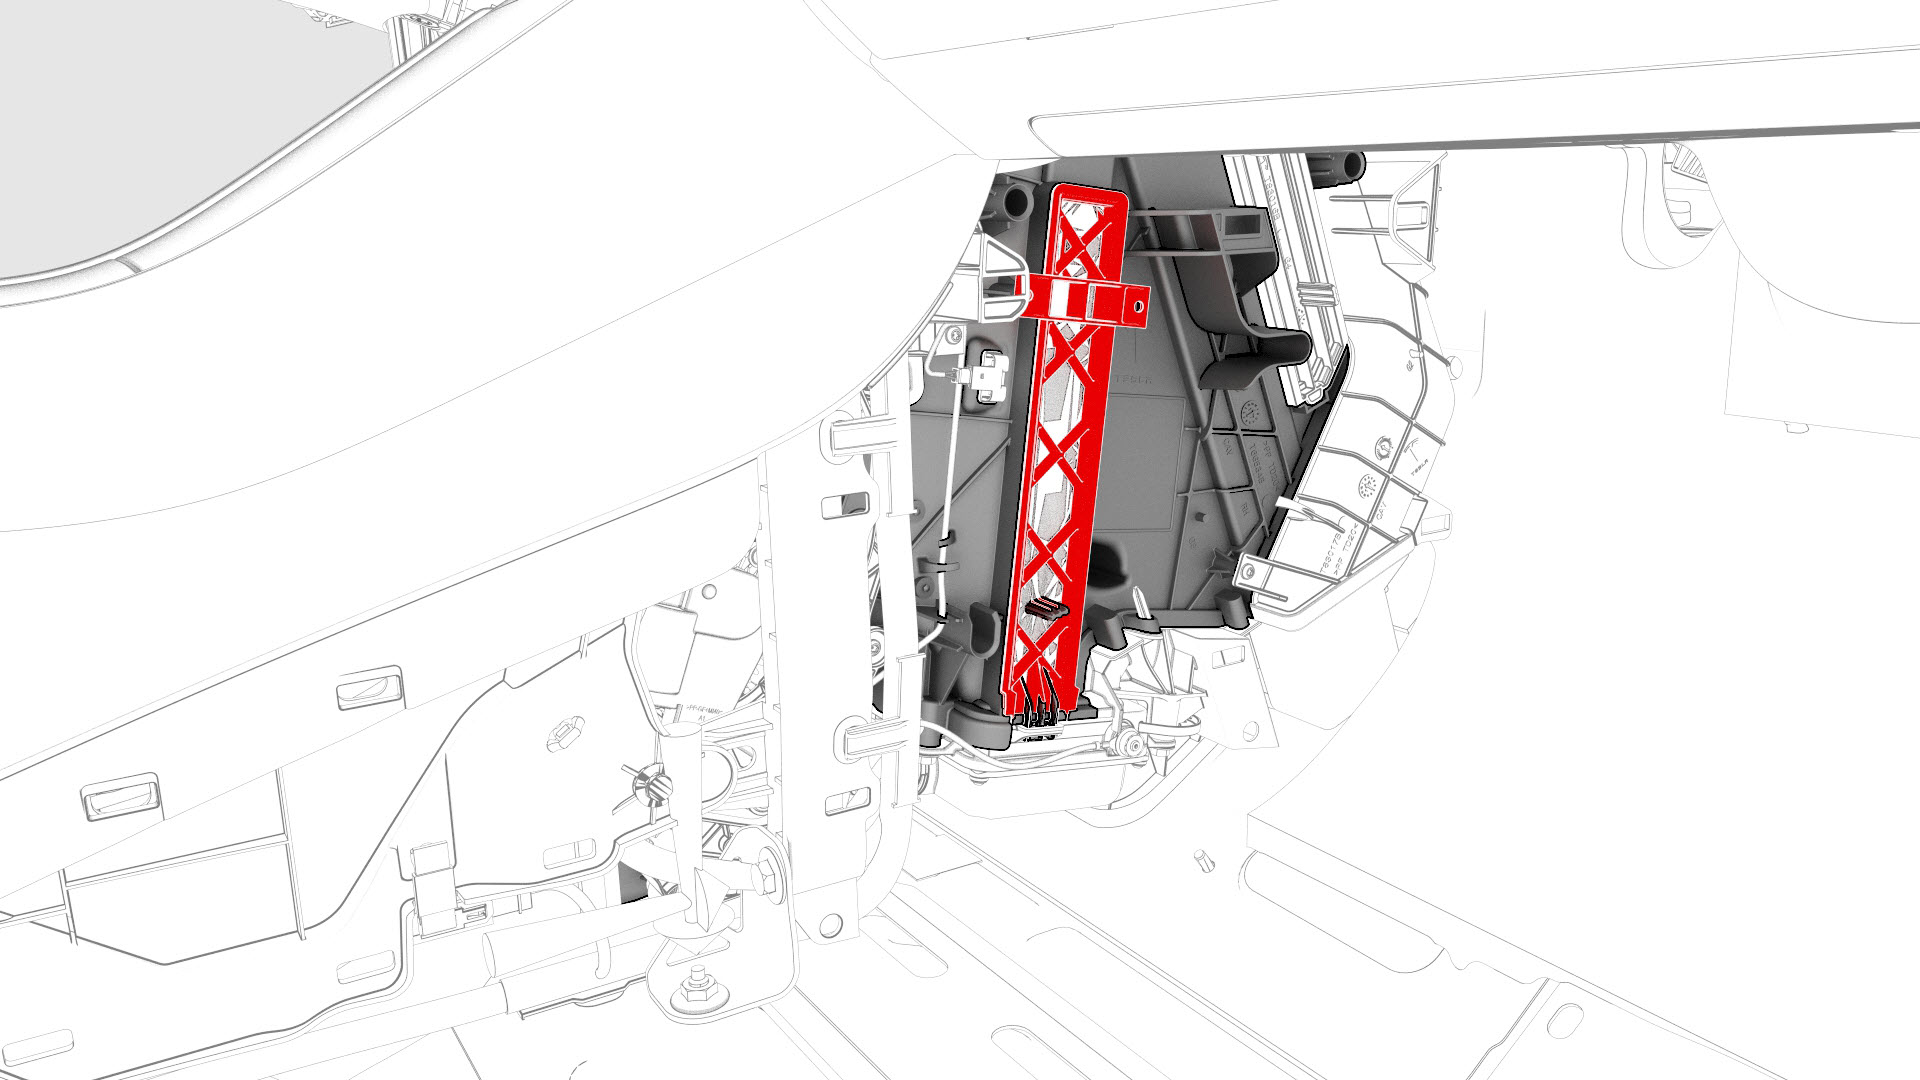
Use a razor blade to carefully cut the inner edge of the airbox side cover, and then remove and discard the airbox side cover.
Caution:Use caution when cutting the airbox. Avoid contact with the PTC heater.
-
Remove the sealing plate from the PTC heater.
Note: Replace the sealing plate, if damaged.
| 1 | Raise and support the vehicle on a 2 post lift. See Raise Vehicle - 2 Post Lift. | ||
| 2 | Remove the rear underhood apron. See Underhood Apron - Rear (Remove and Replace). | ||
| 3 | Remove the 2nd row lower seat cushion. See Seat Cushion - Lower - 2nd Row (Remove and Replace). | ||
| 4 | Remove the LH center console side panel carpet. See Carpet - Side Panel - Center Console - LH (Remove and Replace). | ||
| 5 | Remove the RH instrument panel end cap. See End Cap - Instrument Panel - LH (Remove and Replace). | ||
| 6 | Remove the RH middle A-pillar trim. See Trim - A-Pillar - Middle - LH (Remove and Replace). | ||
| 7 | Remove the RH lower A-pillar trim. See Trim - A-Pillar - Lower - LH (Remove and Replace). | ||
| 8 | Remove the RH center console side panel carpet. See Carpet - Side Panel - Center Console - LH (Remove and Replace). | ||
| 9 | Remove the RH footwell cover. See Cover - Footwell - Passenger (LHD) (Remove and Replace). | ||
| 10 | Disconnect 12V power. See 12V Power (Disconnect and Connect). | ||
| 11 | Perform the vehicle electrical isolation procedure. See Vehicle Electrical Isolation Procedure. | ||
| 12 | Remove the HV cap that covers the HV harness located on the LH side of the penthouse. | |
| 13 | Remove the LH 2nd row seat side bolster. See Bolster - Side - Seat - 2nd Row - LH (Remove and Replace). | ||
| 14 | Remove the LH rear sill panel trim. See Trim - Sill Panel - Rear - LH (Remove and Replace). | ||
| 15 | Remove the bolts that attach the wiring harness bracket at the penthouse. | |
| 16 | Release the clips that attach the wiring harness bracket, and then remove the bracket from the vehicle. | ||
| 17 | Release the clip that attaches the wiring harness to the LH lower C-pillar. | |
| 18 | Raise the handle to disconnect the electrical harness from the DC Input assembly. | |
| 19 | Remove the front area shield panel. See Panel - Aero Shield - Front (Remove and Replace). | ||
| 20 | Disconnect the HV harness connector from the PTC heater. Note: Release the bracket from the body for better access to the connector.
| |
| 21 | Release the clips that attach the PTC heater electrical connector to the body. | |
| 22 | Lower the vehicle. | ||
| 23 | Remove the front passenger knee airbag. See Airbag - Knee - Front Passenger (Remove and Replace). | ||
| 24 | Remove the RH footwell duct. See Duct - Footwell - RH (Remove and Replace). | ||
| 25 | Release the clips that attach the front RH carpet to the vehicle, and then fold the front RH carpet rearwards. | |
| 26 | Disconnect the 12V electrical connector from the PTC heater. | |
| 27 | Release the clip that attaches the PTC heater electrical harness to the HVAC assembly. | |
| 28 | Remove the bolts that attach the LH side of the PTC heater to the HVAC assembly. | |
| 29 | Remove the clips that attach the PTC heater electrical harness to the HVAC assembly. | |
| 30 | Remove the nut that attaches the instrument panel harness ground strap to the PTC heater. | |
| 31 | Remove the grommet, and then carefully pull the HV cable through the bulkhead. Caution: Do not damage the HV cable while feeding through the bulkhead.
| |
| 32 | Remove the bolts that attach the RH side of the PTC heater to the HVAC assembly, and then lower the PTC heater from the HVAC assembly. | |
| 33 | Use a razor blade to carefully cut the inner edge of the airbox side cover, and then remove and discard the airbox side cover. Caution: Use caution when cutting the airbox. Avoid contact with the PTC heater.
| |
| 34 | Slide the PTC heater out of the HVAC assembly, and then remove the PTC heater from the vehicle. | ||
| 35 | Remove the sealing plate from the PTC heater. Note: Replace the sealing plate, if damaged.
|
Install
-
Install the bolts that attach the RH side of the PTC heater to the HVAC assembly.
 Torque 2.9 Nm
 -
Position the new airbox side cover for installation, and then install the bolts that attach the airbox side cover to the HVAC assembly.Torque 1.2 Nm
-
Push the HV cable through the bulkhead, and then install the grommet.
Caution:Do not damage the HV cable while feeding through the bulkhead.Note: Apply lubricant to the HV cable, if necessary.
-
Install the nut that attaches the instrument panel harness ground strap to the PTC heater.
 Torque 5 Nm
 -
Install the clips that attach the PTC heater electrical harness to the HVAC assembly.
-
Instal the bolts that attach the LH side of the PTC heater to the HVAC assembly.Torque 2.9 Nm
-
Install the clip that attaches the PTC heater electrical harness to the HVAC assembly.
-
Connect the 12V electrical connector to the PTC heater.
-
Unfold the front RH carpet forward, and then install the clips that attach the front RH carpet to the vehicle.
-
Install the clips that attach the PTC heater electrical connector to the body.
-
Connect the HV harness connector to the PTC heater.
Note: Install the bracket to the body.
-
Connect the charge port electrical harness to the DC Input assembly.
Note: Use 1 hand to support the electrical connector while the other hand latches the locking tab.Note: Make sure that the latch is not damaged and is fully secured in the latched position.
-
Install the clip that attaches the electrical harness to the LH lower C-pillar.
-
Install the bolts that attach the wiring harness bracket at the penthouse.
 Torque 10 Nm
 -
Install the HV cap onto the penthouse.
| 1 | Install the sealing plate onto the new PTC heater. Note: Failure to transfer the sealing plate has the potential of introducing air or water leakage.
| ||
| 2 | Slide the PTC heater into the HVAC assembly, and then push the PTC heater up to install it. | ||
| 3 | Install the bolts that attach the RH side of the PTC heater to the HVAC assembly. Torque 2.9 Nm | |
| 4 | Position the new airbox side cover for installation, and then install the bolts that attach the airbox side cover to the HVAC assembly. Torque 1.2 Nm | |
| 5 | Push the HV cable through the bulkhead, and then install the grommet. Caution: Do not damage the HV cable while feeding through the bulkhead.
Note: Apply lubricant to the HV cable, if necessary.
| |
| 6 | Install the nut that attaches the instrument panel harness ground strap to the PTC heater. Torque 5 Nm | |
| 7 | Install the clips that attach the PTC heater electrical harness to the HVAC assembly. | |
| 8 | Instal the bolts that attach the LH side of the PTC heater to the HVAC assembly. Torque 2.9 Nm | |
| 9 | Install the clip that attaches the PTC heater electrical harness to the HVAC assembly. | |
| 10 | Connect the 12V electrical connector to the PTC heater. | |
| 11 | Unfold the front RH carpet forward, and then install the clips that attach the front RH carpet to the vehicle. | |
| 12 | Install the RH footwell duct. See Duct - Footwell - RH (Remove and Replace). | ||
| 13 | Install the front passenger knee airbag. See Airbag - Knee - Front Passenger (Remove and Replace). | ||
| 14 | Raise the vehicle fully. | ||
| 15 | Install the clips that attach the PTC heater electrical connector to the body. | |
| 16 | Connect the HV harness connector to the PTC heater. Note: Install the bracket to the body.
| |
| 17 | Install the front area shield panel. See Panel - Aero Shield - Front (Remove and Replace). | ||
| 18 | Lower the vehicle fully. | ||
| 19 | Perform the penthouse air leak test. See Penthouse Air Leak Test. | ||
| 20 | Connect the charge port electrical harness to the DC Input assembly. Note: Use 1 hand to support the electrical connector while the other hand latches the locking tab.
Note: Make sure that the latch is not damaged and is fully secured in the latched position.
| |
| 21 | Install the clip that attaches the electrical harness to the LH lower C-pillar. | |
| 22 | Install the bolts that attach the wiring harness bracket at the penthouse. Torque 10 Nm | |
| 23 | Install the LH rear sill panel trim. See Trim - Sill Panel - Rear - LH (Remove and Replace). | ||
| 24 | Install the LH 2nd row seat side bolster. See Bolster - Side - Seat - 2nd Row - LH (Remove and Replace). | ||
| 25 | Install the HV cap onto the penthouse. | |
| 26 | Reconnect 12V power. See 12V Power (Disconnect and Connect). | ||
| 27 | Install the RH footwell cover. See Cover - Footwell - Passenger (LHD) (Remove and Replace). | ||
| 28 | Install the RH center console side panel carpet. See Carpet - Side Panel - Center Console - LH (Remove and Replace). | ||
| 29 | Install the RH lower A-pillar trim. See Trim - A-Pillar - Lower - LH (Remove and Replace). | ||
| 30 | Install the RH middle A-pillar trim. See Trim - A-Pillar - Middle - LH (Remove and Replace). | ||
| 31 | Install the RH instrument panel end cap. See End Cap - Instrument Panel - LH (Remove and Replace). | ||
| 32 | Install the LH center console side panel carpet. See Carpet - Side Panel - Center Console - LH (Remove and Replace). | ||
| 33 | Install the 2nd row lower seat cushion. See Seat Cushion - Lower - 2nd Row (Remove and Replace). | ||
| 34 | Install the rear underhood apron. See Underhood Apron - Rear (Remove and Replace). |