Harness - Body - RH (Remove and Replace)
Correction code 1710090217100902
Remove
-
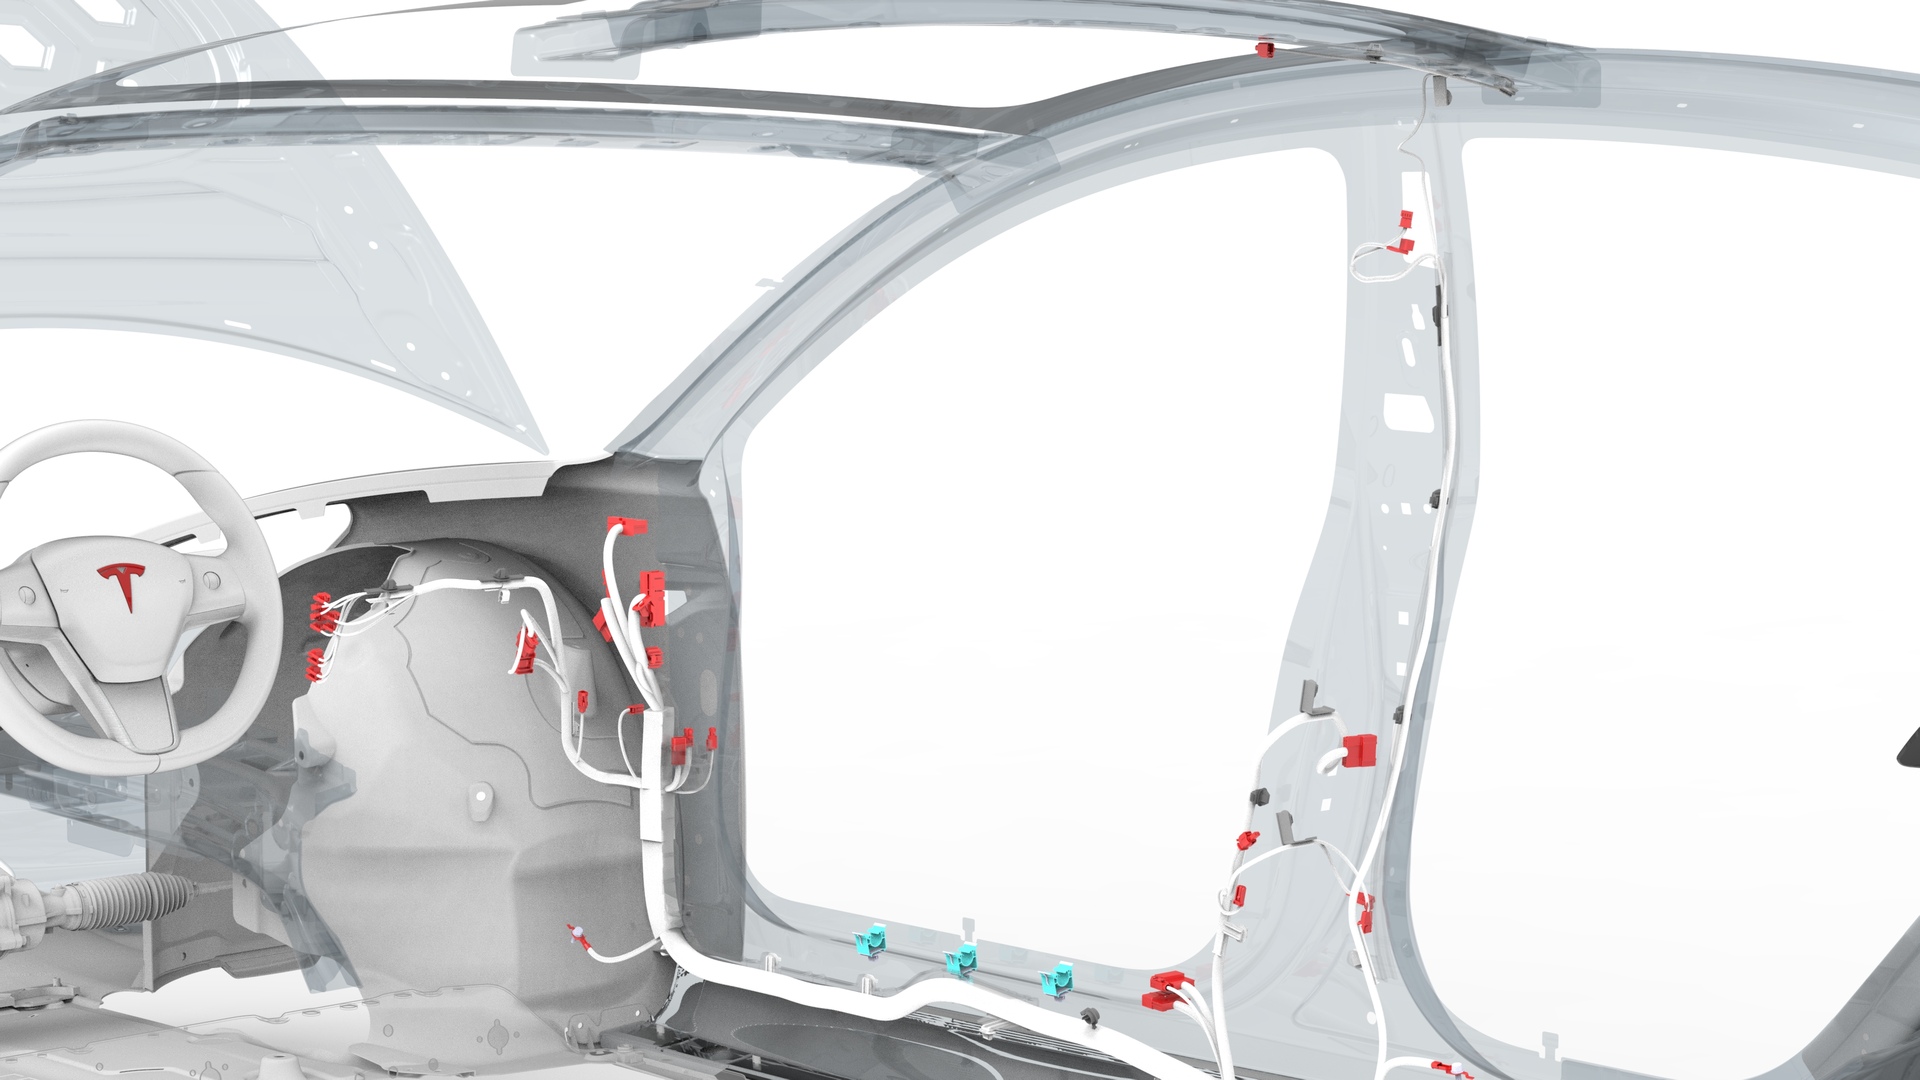
Disconnect the RH body harness from the package tray electrical harness connector and the tuner connectors.
-
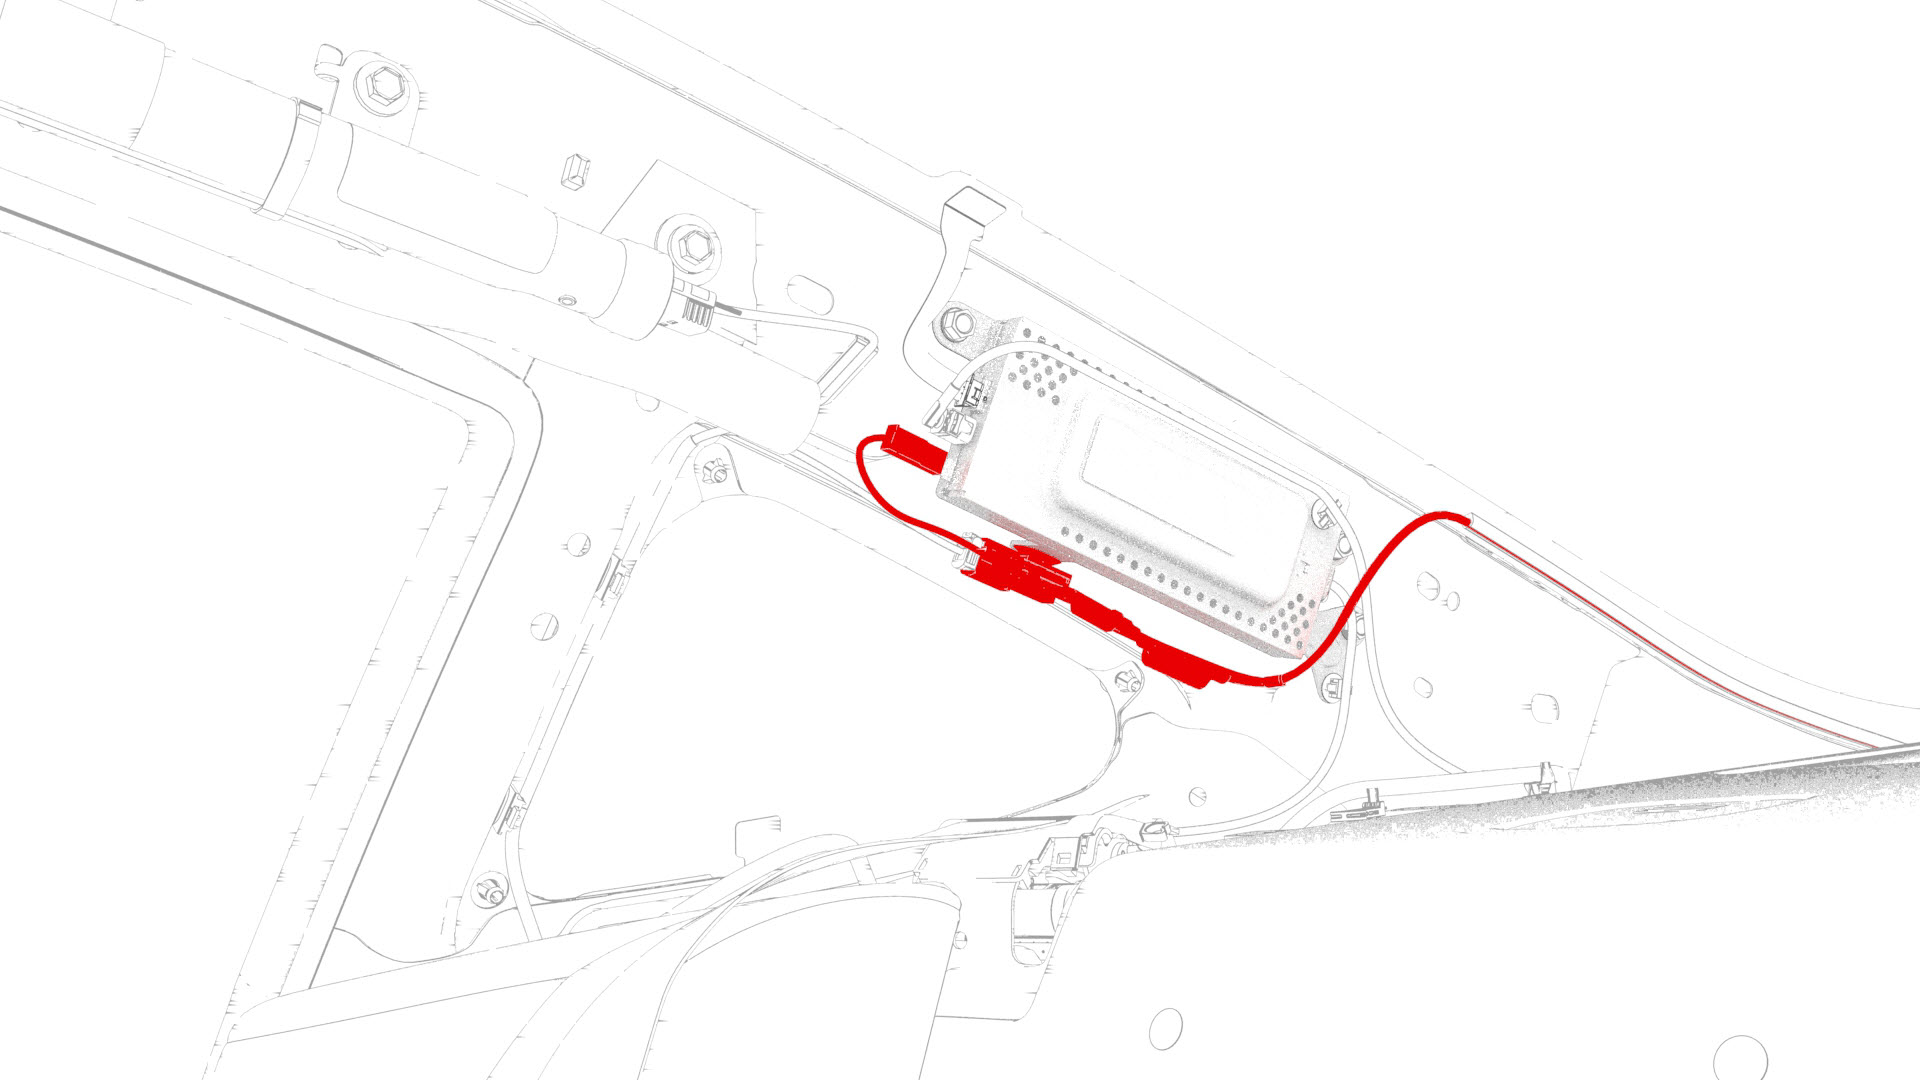
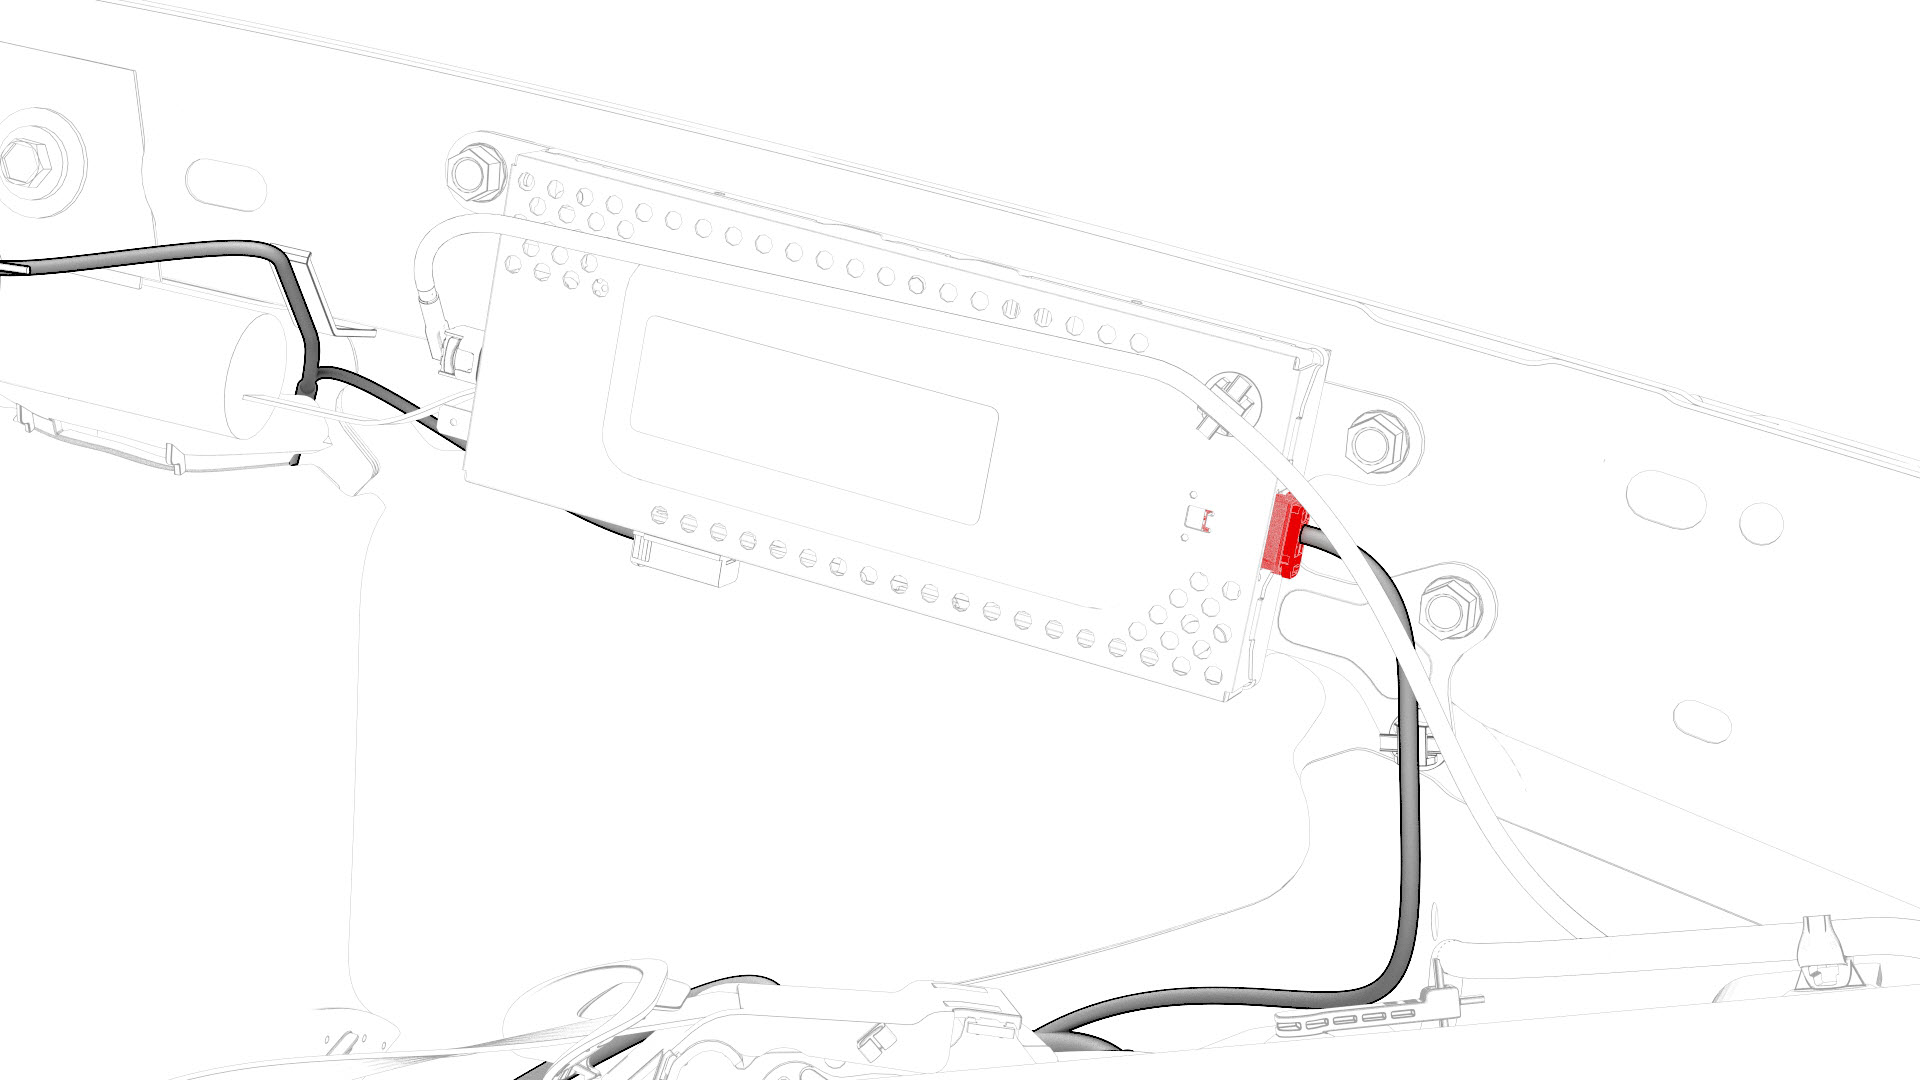
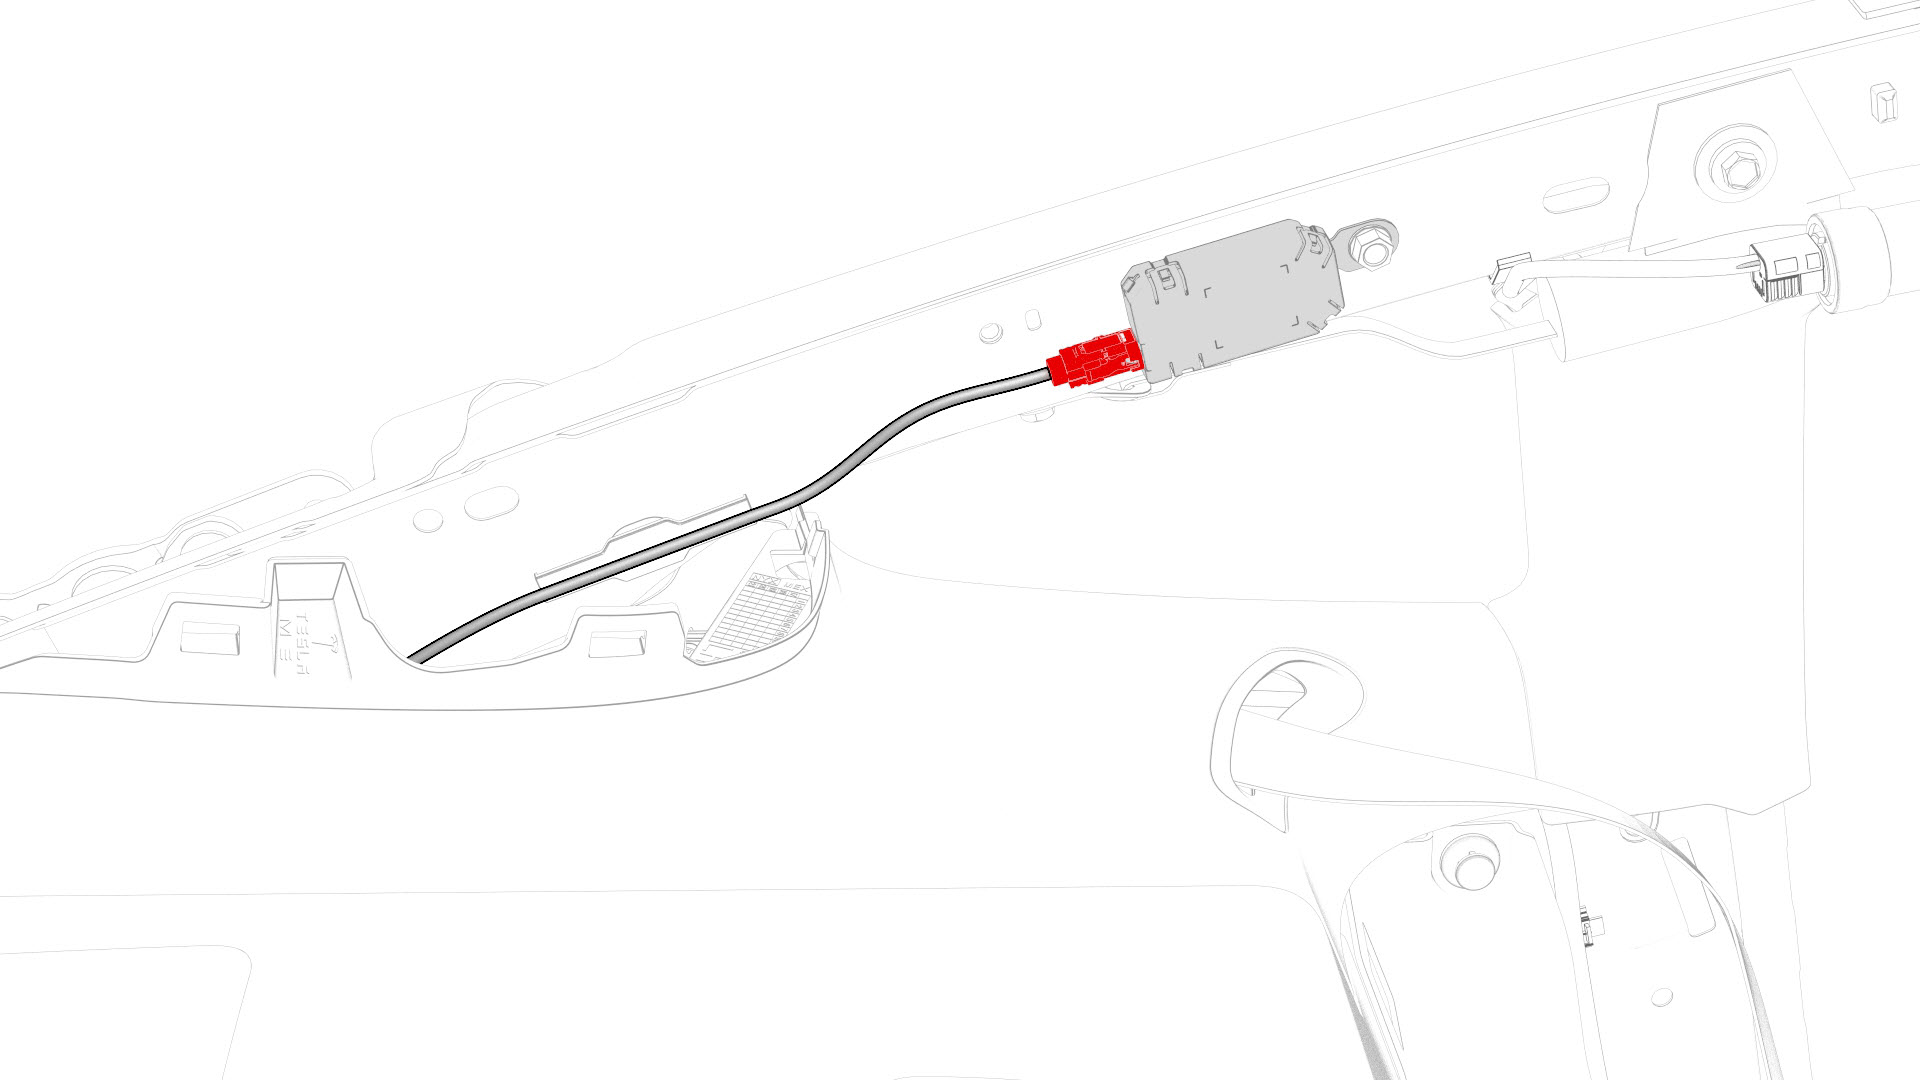
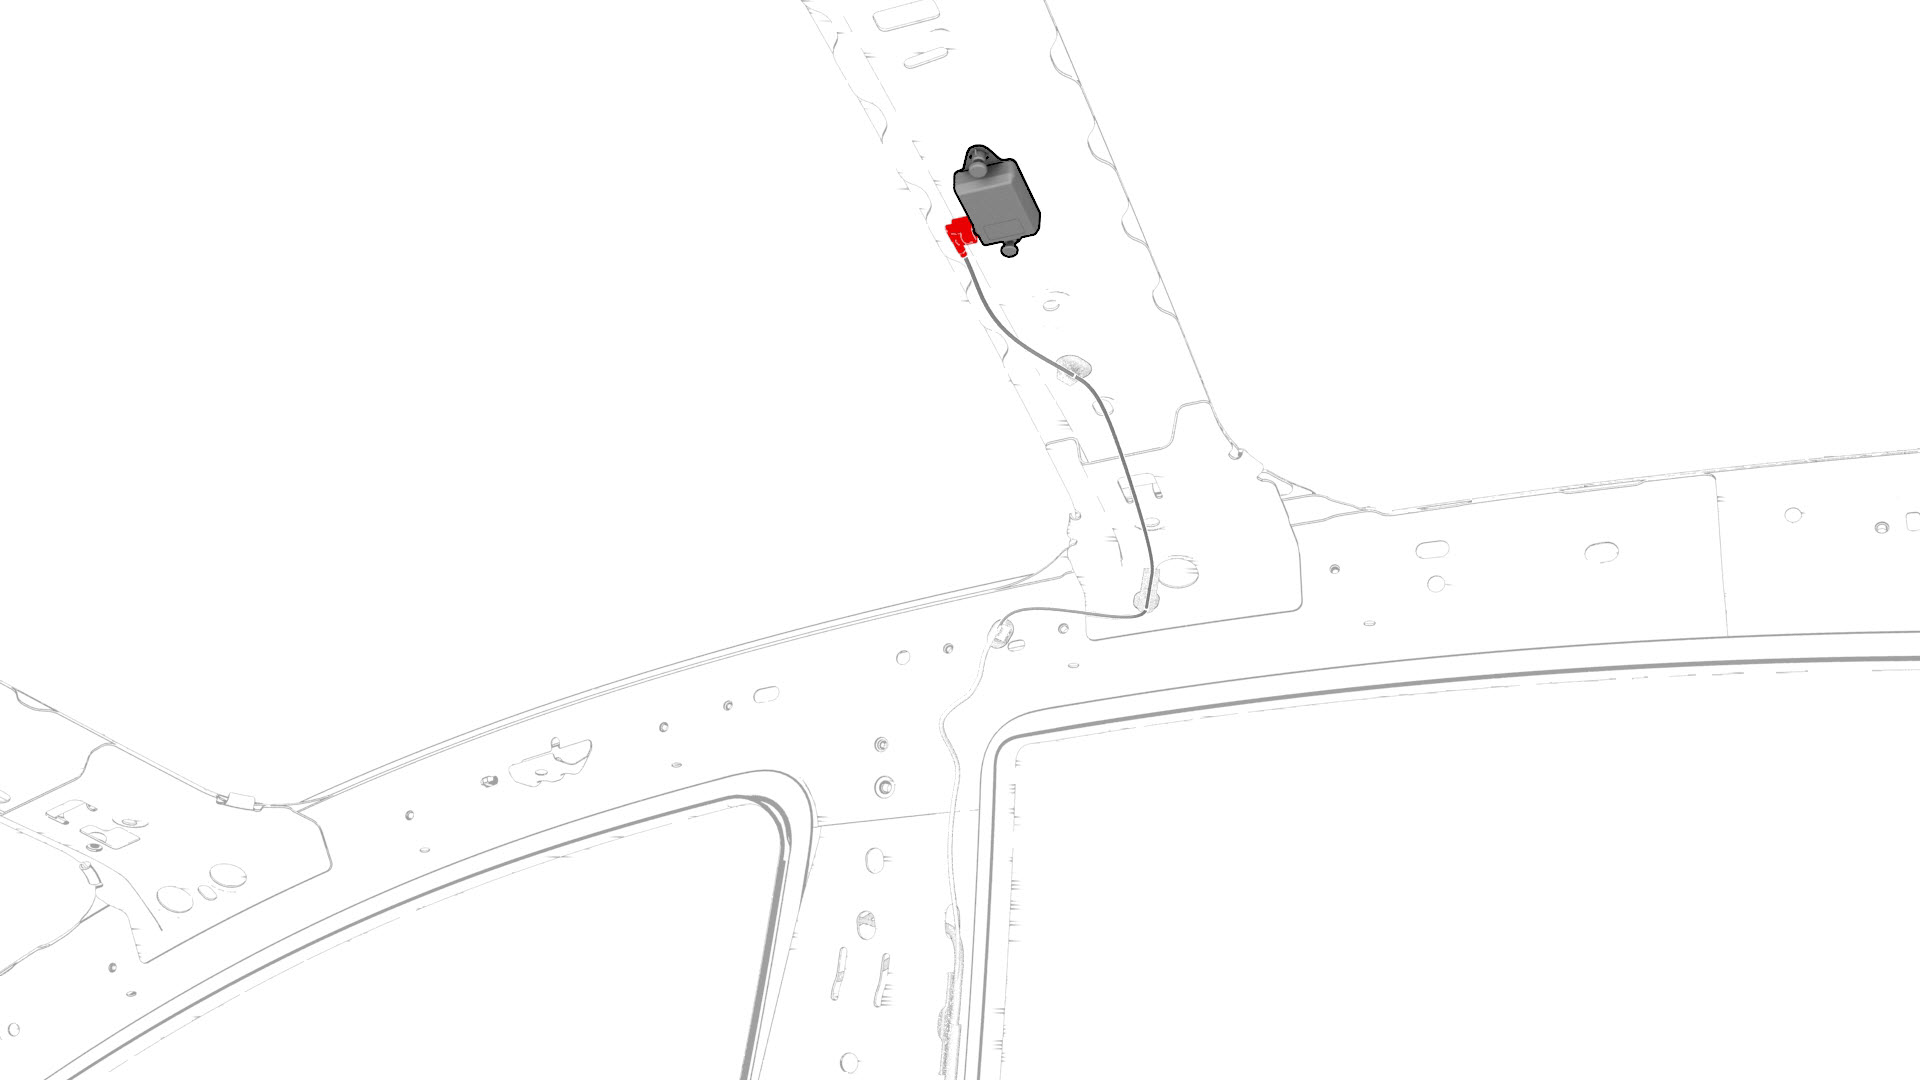
Disconnect the electrical harness from the LH antenna amplifier.
-
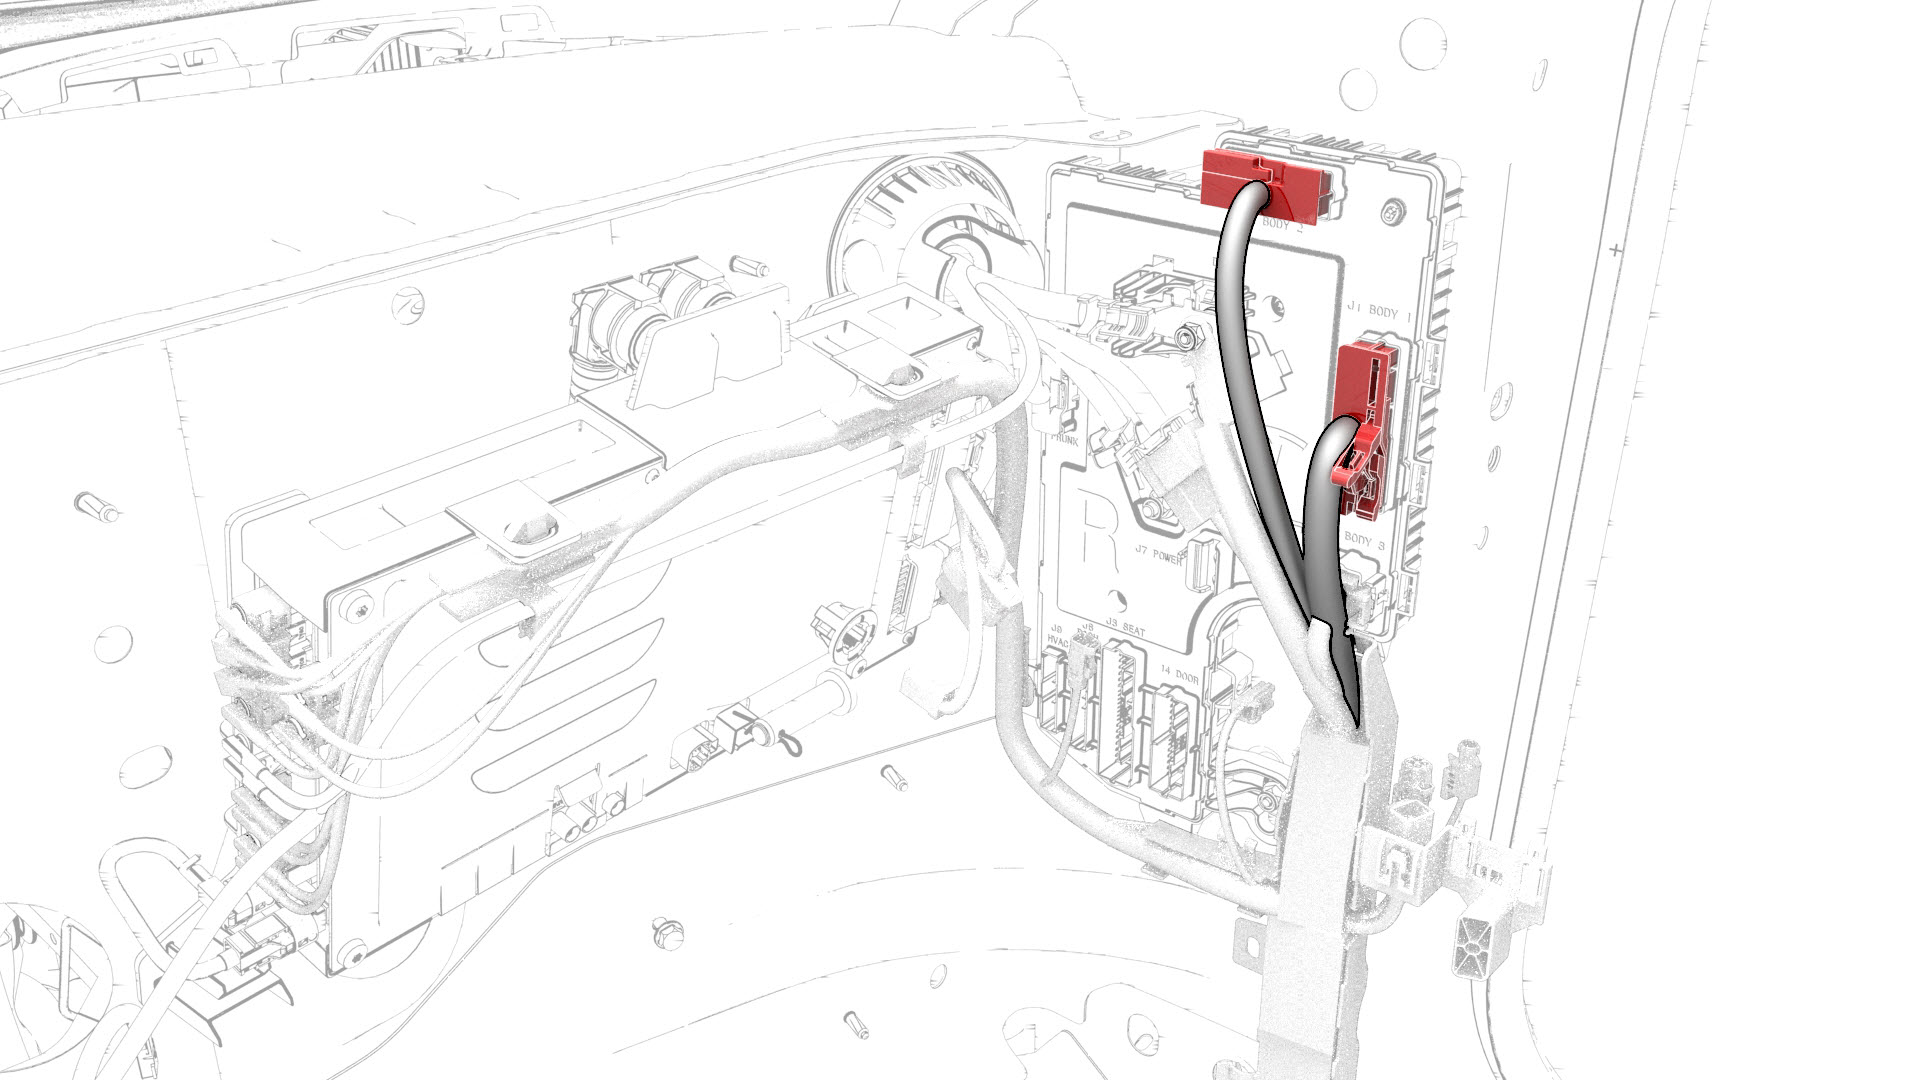
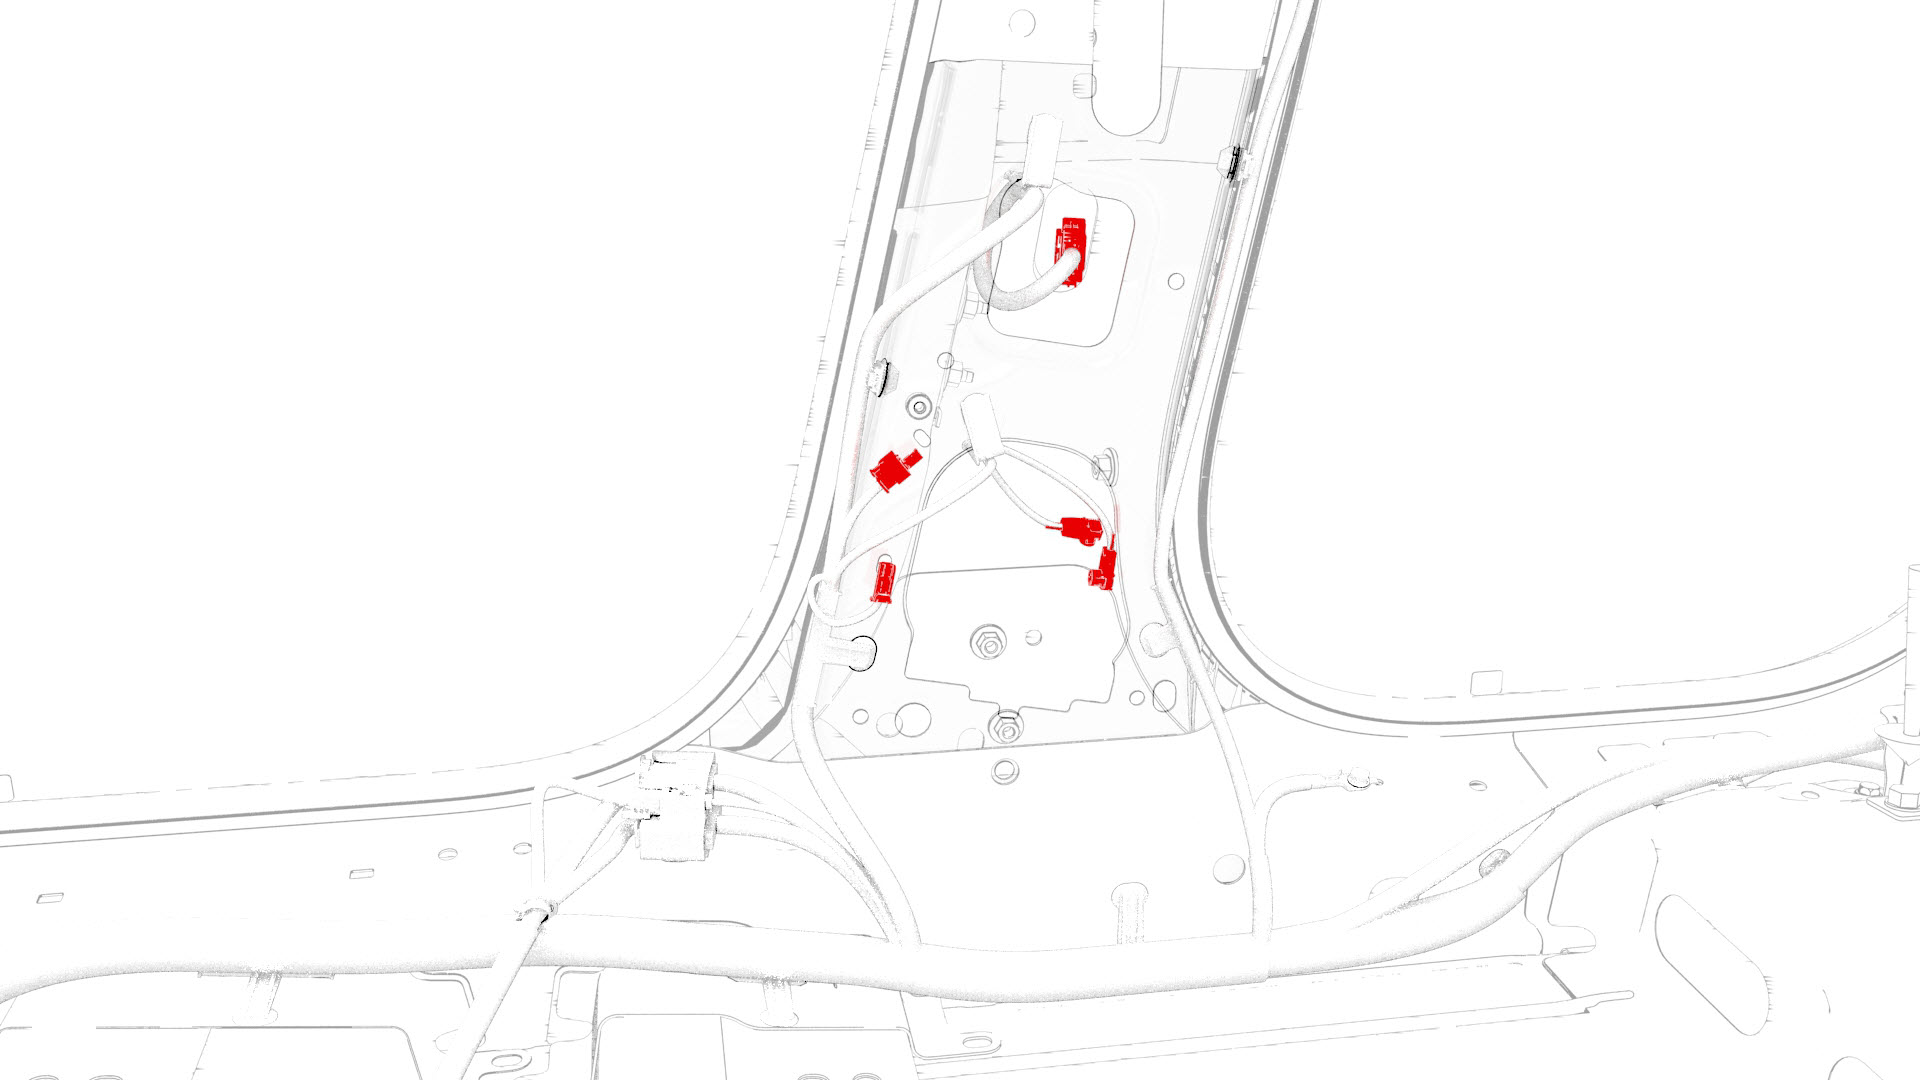
Disconnect the electrical harness from the RH body controller module connectors.
-
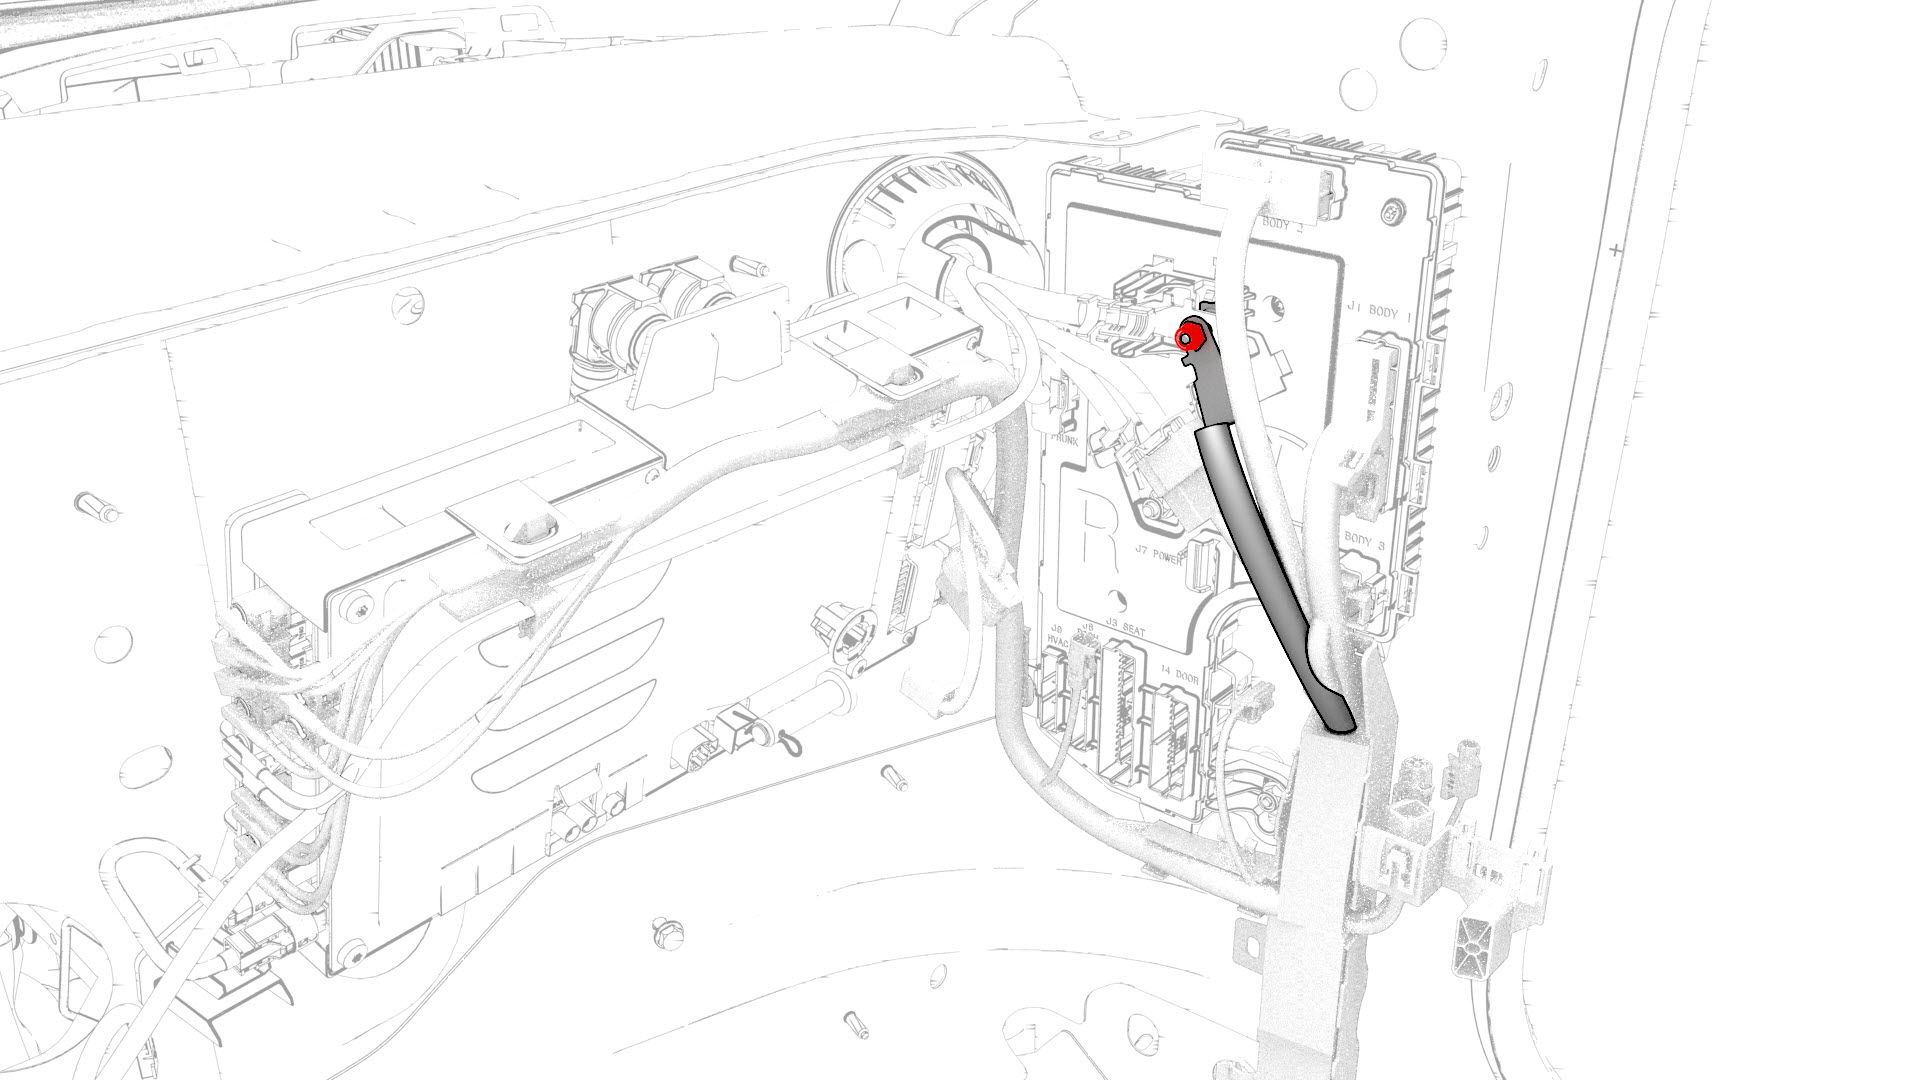
Remove the nut that attaches the electrical harness ground strap to the RH body controller module, and then remove the ground strap from the module.
-
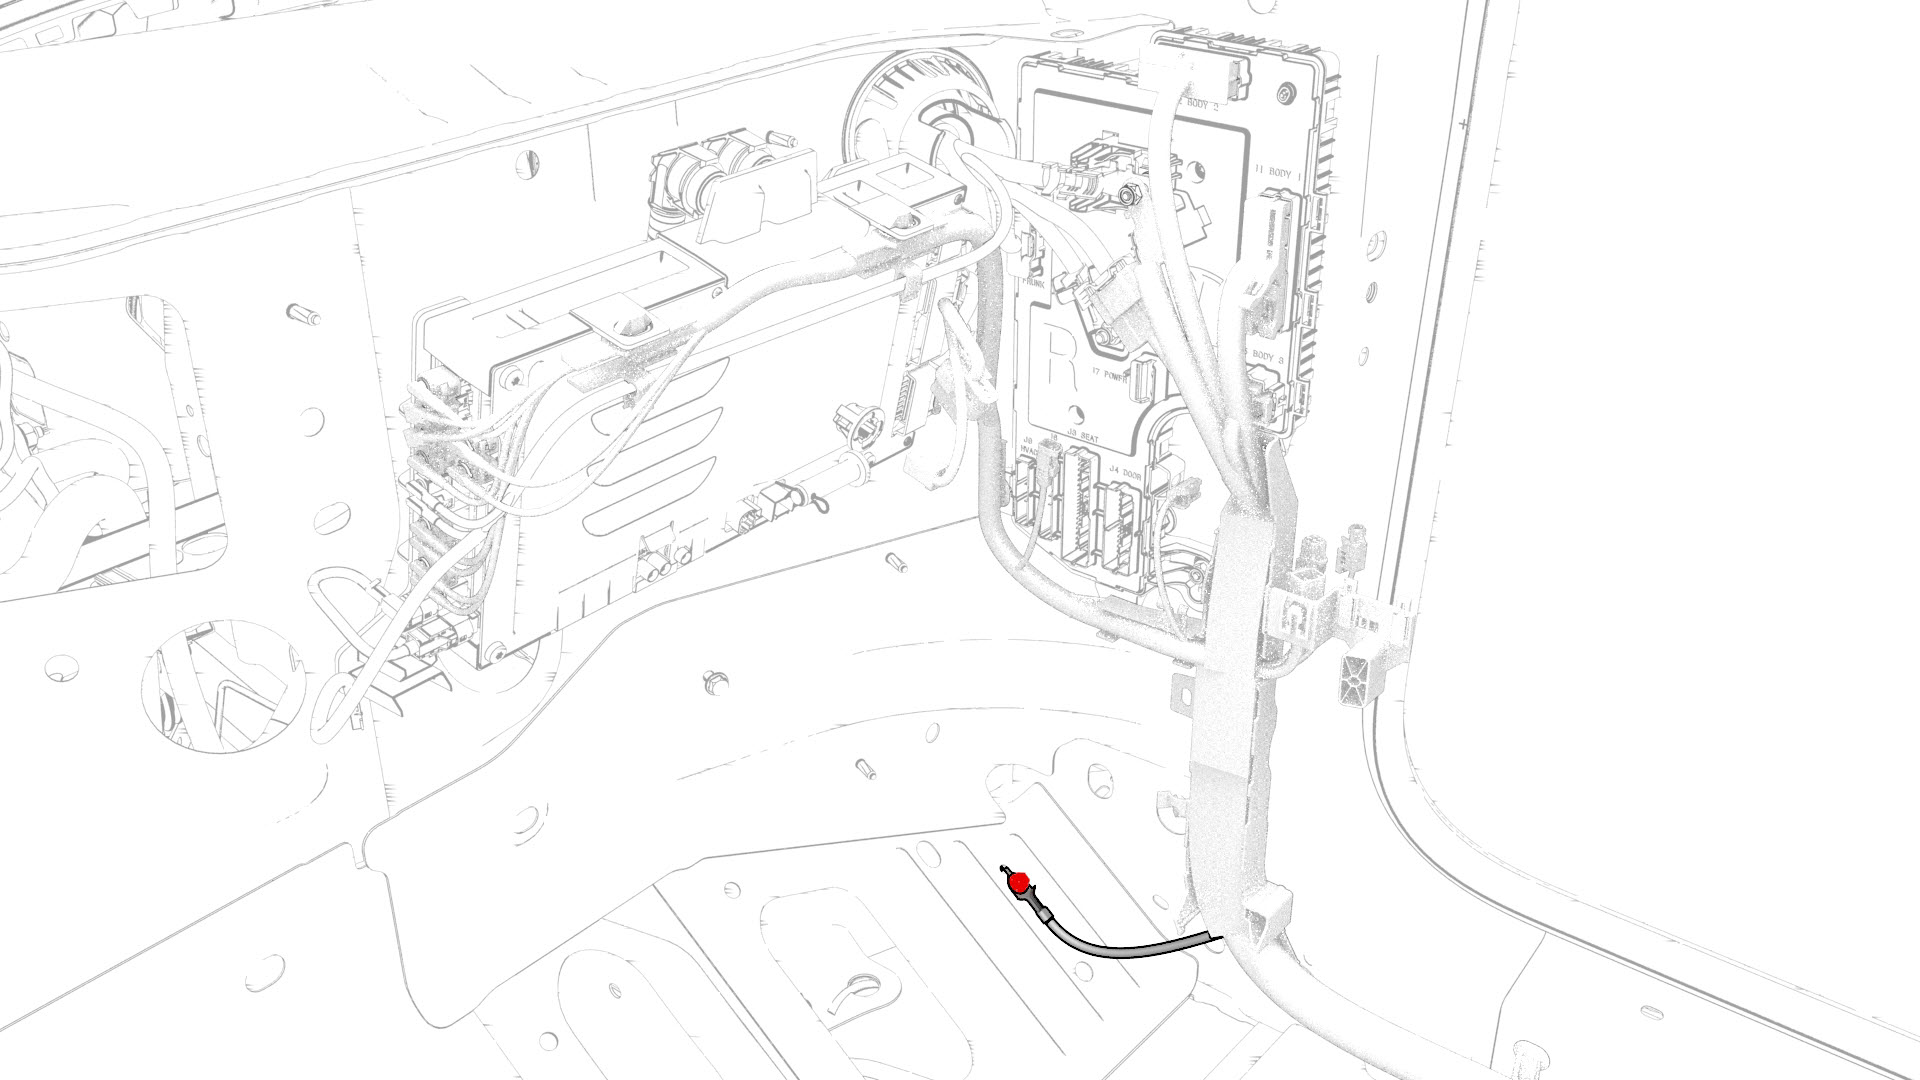
Remove and discard the bolt that attaches the electrical harness ground strap to the body in the passenger footwell area.
-
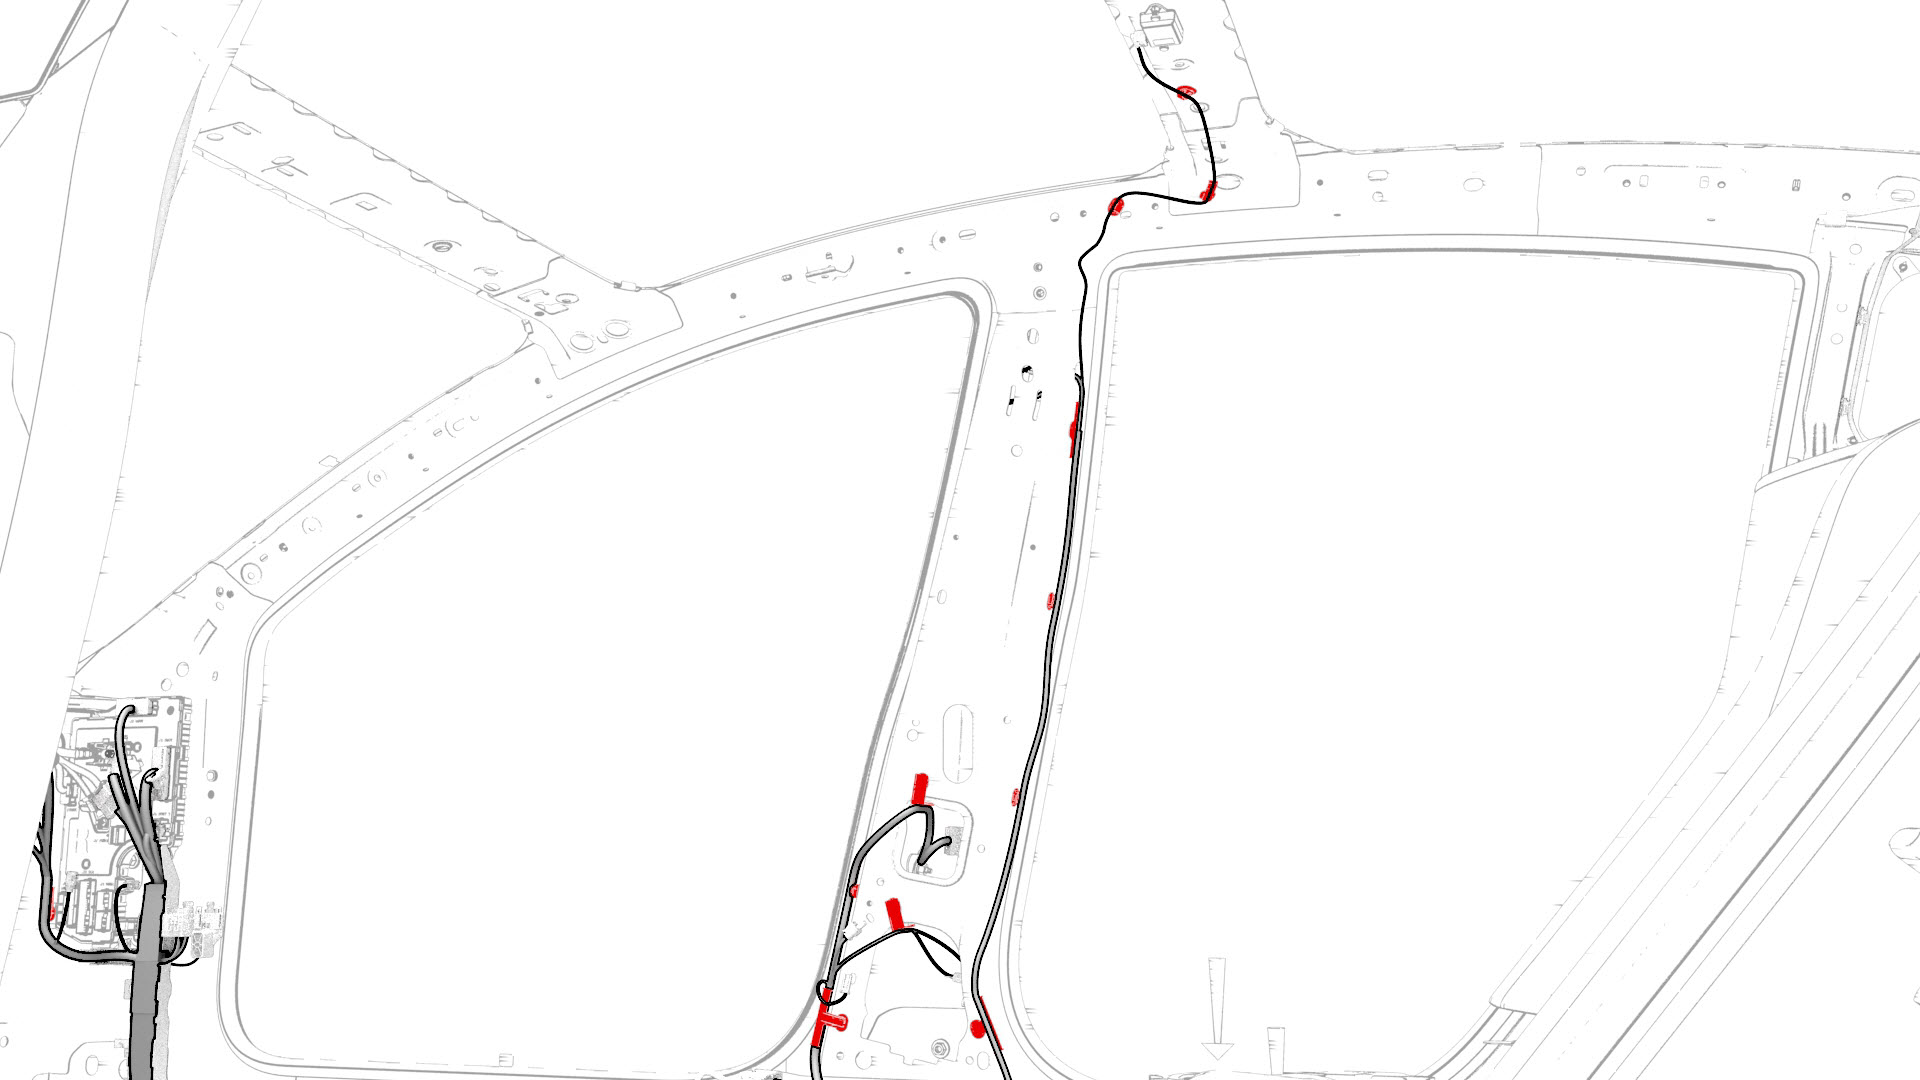
Release the clips that attach the electrical harness to the body in the A-pillar and B-pillar areas.
-
Disconnect the electrical harness from the B-pillar antenna connector.
-
Disconnect the electrical harness from the connectors in the lower B-pillar area.
-
Remove and discard the bolt that attaches the electrical harness ground strap to the body in the lower B-pillar area.
-
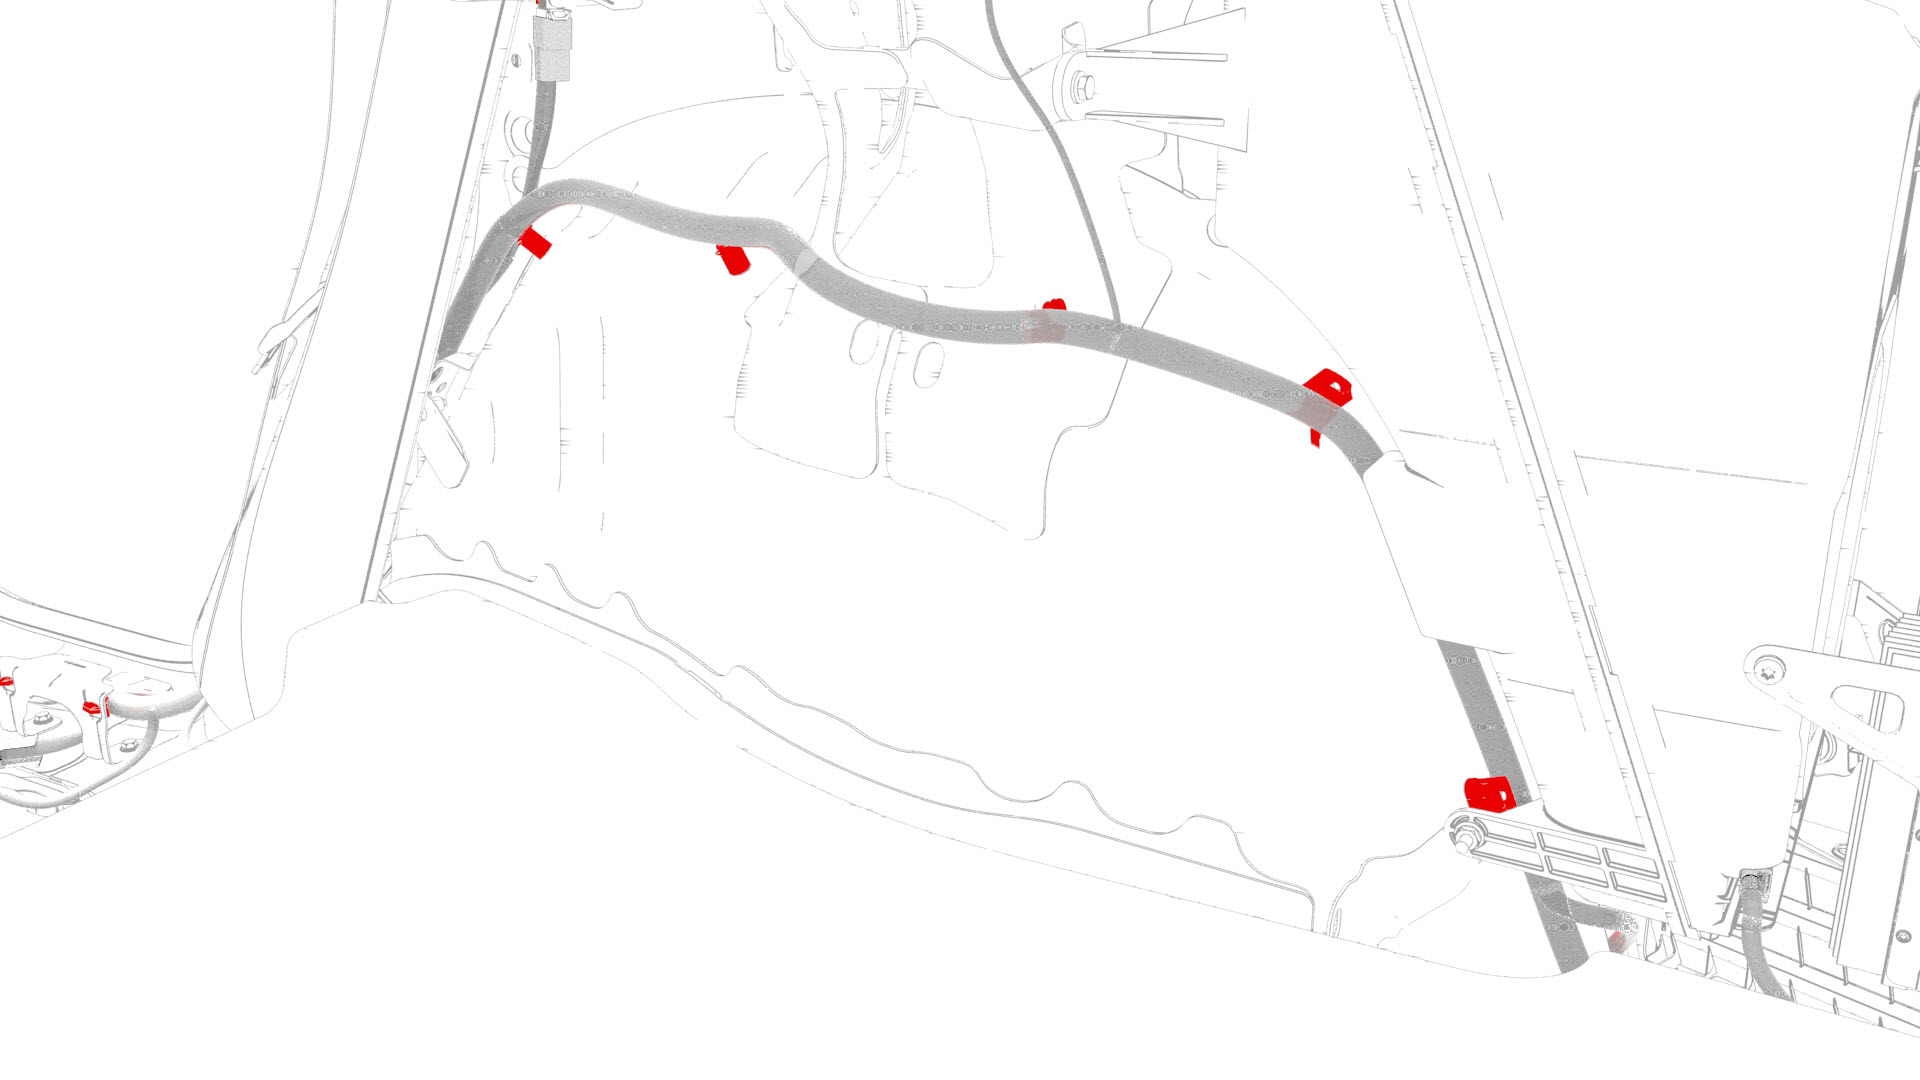
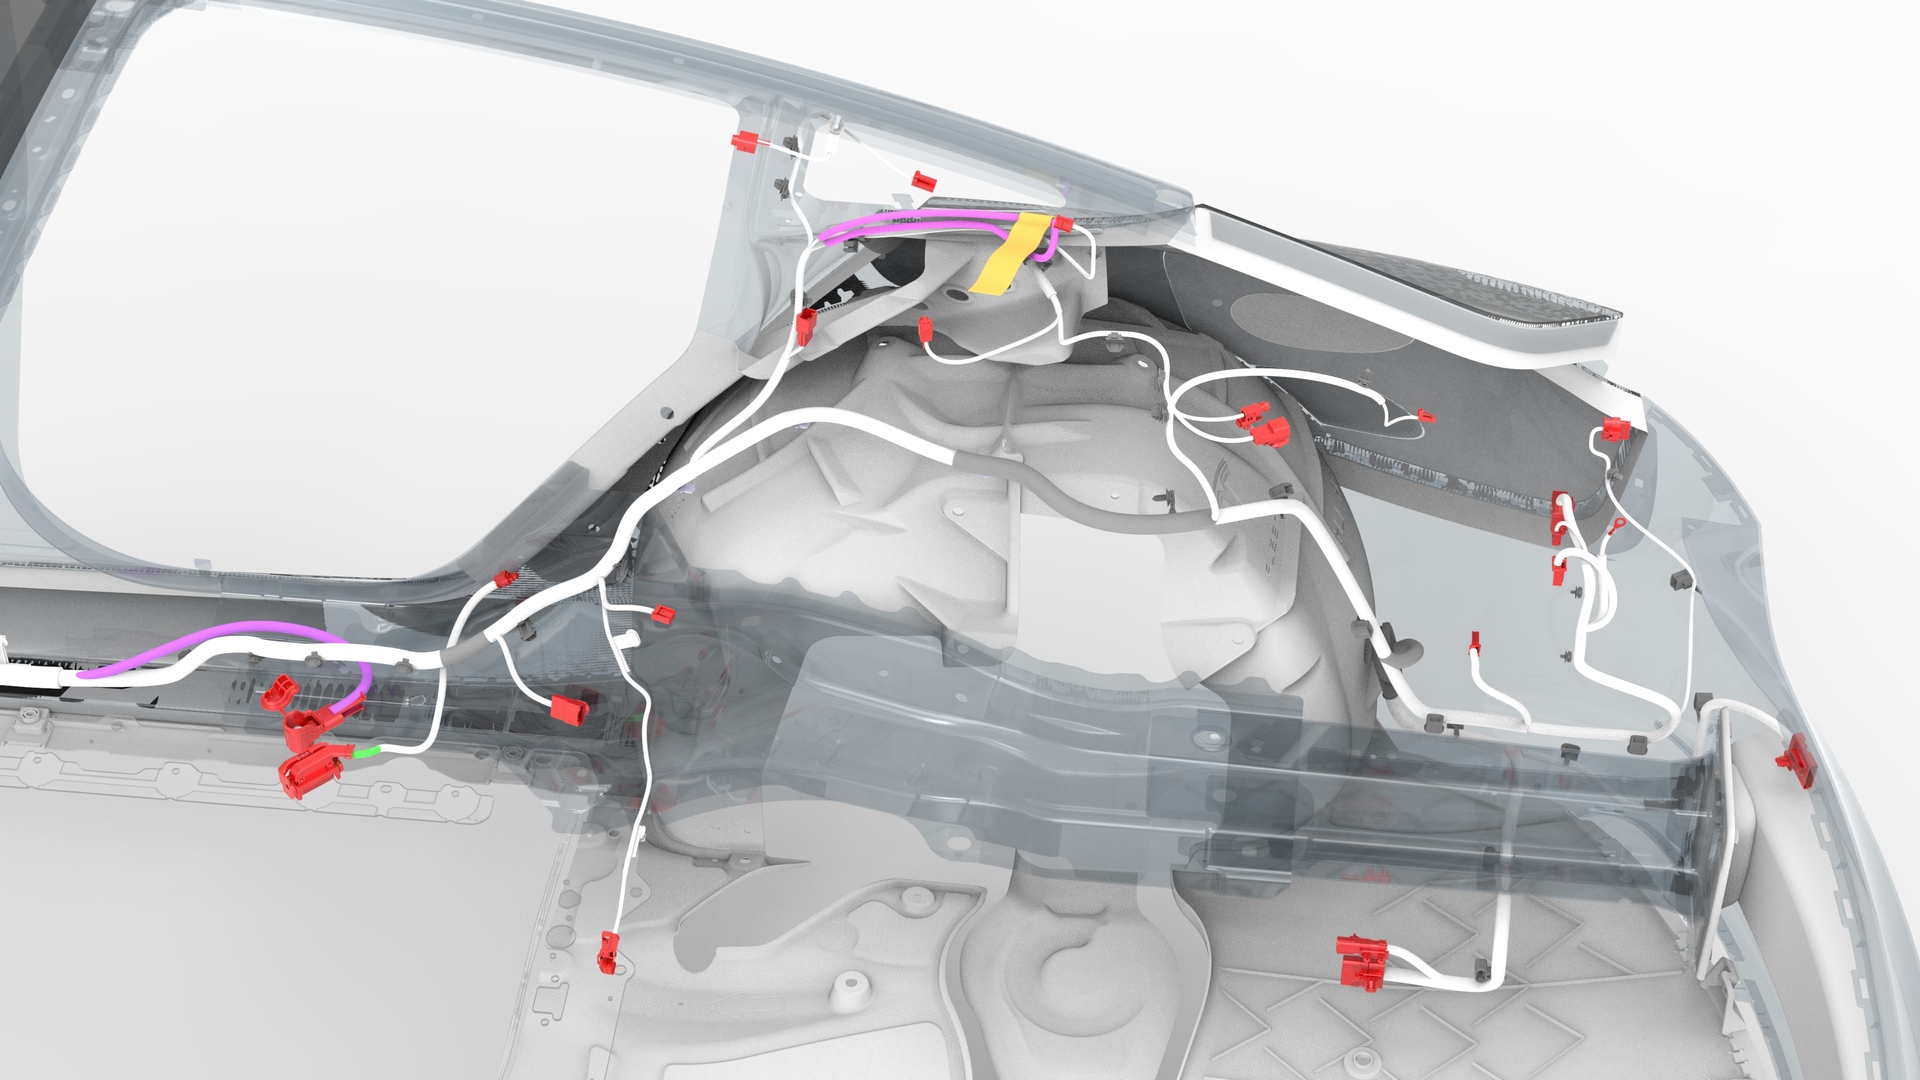
Release the clips that attach the electrical harness to the body in the C-pillar lower area.
-
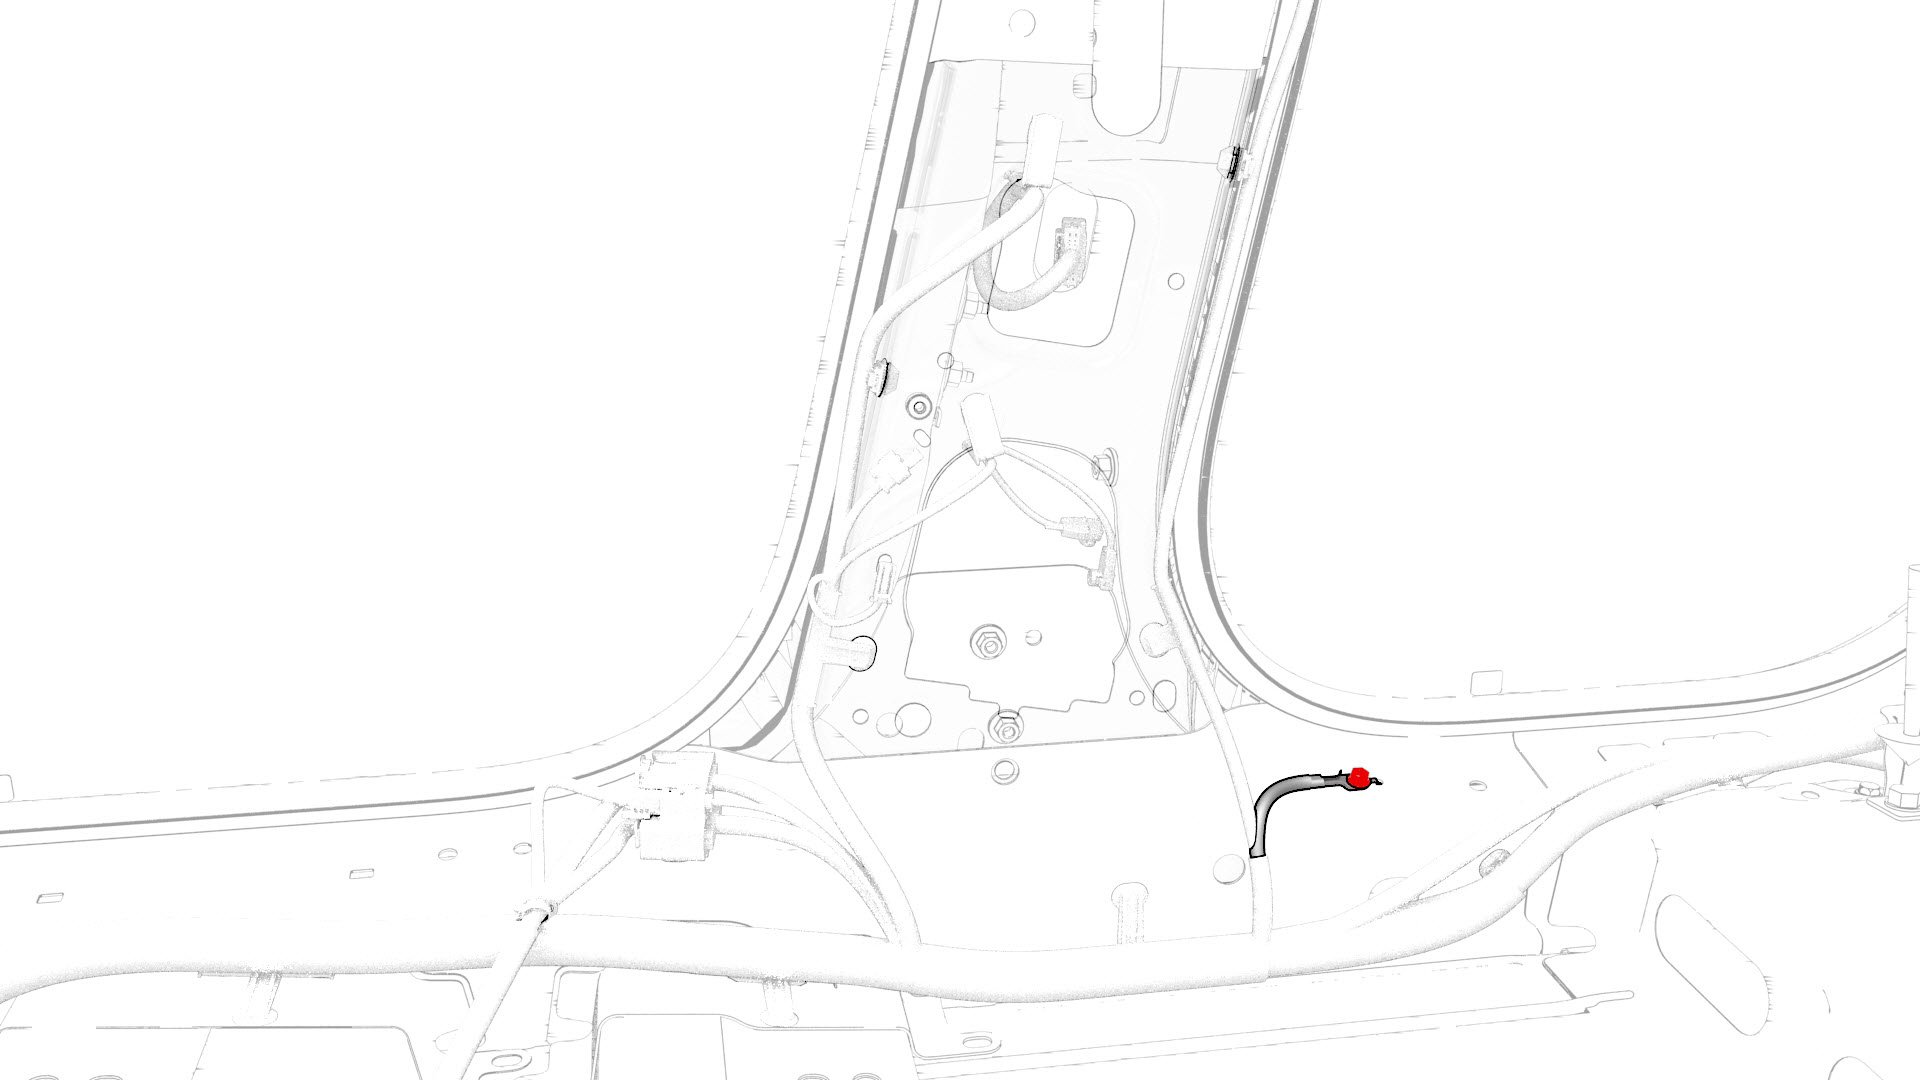
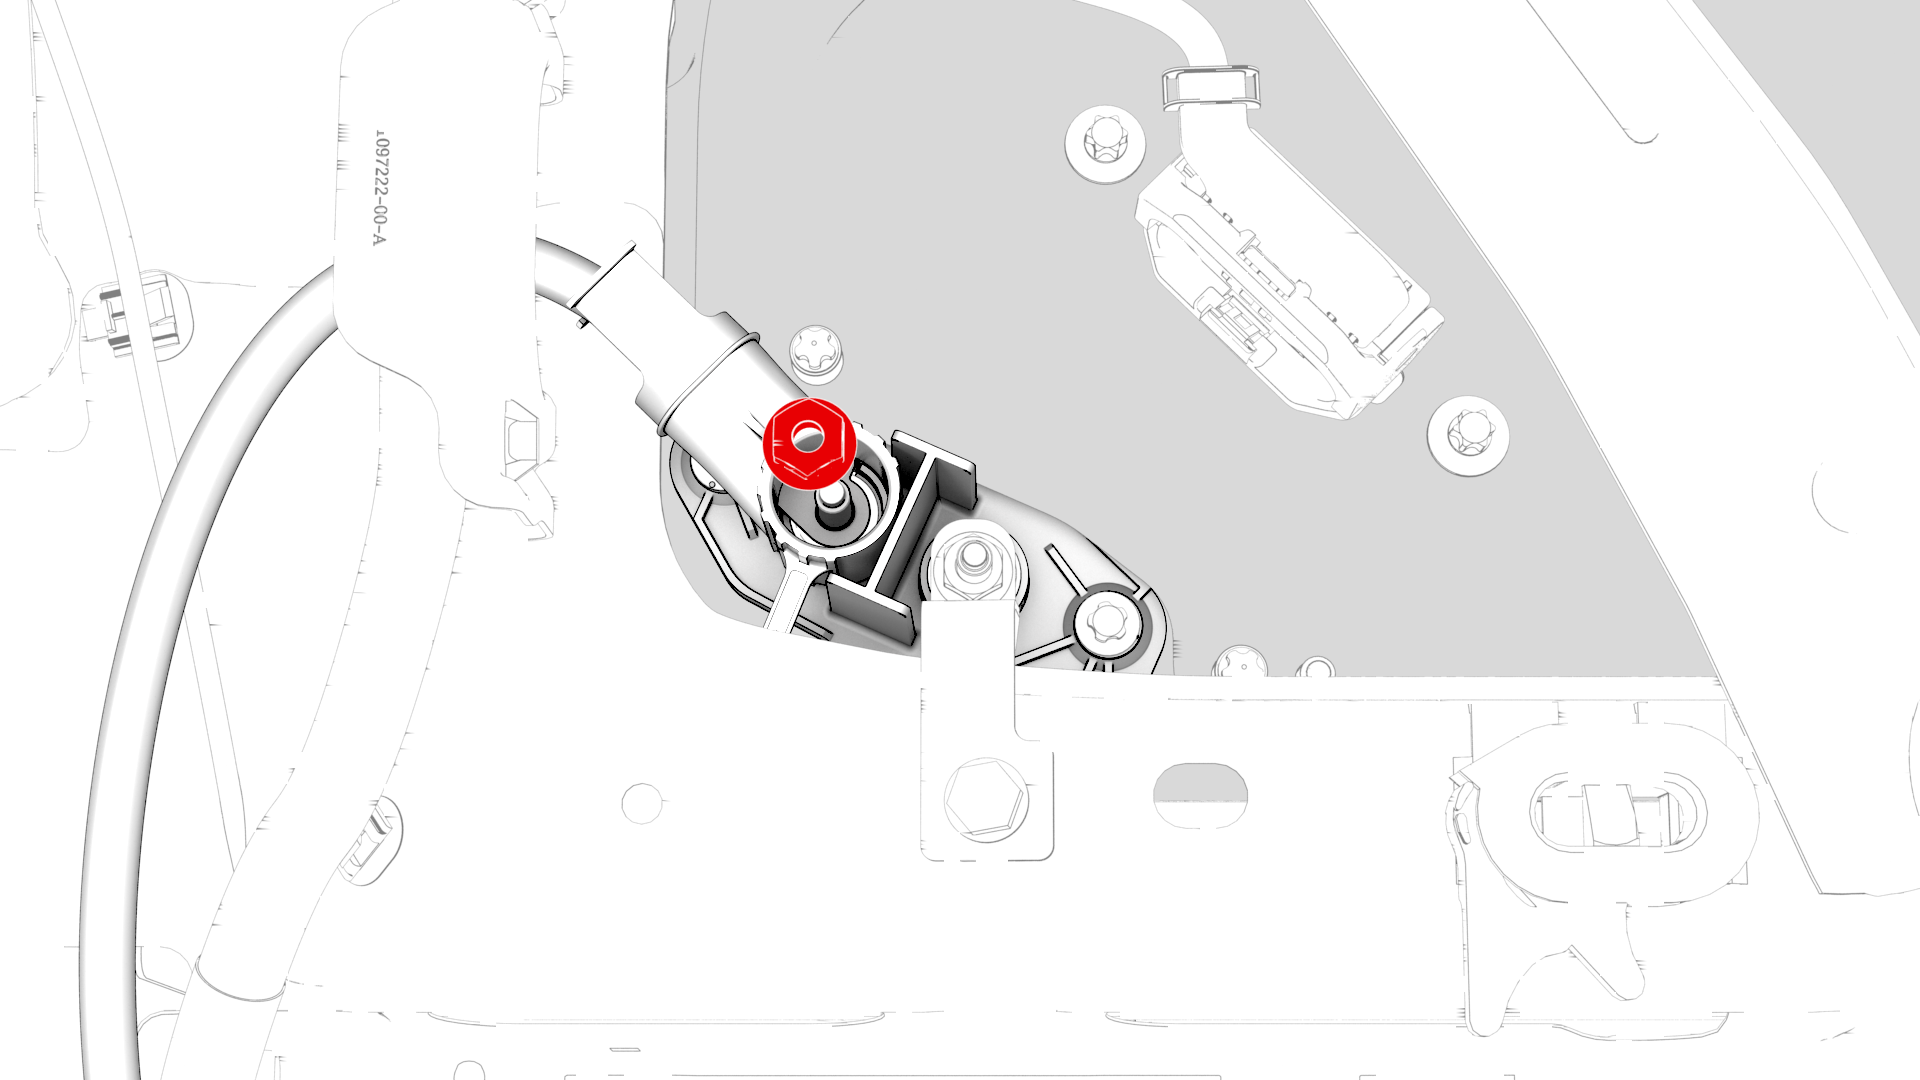
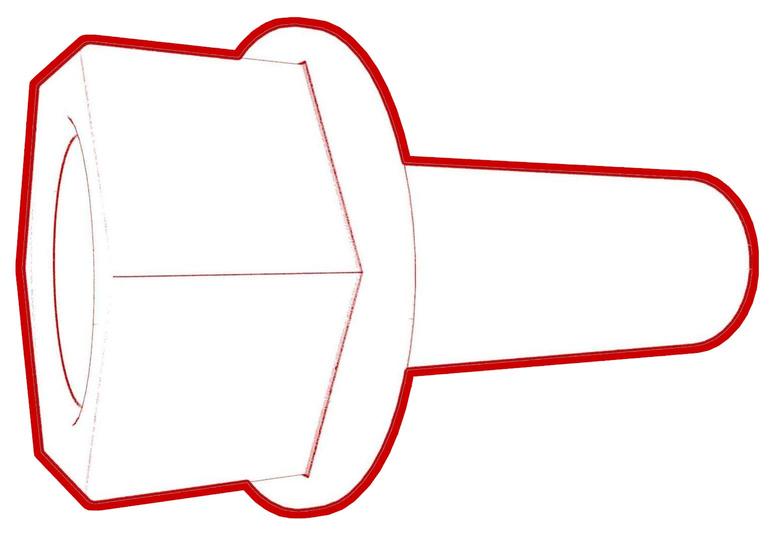
Remove and discard the nut that attaches the positive 12V output cable to the DCDC passthrough, and then remove the cable from the passthrough.
Note: Inspect the condition of the rubber boot at the end of the output cable, and replace the boot if it is melted or damaged.
-
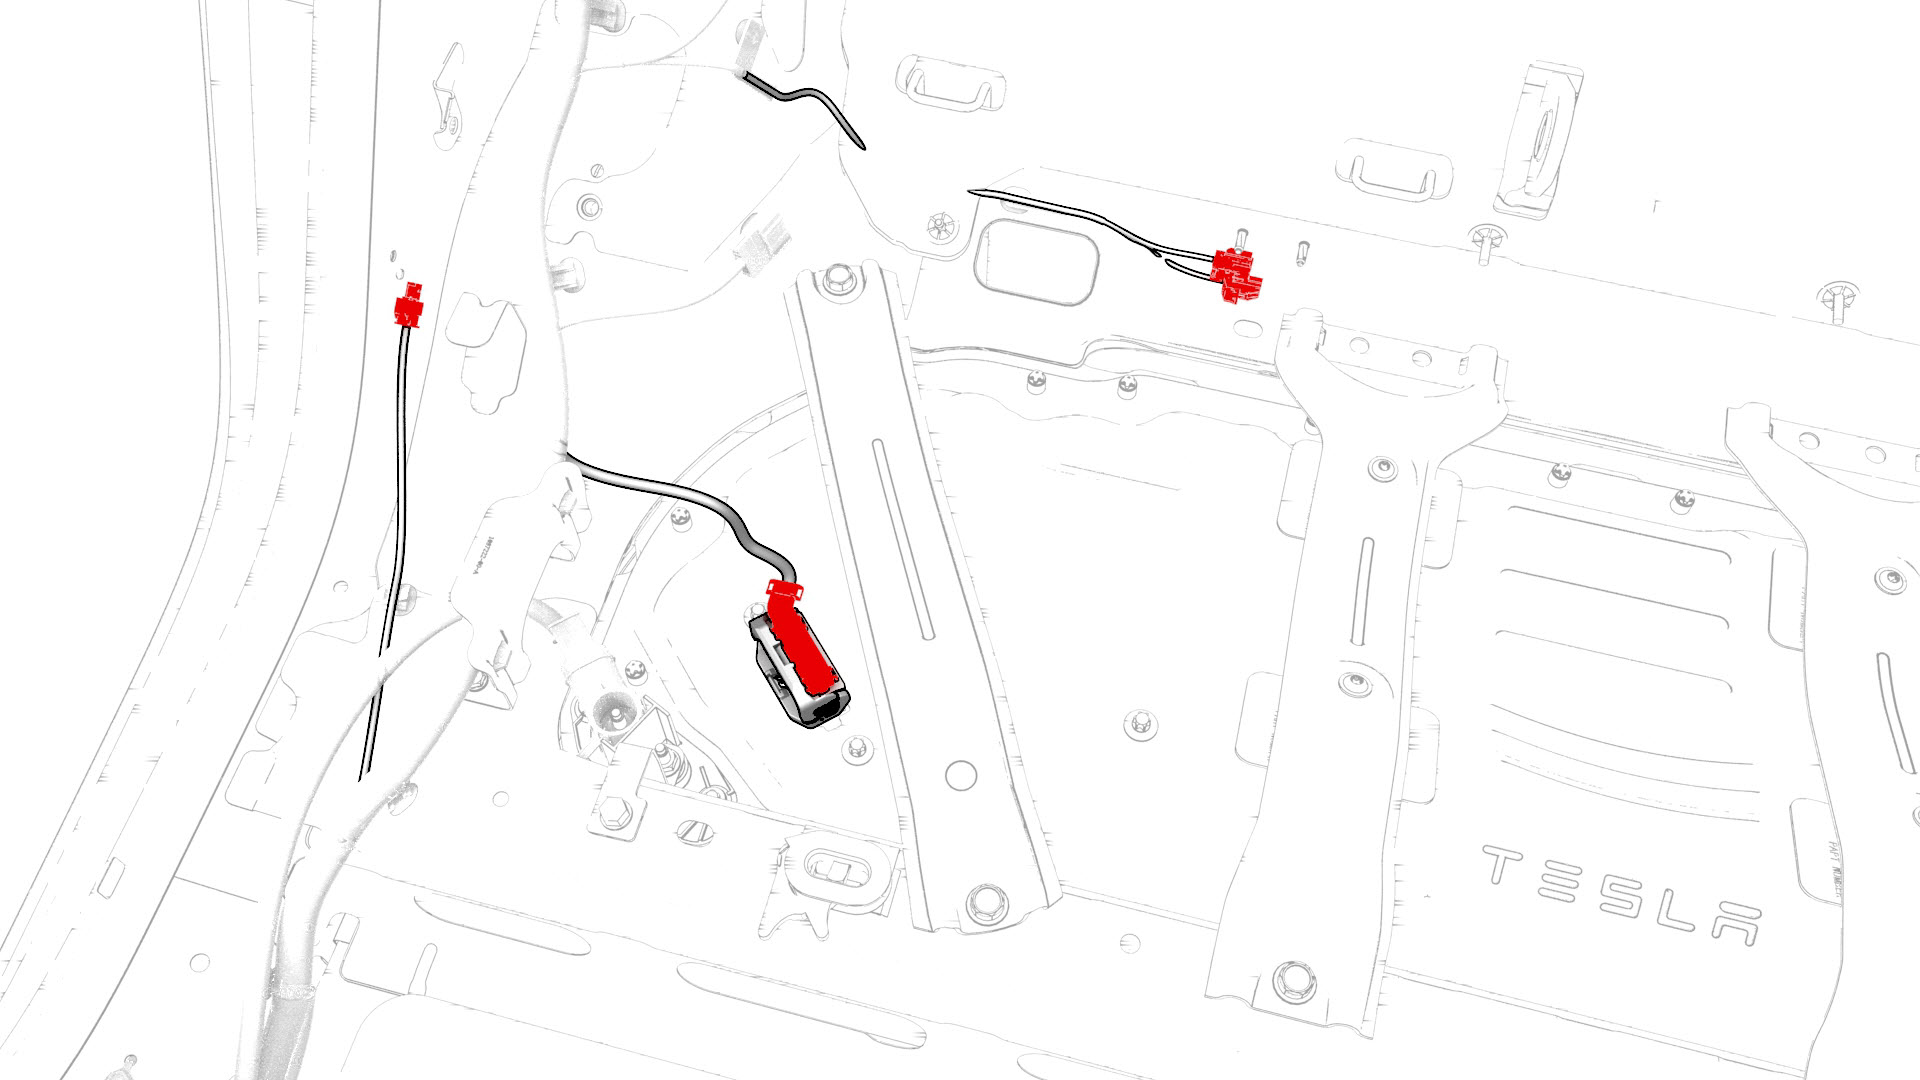
Disconnect the electrical harness from the rear seat belt buckle connectors, the HV battery controller connector, and the C-pillar airbag sensor connector.
-
Release the clips that attach the electrical harness to the body in the C-pillar area.
-
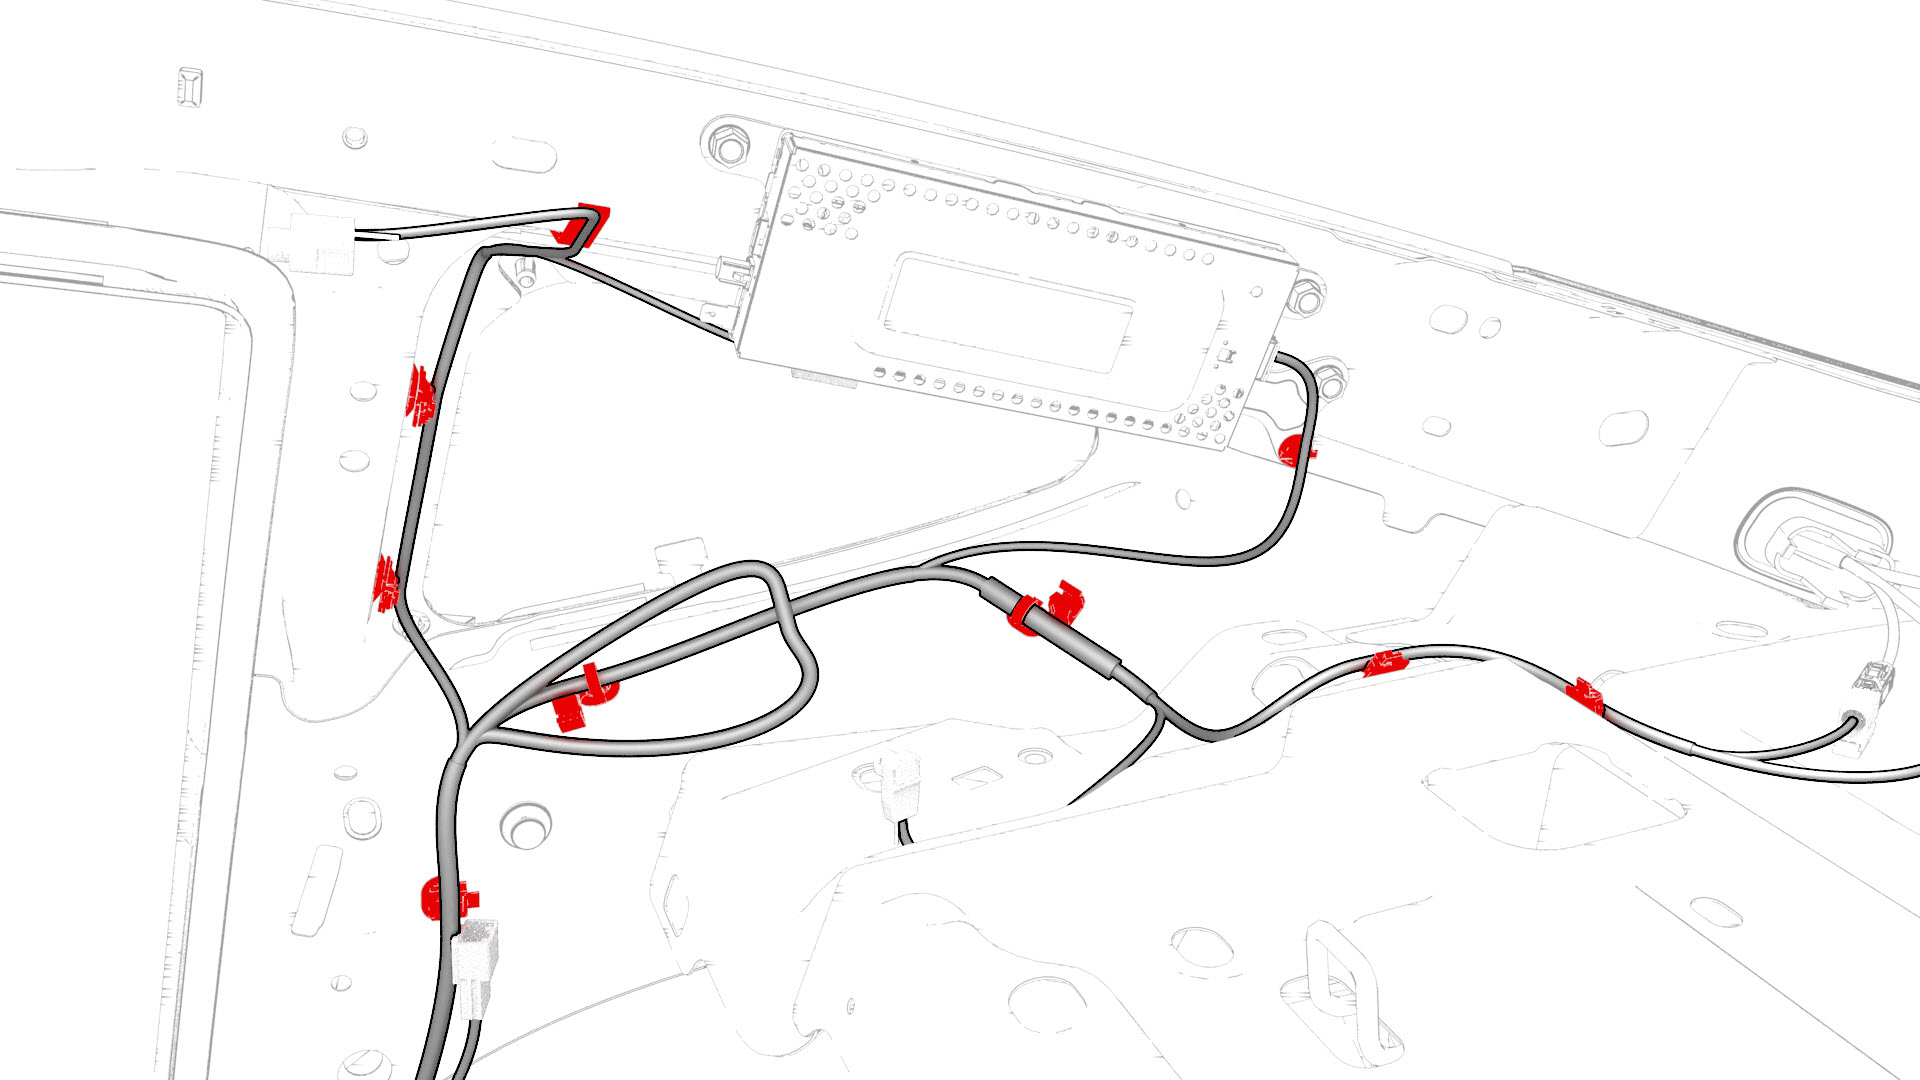
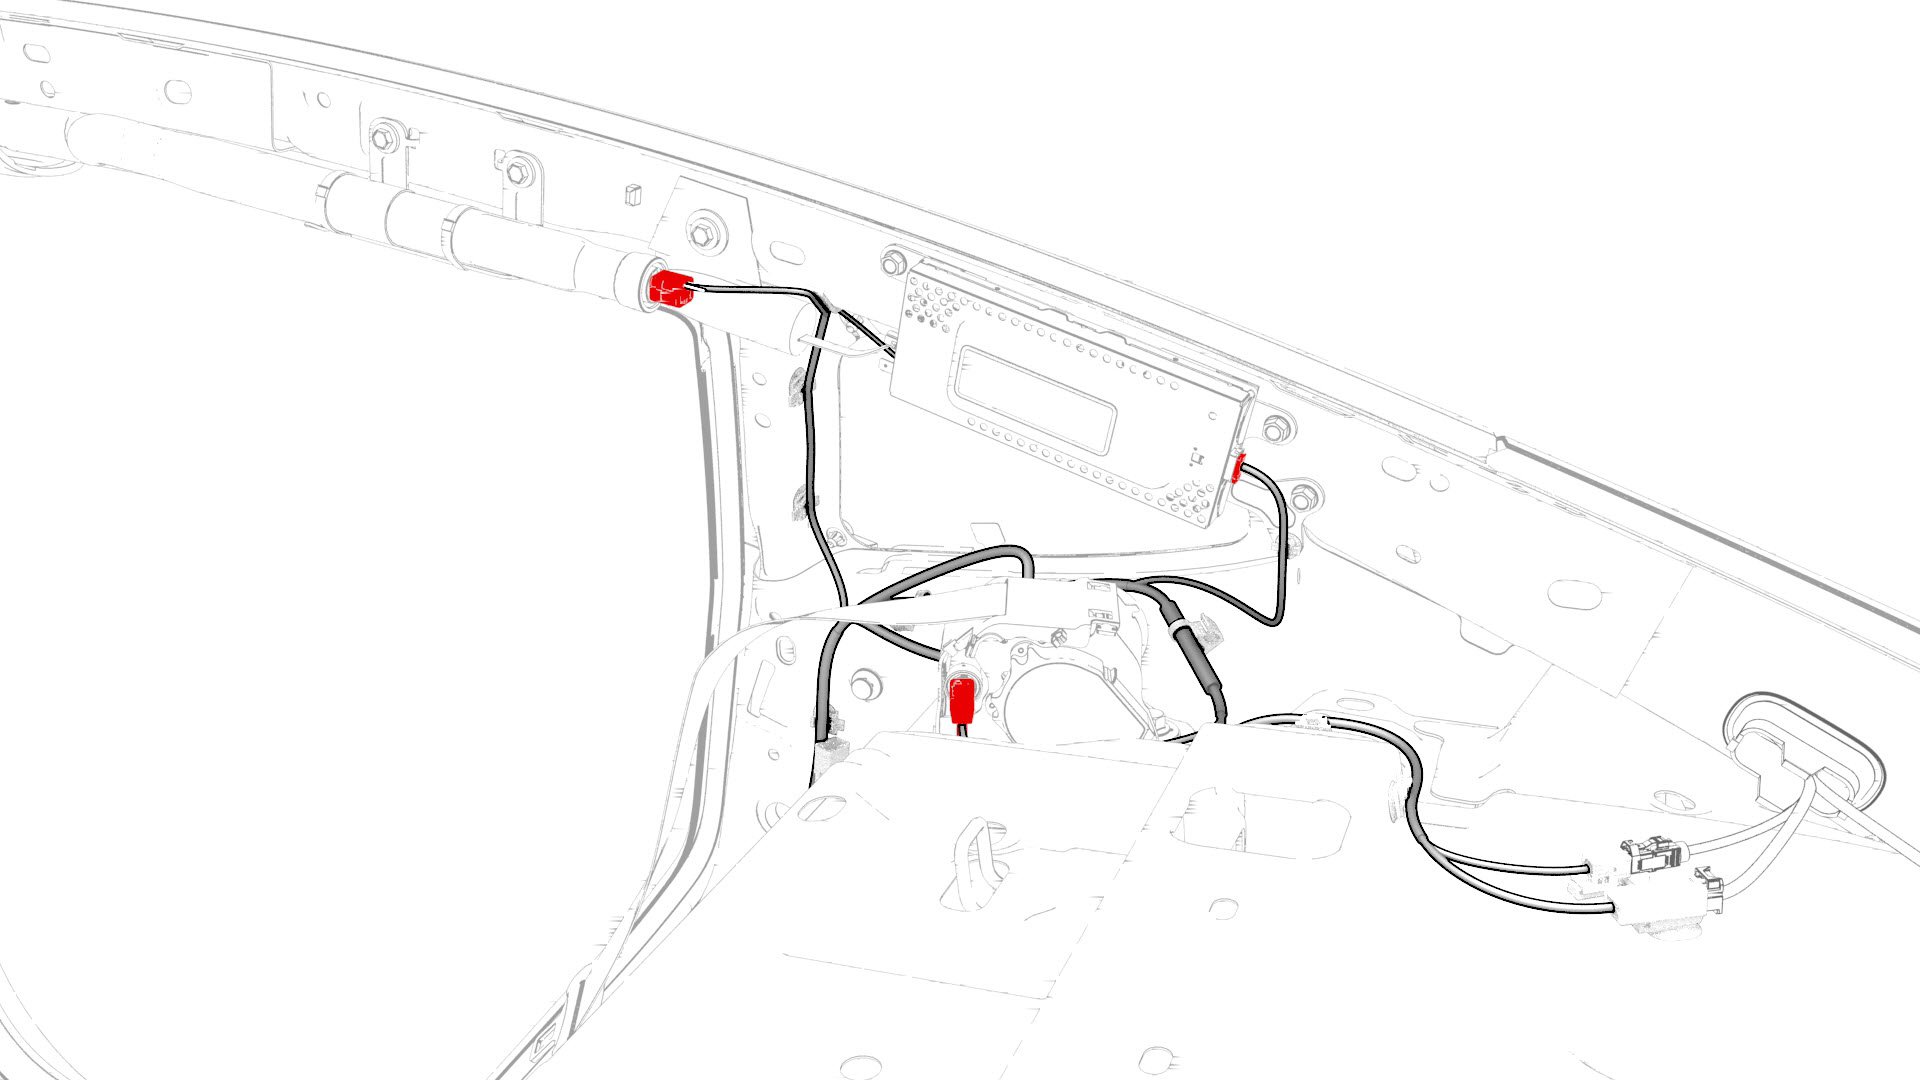
Disconnect the electrical harness from the trunk electrical harness connectors that are located under the package tray.

-
Disconnect the electrical harness from the RH side curtain airbag connector, the RH rear seat belt buckle connector, and the audio tuner connector.
-
Release the clips that attach the electrical harness to the body at the RH side of the trunk area.
-
Release the clips that attach the electrical harness to the body at the RH side of the tail lamp area.
-
With an assistant, move the vehicle to a lift.
 Caution:The vehicle is safely pushed for only a very short distance and at a very slow speed.
 -
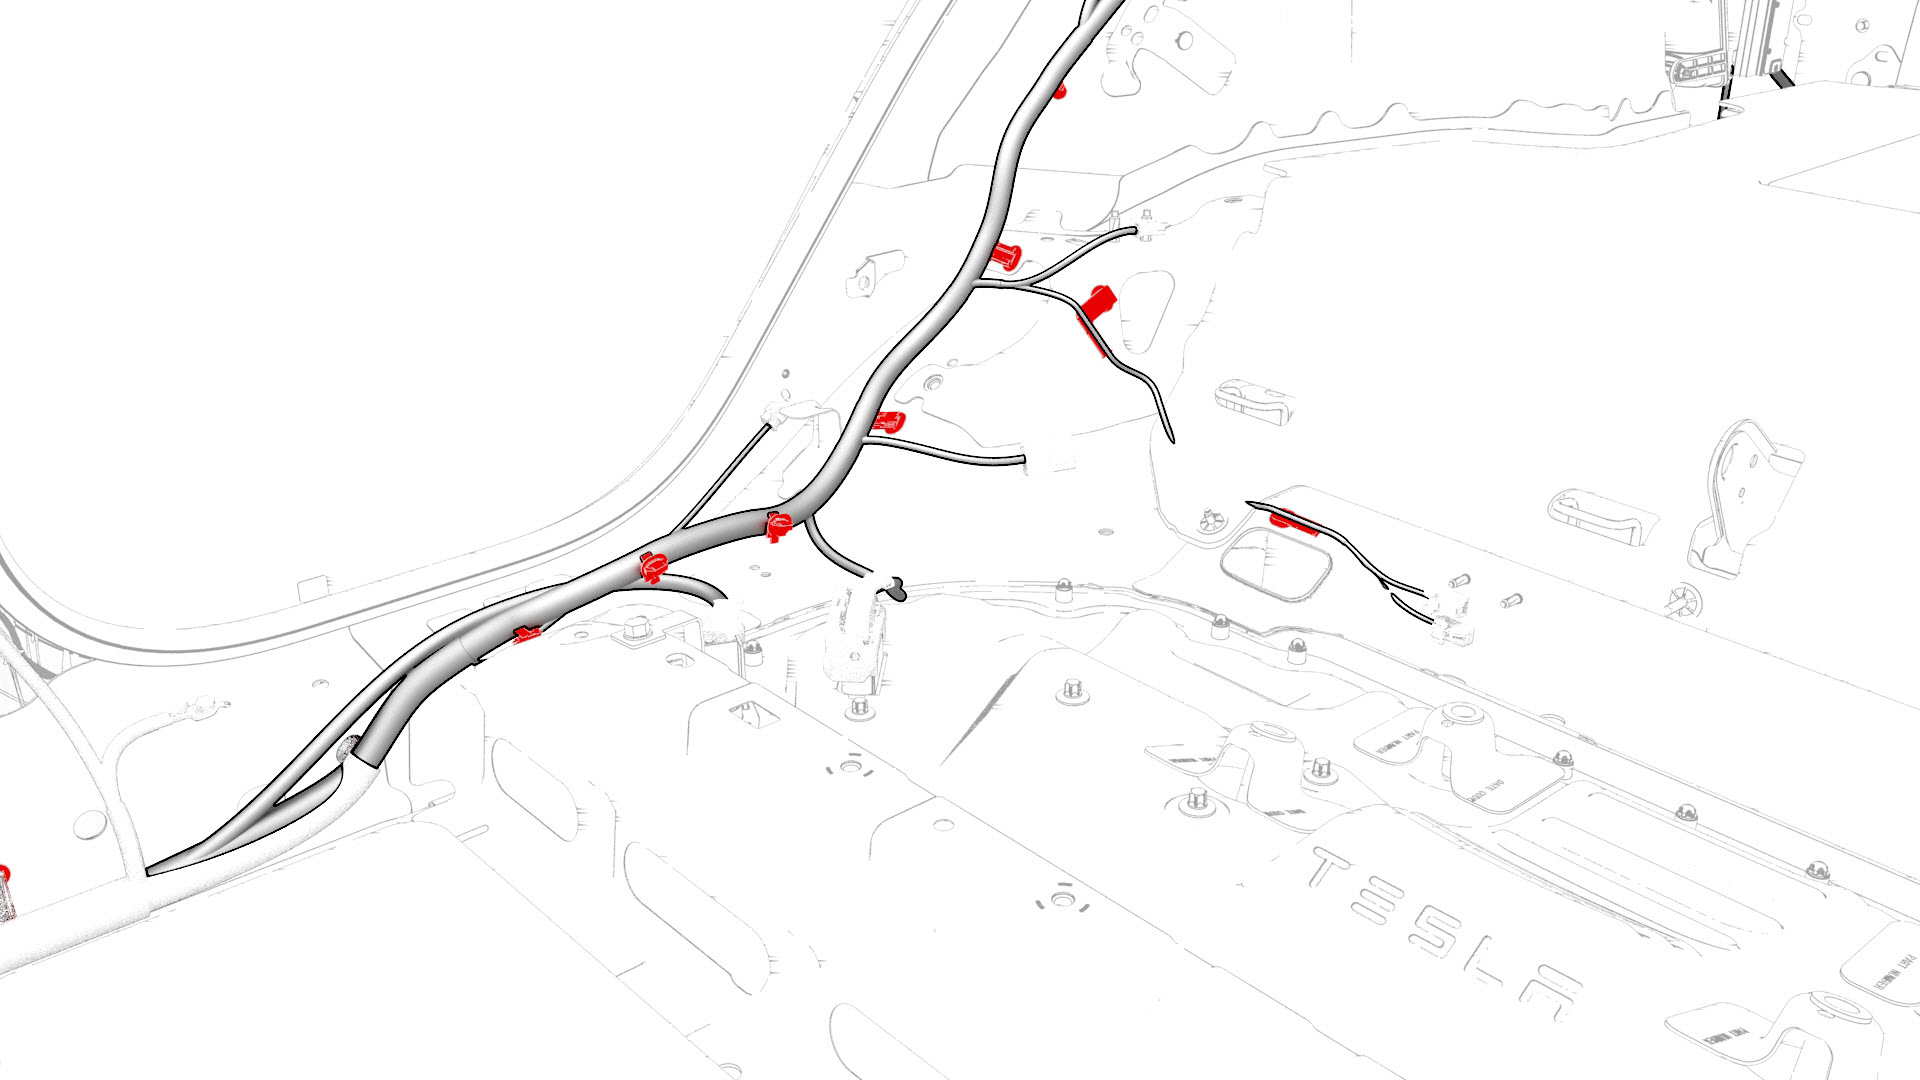
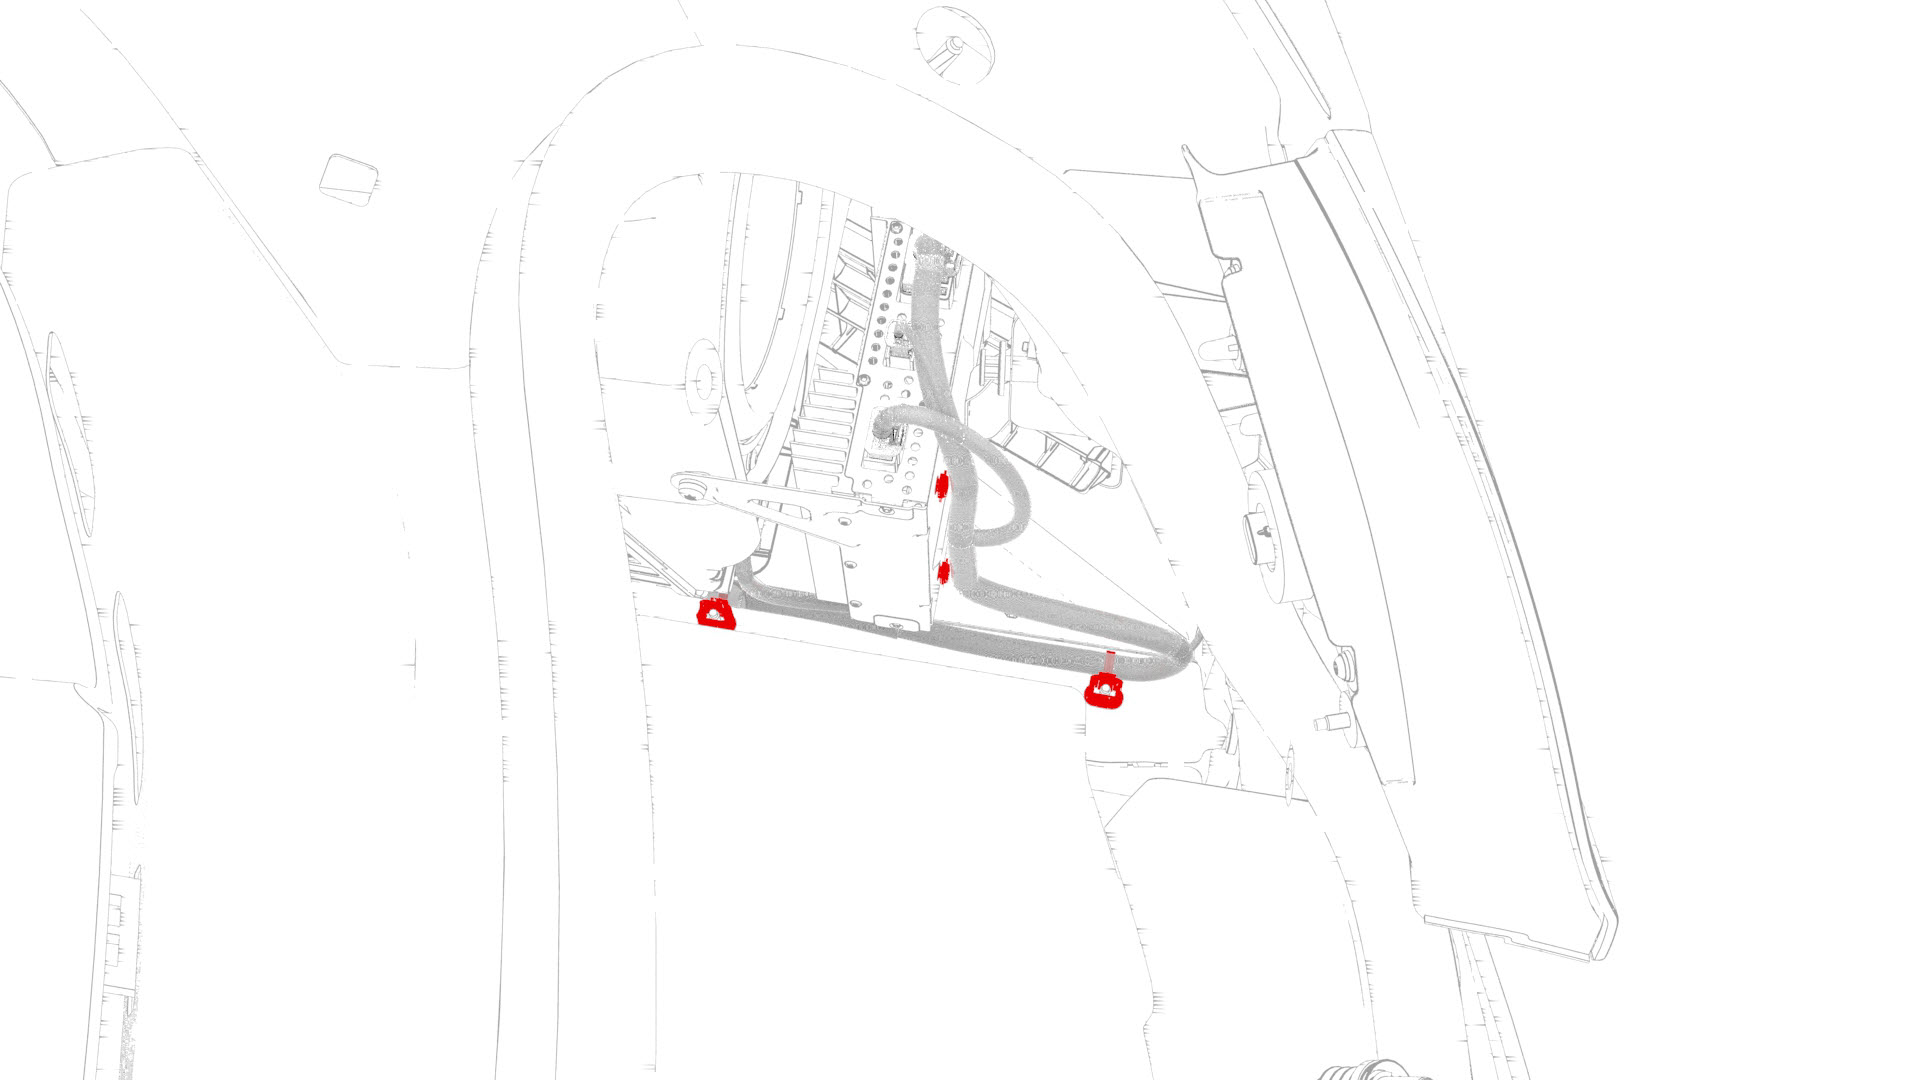
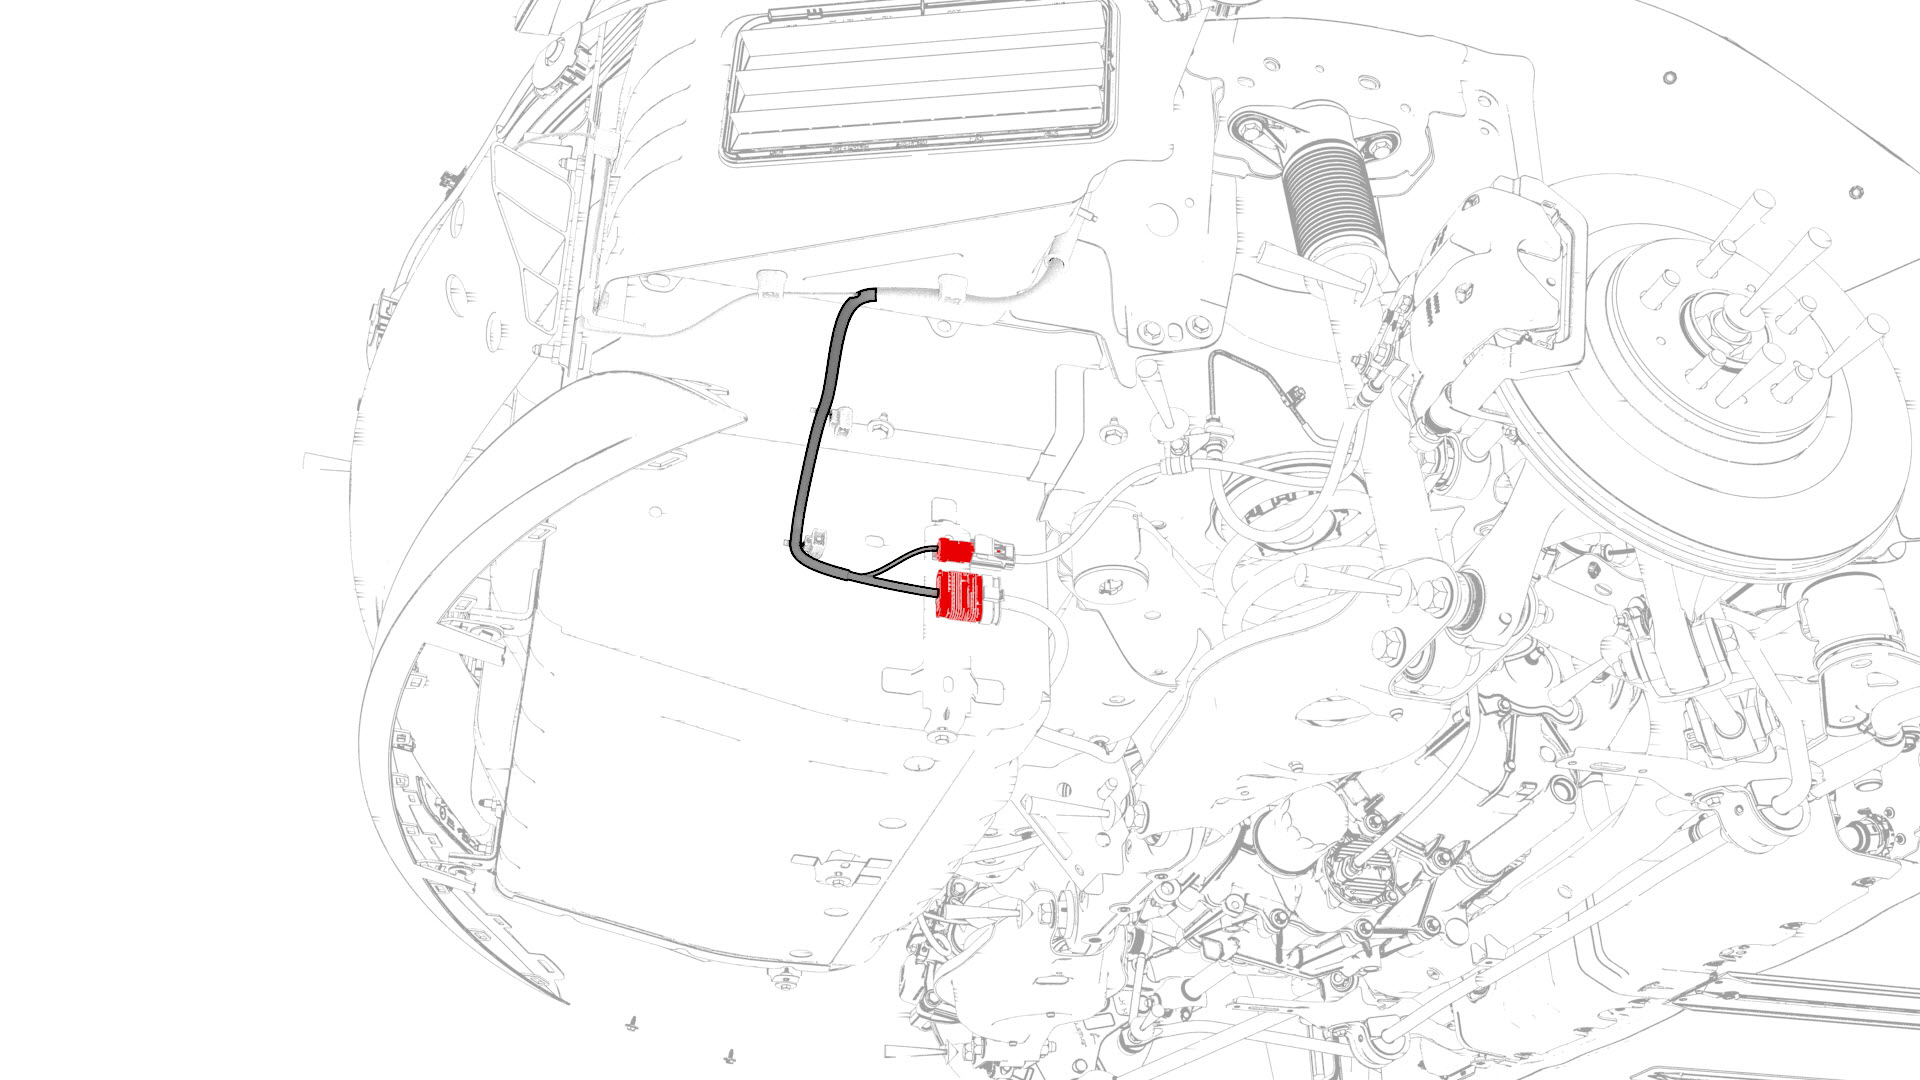
Release the clips that attach the electrical harness to the body in the rear fascia area.

-
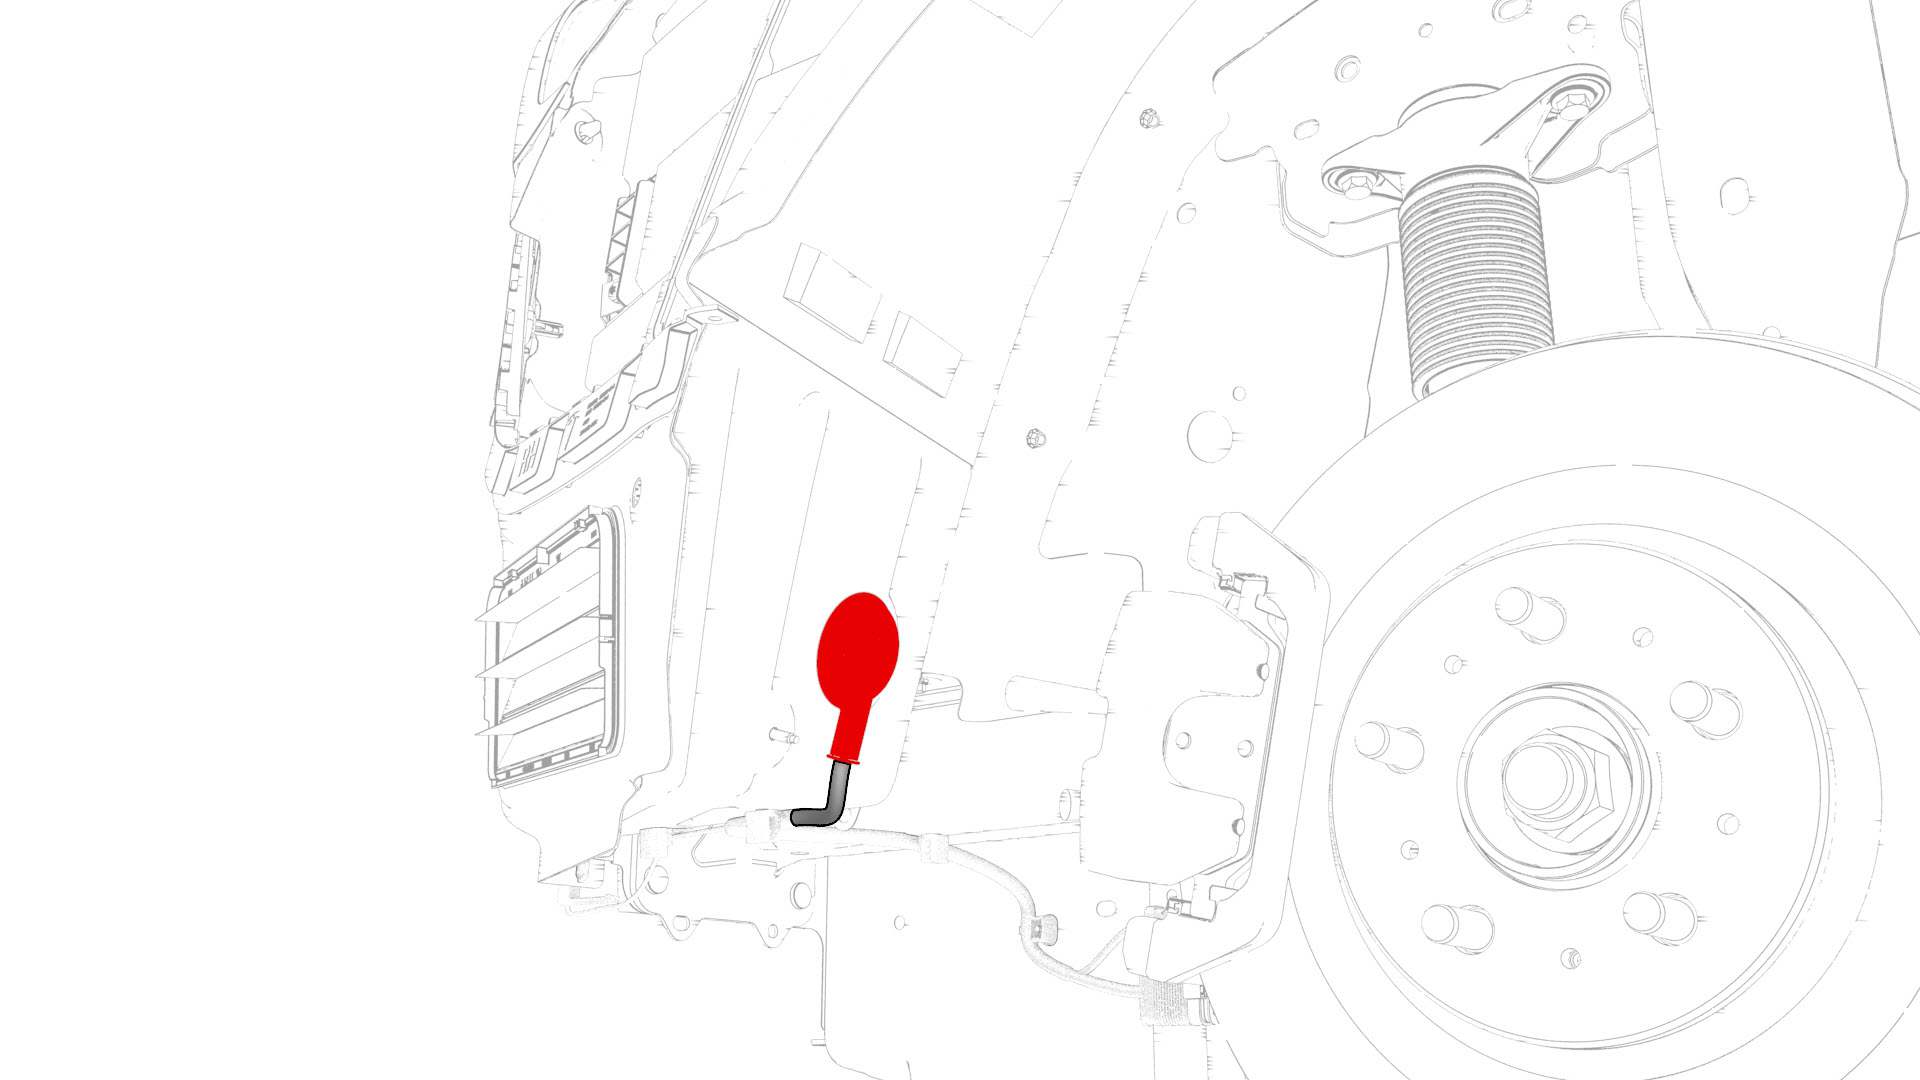
Disconnect the electrical harness from the rear subframe harness connector and the RH electric parking brake connector.
-
Push the rear portion of the electrical harness through the RH side of the trunk bulkhead.
-
Remove the RH body harness from the vehicle.
| 1 | Open all doors. | ||
| 2 | Place wheel chocks on both rear wheels. | ||
| 3 | Put vehicle in Neutral. | ||
| 4 | Open the trunk. | ||
| 5 | Remove the 2nd row lower seat cushion. See Seat Cushion - Lower - 2nd Row (Remove and Replace). | ||
| 6 | Remove the LH and RH trunk stops. | ||
| 7 | Remove the floor rear trunk trim. See Trim - Floor - Trunk (Remove and Replace). | ||
| 8 | Remove the LH side rear trunk trim. See Trim - Side - Trunk - LH (Remove and Replace). | ||
| 9 | Remove the RH side rear trunk trim. See Trim - Side - Trunk - RH (Remove and Replace). | ||
| 10 | Remove the subwoofer. See Subwoofer (Remove and Replace). | ||
| 11 | Remove the LH and RH tail light assemblies. See Taillight - LH (Remove and Replace). | ||
| 12 | Remove the fasteners (x2) that attach the rear fascia to the rear corners of the body. | ||
| 13 | Remove the rear underhood apron. See Underhood Apron - Rear (Remove and Replace). | ||
| 14 | Remove the LH lower A-pillar trim. See Trim - A-Pillar - Lower - LH (Remove and Replace). | ||
| 15 | Remove the RH lower A-pillar trim. See Trim - A-Pillar - Lower - LH (Remove and Replace). | ||
| 16 | Remove the front passenger's knee air bag. See Airbag - Knee - Front Passenger (Remove and Replace). | ||
| 17 | Remove the glove box. See Glove Box (LHD) (Remove and Replace). | ||
| 18 | Remove the RH footwell duct. See Duct - Footwell - RH (Remove and Replace). | ||
| 19 | Remove the front passenger seat. See Seat - Driver (Remove and Replace). | ||
| 20 | Remove the 2nd row LH seat side bolster. See Bolster - Side - Seat - 2nd Row - LH (Remove and Replace). | ||
| 21 | Remove the LH rear sill panel trim. See Trim - Sill Panel - Rear - LH (Remove and Replace). | ||
| 22 | Remove the LH upper B-pillar trim. See Trim - B-Pillar - Upper - LH (Remove and Replace). | ||
| 23 | Remove the LH lower B-pillar trim. See Trim - B-Pillar - Lower - LH (Remove and Replace). | ||
| 24 | Remove the LH side rail trim. See Trim - Side Rail - LH (Remove and Replace). | ||
| 25 | Remove the LH upper C-pillar trim. See Trim - C-Pillar - Upper - LH (Remove and Replace). | ||
| 26 | Remove the 2nd row RH seat side bolster. See Bolster - Side - Seat - 2nd Row - LH (Remove and Replace). | ||
| 27 | Remove the rear RH sill panel trim. See Trim - Sill Panel - Rear - LH (Remove and Replace). | ||
| 28 | Remove the RH upper B-pillar trim. See Trim - B-Pillar - Upper - LH (Remove and Replace). | ||
| 29 | Remove the RH lower B-pillar trim. See Trim - B-Pillar - Lower - LH (Remove and Replace). | ||
| 30 | Remove the RH upper C-pillar trim. See Trim - C-Pillar - Upper - LH (Remove and Replace). | ||
| 31 | Disconnect the RH body harness from the package tray electrical harness connector and the tuner connectors. | |
| 32 | Disconnect the electrical harness from the LH antenna amplifier. | |
| 33 | Remove the package tray trim. See Trim - Package Tray (Remove and Install). | ||
| 34 | Remove the B-pillar applique. See Applique - B-Pillar - LH (Remove and Replace). | ||
| 35 | Release the clips that attach the carpet to the body, and fold the carpet towards the LH side. | ||
| 36 | Remove the headliner. See Headliner (Remove and Install). | ||
| 37 | Disconnect 12V power. See 12V Power (Disconnect and Connect). | ||
| 38 | Disconnect the electrical harness from the RH body controller module connectors. | |
| 39 | Remove the nut that attaches the electrical harness ground strap to the RH body controller module, and then remove the ground strap from the module. | |
| 40 | Release the clips that attach the electrical harness to the car computer. | ||
| 41 | Disconnect the electrical harness from the car computer connectors. | ||
| 42 | Remove and discard the bolt that attaches the electrical harness ground strap to the body in the passenger footwell area. | |
| 43 | Release the clips that attach the electrical harness to the body in the A-pillar and B-pillar areas. | |
| 44 | Disconnect the electrical harness from the B-pillar antenna connector. | |
| 45 | Disconnect the electrical harness from the connectors in the lower B-pillar area. | |
| 46 | Remove and discard the bolt that attaches the electrical harness ground strap to the body in the lower B-pillar area. | |
| 47 | Release the clips that attach the electrical harness to the body in the C-pillar lower area. | |
| 48 | Release the cover on the positive 12V output cable at the DCDC passthrough. | ||
| 49 | Remove and discard the nut that attaches the positive 12V output cable to the DCDC passthrough, and then remove the cable from the passthrough. Note: Inspect the condition of the rubber boot at the end of the output cable, and replace the boot if it is melted or damaged.
| |
| 50 | Disconnect the electrical harness from the rear seat belt buckle connectors, the HV battery controller connector, and the C-pillar airbag sensor connector. | |
| 51 | Release the clips that attach the electrical harness to the body in the C-pillar area. | |
| 52 | Disconnect the electrical harness from the trunk electrical harness connectors that are located under the package tray. | |
| 53 | Disconnect the electrical harness from the RH side curtain airbag connector, the RH rear seat belt buckle connector, and the audio tuner connector. | |
| 54 | Release the clips that attach the electrical harness to the body at the RH side of the trunk area. | |
| 55 | Release the clips that attach the electrical harness to the body at the RH side of the tail lamp area. | |
| 56 | Partially close all doors. | ||
| 57 | Remove the wheel chocks. | ||
| 58 | With an assistant, move the vehicle to a lift. Caution: The vehicle is safely pushed for only a very short distance and at a very slow speed.
| ||
| 59 | Remove the rear fascia. See Fascia - Rear (Remove and Install). | ||
| 60 | Release the clips that attach the electrical harness to the body in the rear fascia area. | |
| 61 | Release the clips that attach the electrical harness to the body in the rear subframe area. | ||
| 62 | Disconnect the electrical harness from the rear subframe harness connector and the RH electric parking brake connector. | |
| 63 | Push the rear portion of the electrical harness through the RH side of the trunk bulkhead. | |
| 64 | Lower the vehicle. | ||
| 65 | Remove the RH body harness from the vehicle. |
Install
-
Move the rear portion of the electrical harness in through the RH side of the trunk bulkhead.
-
Connect the electrical harness to the rear subframe harness connector and the RH electric parking brake connector.
-
With an assistant, remove the vehicle from the lift.
Caution:The vehicle is safely pushed for only a very short distance and at a very slow speed.
-
Fasten the clips that attach the electrical harness to the body in the rear fascia area.
-
Fasten the clips that attach the electrical harness to the body at the RH side of the tail lamp area.
-
Fasten the clips that attach the electrical harness to the body at the RH side of the trunk area.
-
Connect the electrical harness to the audio tuner connector, the RH rear seat belt buckle connector, and the RH side curtain airbag connector.
-
Connect the electrical harness to the trunk electrical harness connectors that are located under the package tray.
-
Fasten the clips that attach the electrical harness to the body in the C-pillar area.
-
Connect the electrical harness to the C-pillar airbag sensor connector, the HV battery controller connector, and the rear seat belt buckle connectors.
-
Connect the positive 12V output cable to the DCDC passthrough, install a new nut to attach the cable, and mark the nut with a green paint pen after torque.
 Torque 9 NmCaution:Make sure that the rubber boot is not trapped under the cable lug or pinched between the cable lug and nut.
 -
Fasten the clips that attach the electrical harness to the body in the C-pillar lower area.
-
Install a new bolt to attach the electrical harness ground strap to the body in the lower B-pillar area.
 Torque 8 Nm
 -
Connect the electrical harness to the connectors in the lower B-pillar area.
-
Connect the electrical harness to the B-pillar antenna connector.
-
Fasten the clips that attach the electrical harness to the body in the A-pillar and B-pillar areas.
-
Install a new bolt to attach the electrical harness ground strap to the body in the passenger footwell area.Torque 8 Nm
-
Install the electrical harness ground strap to the RH body controller module, and then install the nut that attaches the ground strap to the module.Torque 9 Nm
-
Connect the electrical harness to the RH body controller module connectors.
-
Connect the electrical harness to the LH antenna amplifier connector.
-
Connect the electrical harness to the package tray electrical harness connector and the tuner connectors.
| 1 | Install the RH body harness into the vehicle. | ||
| 2 | Partially close all doors. | ||
| 3 | Raise the vehicle. | ||
| 4 | Move the rear portion of the electrical harness in through the RH side of the trunk bulkhead. | |
| 5 | Connect the electrical harness to the rear subframe harness connector and the RH electric parking brake connector. | |
| 6 | Fasten the clips that attach the electrical harness to the body in the rear subframe area. | ||
| 7 | Lower the vehicle. | ||
| 8 | With an assistant, remove the vehicle from the lift. Caution: The vehicle is safely pushed for only a very short distance and at a very slow speed.
| ||
| 9 | Position wheel chocks. | ||
| 10 | Open all doors. | ||
| 11 | Fasten the clips that attach the electrical harness to the body in the rear fascia area. | |
| 12 | Install the rear fascia. See Fascia - Rear (Remove and Install). | ||
| 13 | Fasten the clips that attach the electrical harness to the body at the RH side of the tail lamp area. | |
| 14 | Fasten the clips that attach the electrical harness to the body at the RH side of the trunk area. | |
| 15 | Connect the electrical harness to the audio tuner connector, the RH rear seat belt buckle connector, and the RH side curtain airbag connector. | |
| 16 | Connect the electrical harness to the trunk electrical harness connectors that are located under the package tray. | |
| 17 | Fasten the clips that attach the electrical harness to the body in the C-pillar area. | |
| 18 | Connect the electrical harness to the C-pillar airbag sensor connector, the HV battery controller connector, and the rear seat belt buckle connectors. | |
| 19 | Connect the positive 12V output cable to the DCDC passthrough, install a new nut to attach the cable, and mark the nut with a green paint pen after torque. Torque 9 Nm Caution: Make sure that the rubber boot is not trapped under the cable lug or pinched between the cable lug and nut.
| |
| 20 | Replace the cover on the positive 12V output cable at the DCDC passthrough, and then press down to attach the cover. | ||
| 21 | Fasten the clips that attach the electrical harness to the body in the C-pillar lower area. | |
| 22 | Install a new bolt to attach the electrical harness ground strap to the body in the lower B-pillar area. Torque 8 Nm | |
| 23 | Connect the electrical harness to the connectors in the lower B-pillar area. | |
| 24 | Connect the electrical harness to the B-pillar antenna connector. | |
| 25 | Fasten the clips that attach the electrical harness to the body in the A-pillar and B-pillar areas. | |
| 26 | Install a new bolt to attach the electrical harness ground strap to the body in the passenger footwell area. Torque 8 Nm | |
| 27 | Connect the electrical harness to the car computer connectors. | ||
| 28 | Fasten the clips that attach the electrical harness to the car computer. | ||
| 29 | Install the electrical harness ground strap to the RH body controller module, and then install the nut that attaches the ground strap to the module. Torque 9 Nm | |
| 30 | Connect the electrical harness to the RH body controller module connectors. | |
| 31 | Install the headliner. See Headliner (Remove and Install). | ||
| 32 | Fold the carpet back from the LH side, and then fasten the clips that attach the carpet to the body. | ||
| 33 | Install the B-pillar applique. See Applique - B-Pillar - LH (Remove and Replace). | ||
| 34 | Install the package tray trim. See Trim - Package Tray (Remove and Install). | ||
| 35 | Connect the electrical harness to the LH antenna amplifier connector. | |
| 36 | Connect the electrical harness to the package tray electrical harness connector and the tuner connectors. | |
| 37 | Install the RH upper C-pillar trim. See Trim - C-Pillar - Upper - LH (Remove and Replace). | ||
| 38 | Install the RH lower B-pillar trim. See Trim - B-Pillar - Lower - LH (Remove and Replace). | ||
| 39 | Install the RH upper B-pillar trim. See Trim - B-Pillar - Upper - LH (Remove and Replace). | ||
| 40 | Install the rear RH sill panel trim. See Trim - Sill Panel - Rear - LH (Remove and Replace). | ||
| 41 | Install the 2nd row RH seat side bolster. See Bolster - Side - Seat - 2nd Row - LH (Remove and Replace). | ||
| 42 | Install the LH upper C-pillar trim. See Trim - C-Pillar - Upper - LH (Remove and Replace). | ||
| 43 | Install the LH side rail trim. See Trim - Side Rail - LH (Remove and Replace). | ||
| 44 | Install the LH lower B-pillar trim. See Trim - B-Pillar - Lower - LH (Remove and Replace). | ||
| 45 | Install the LH upper B-pillar trim. See Trim - B-Pillar - Upper - LH (Remove and Replace). | ||
| 46 | Install the LH rear sill panel trim. See Trim - Sill Panel - Rear - LH (Remove and Replace). | ||
| 47 | Install the 2nd row LH seat side bolster. See Bolster - Side - Seat - 2nd Row - LH (Remove and Replace). | ||
| 48 | Install the front passenger seat. See Seat - Driver (Remove and Replace). | ||
| 49 | Install the RH footwell duct. See Duct - Footwell - RH (Remove and Replace). | ||
| 50 | Install the glove box. See Glove Box (LHD) (Remove and Replace). | ||
| 51 | Install the front passenger's knee air bag. See Airbag - Knee - Front Passenger (Remove and Replace). | ||
| 52 | Install the RH lower A-pillar trim. See Trim - A-Pillar - Lower - LH (Remove and Replace). | ||
| 53 | Install the LH lower A-pillar trim. See Trim - A-Pillar - Lower - LH (Remove and Replace). | ||
| 54 | Install the rear underhood apron. See Underhood Apron - Rear (Remove and Replace). | ||
| 55 | Install the fasteners (x2) that attach the rear fascia to the rear corners of the body. | ||
| 56 | Install the LH and RH tail light assemblies. See Taillight - LH (Remove and Replace). | ||
| 57 | Install the subwoofer. See Subwoofer (Remove and Replace). | ||
| 58 | Install the RH side rear trunk trim. See Trim - Side - Trunk - RH (Remove and Replace). | ||
| 59 | Install the LH side rear trunk trim. See Trim - Side - Trunk - LH (Remove and Replace). | ||
| 60 | Install the floor rear trunk trim. See Trim - Floor - Trunk (Remove and Replace). | ||
| 61 | Install the LH and RH trunk stops. | ||
| 62 | Install the 2nd row lower seat cushion. See Seat Cushion - Lower - 2nd Row (Remove and Replace). | ||
| 63 | Close the trunk. | ||
| 64 | Remove the wheel chocks. | ||
| 65 | Connect 12V power. See 12V Power (Disconnect and Connect). |