Harness - Instrument Panel (Remove and Replace)
Correction code 1710060217100602
Remove
-
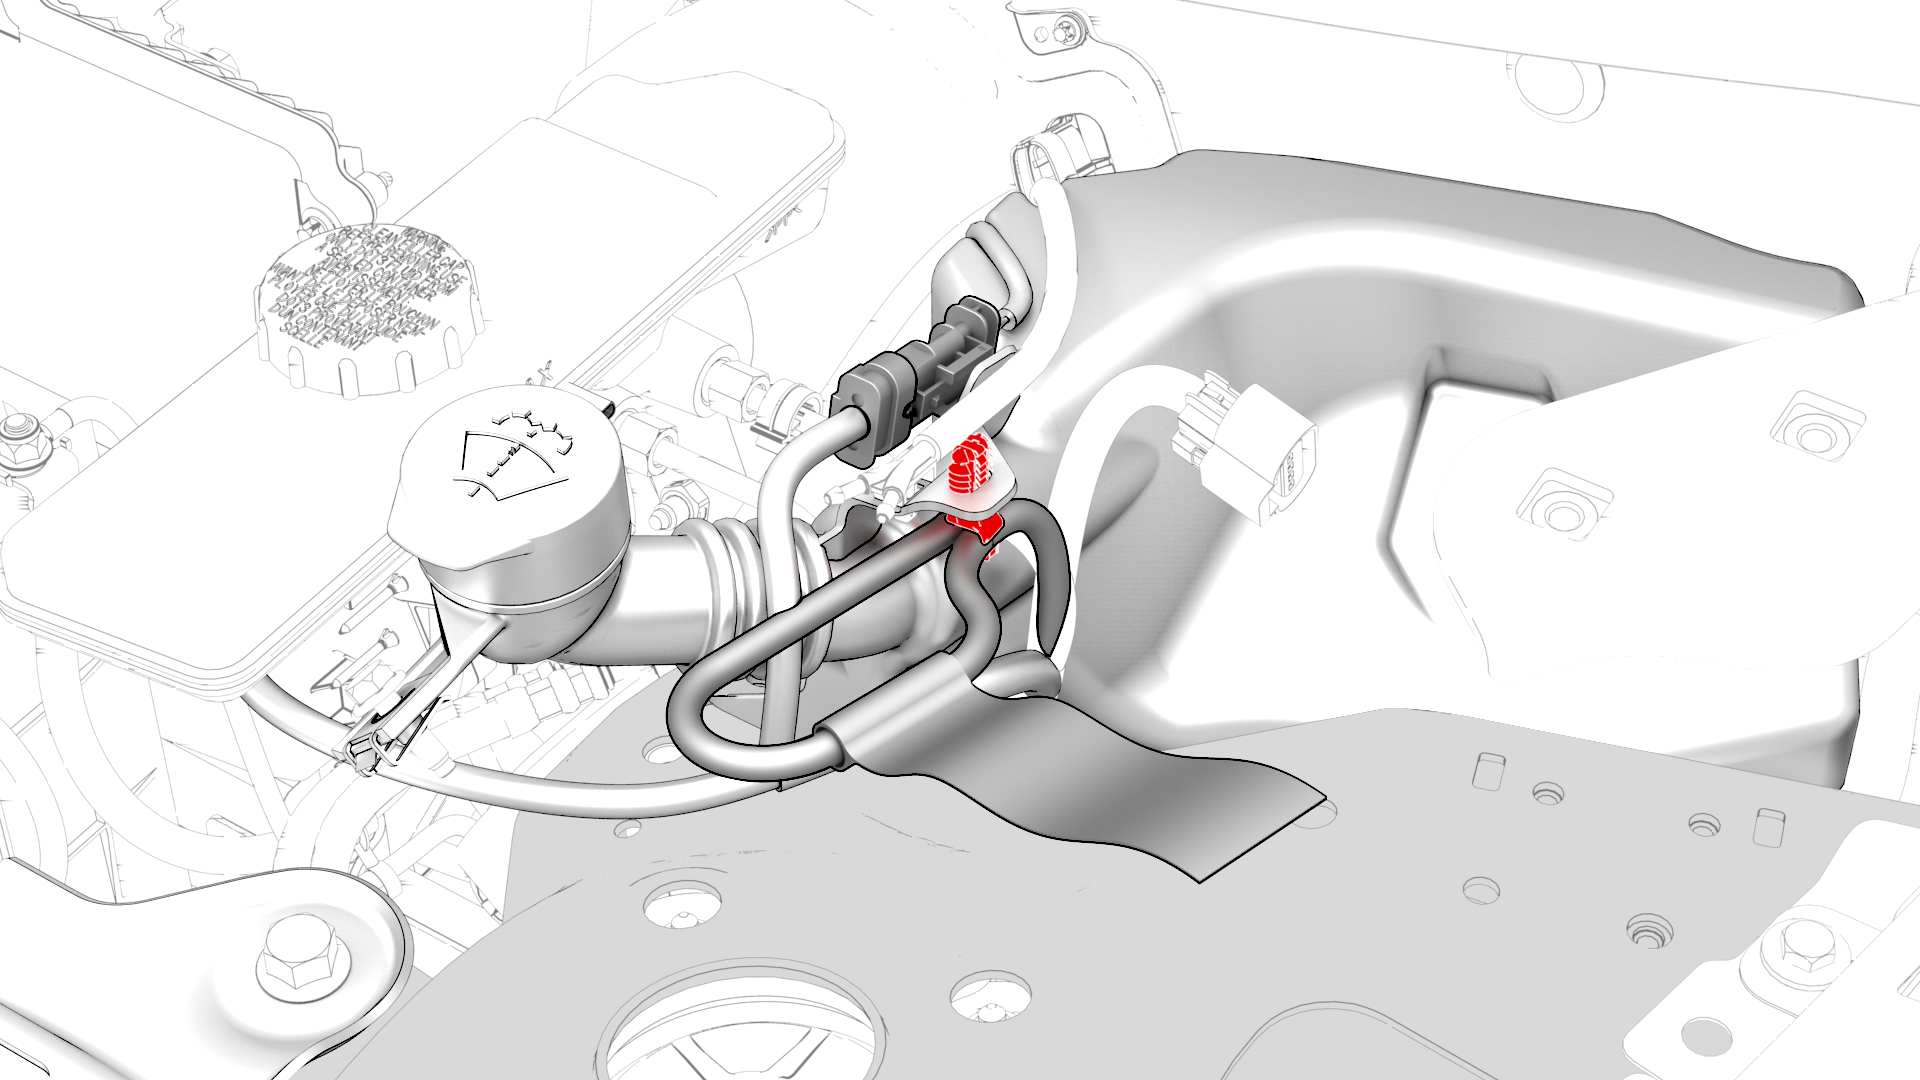
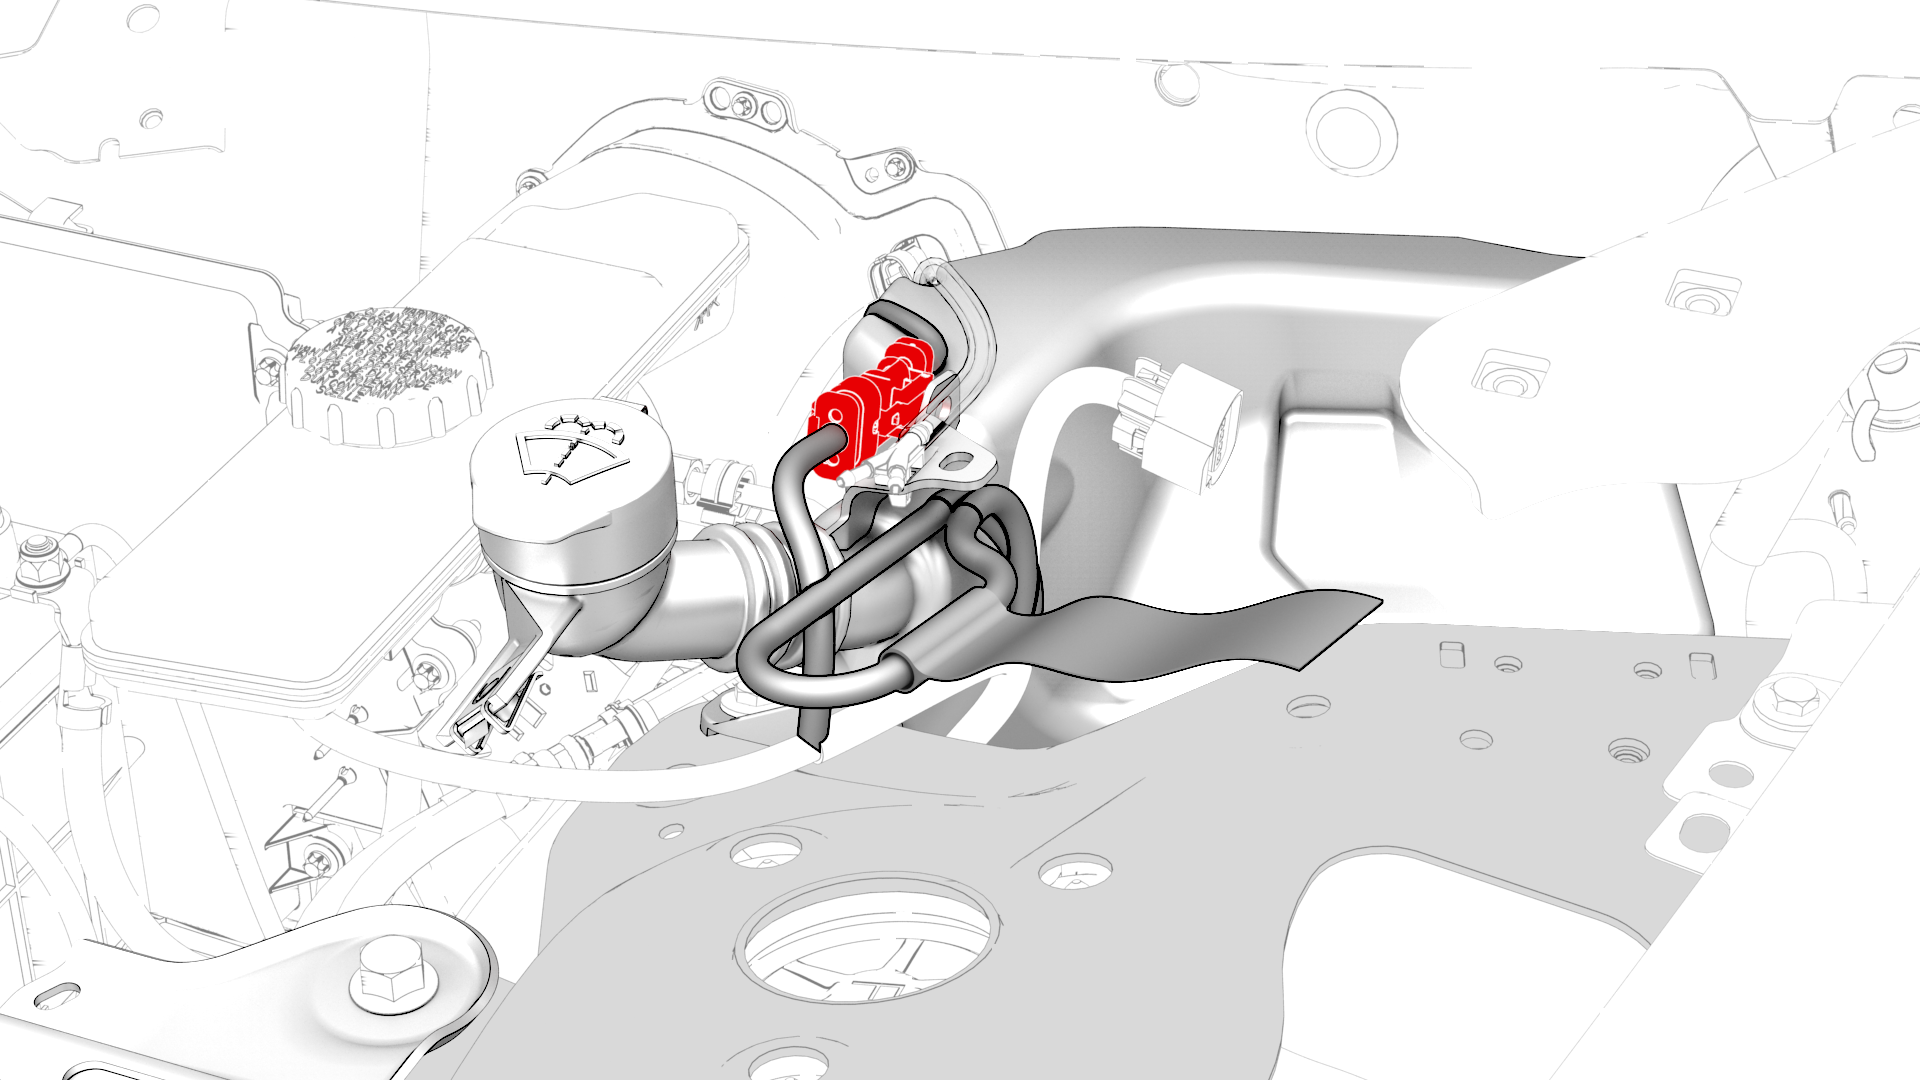
Release the clip that attaches the electrical harness to the windshield washer reservoir.
-
Disconnect the electrical connector from the windshield washer reservoir.
-
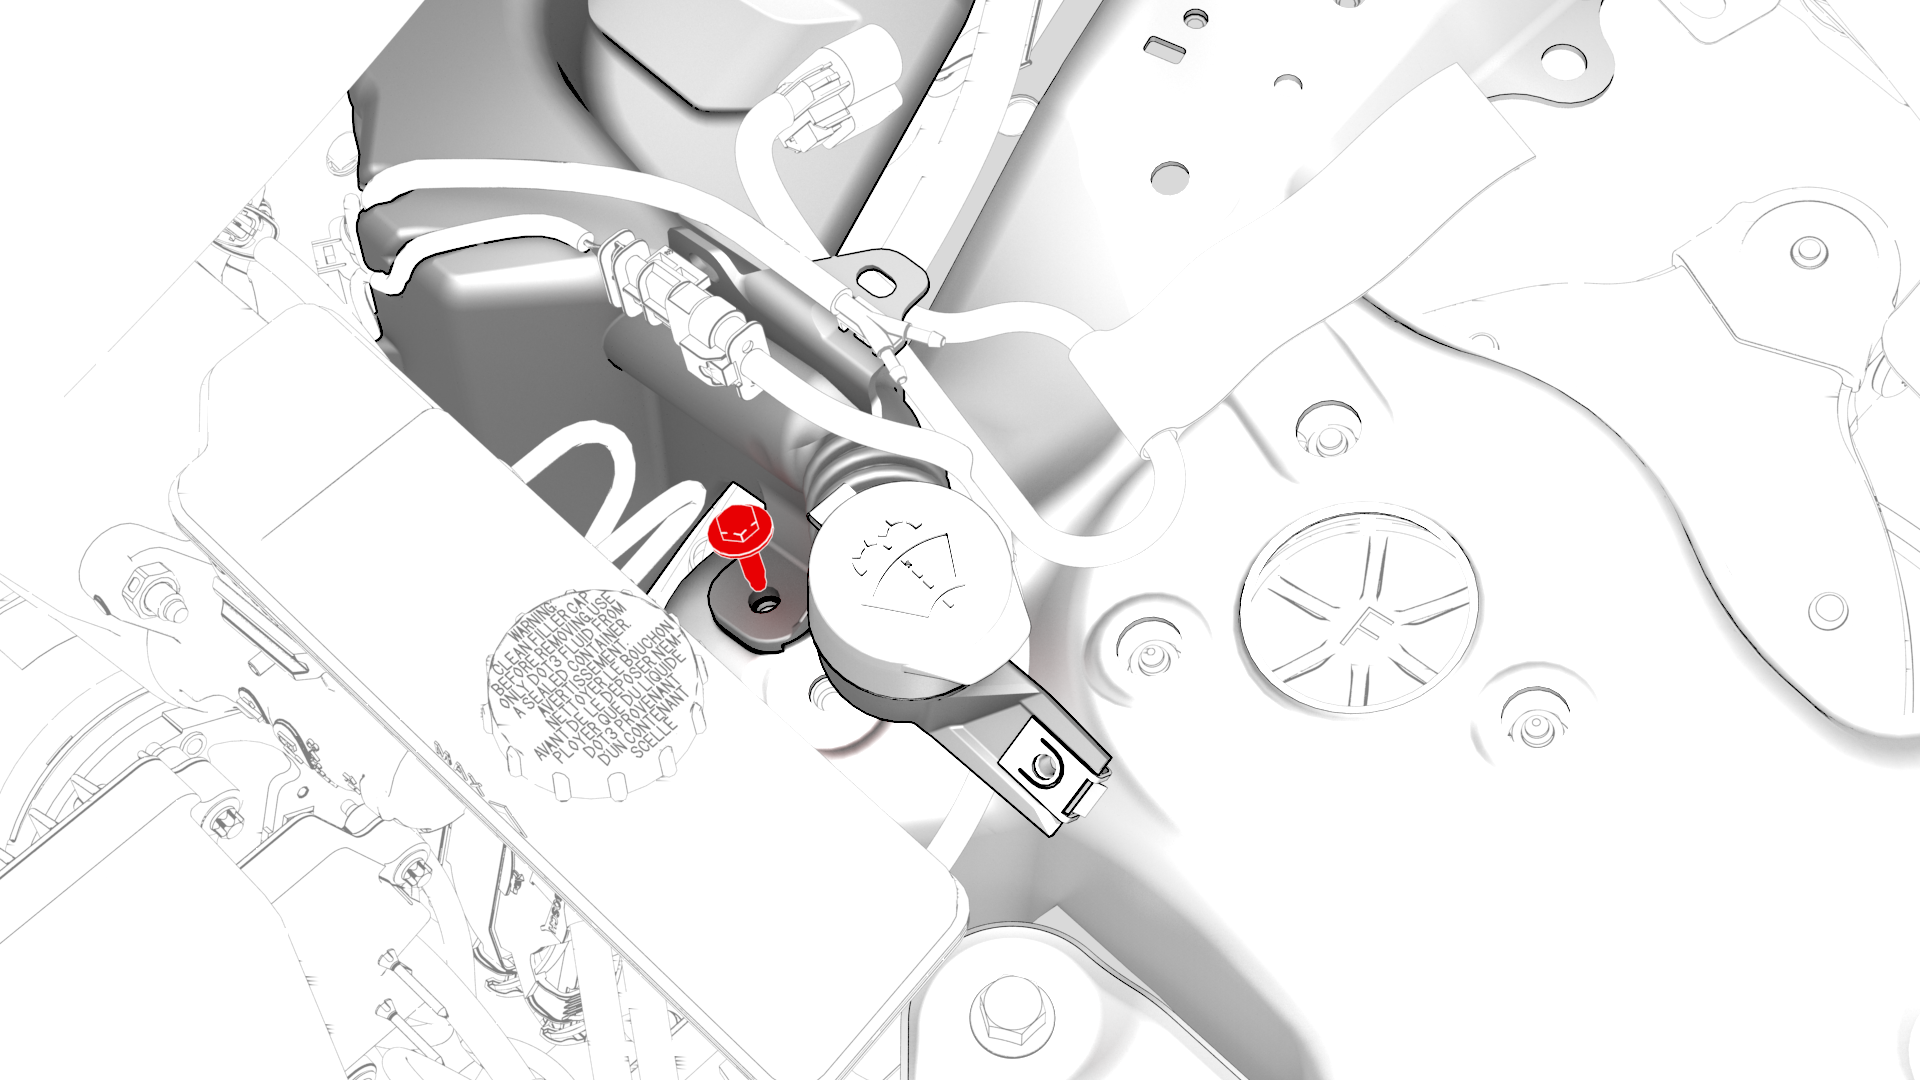
Remove the lower bolt that attaches the windshield washer reservoir to the body.
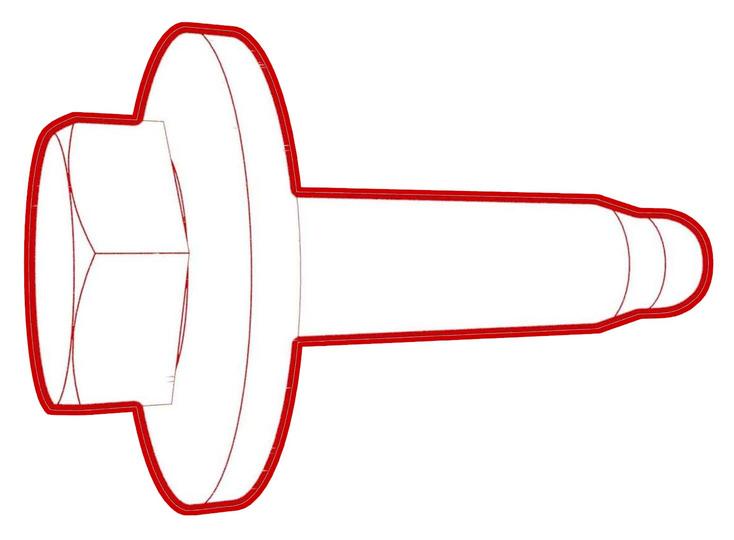 Torque 3 Nm
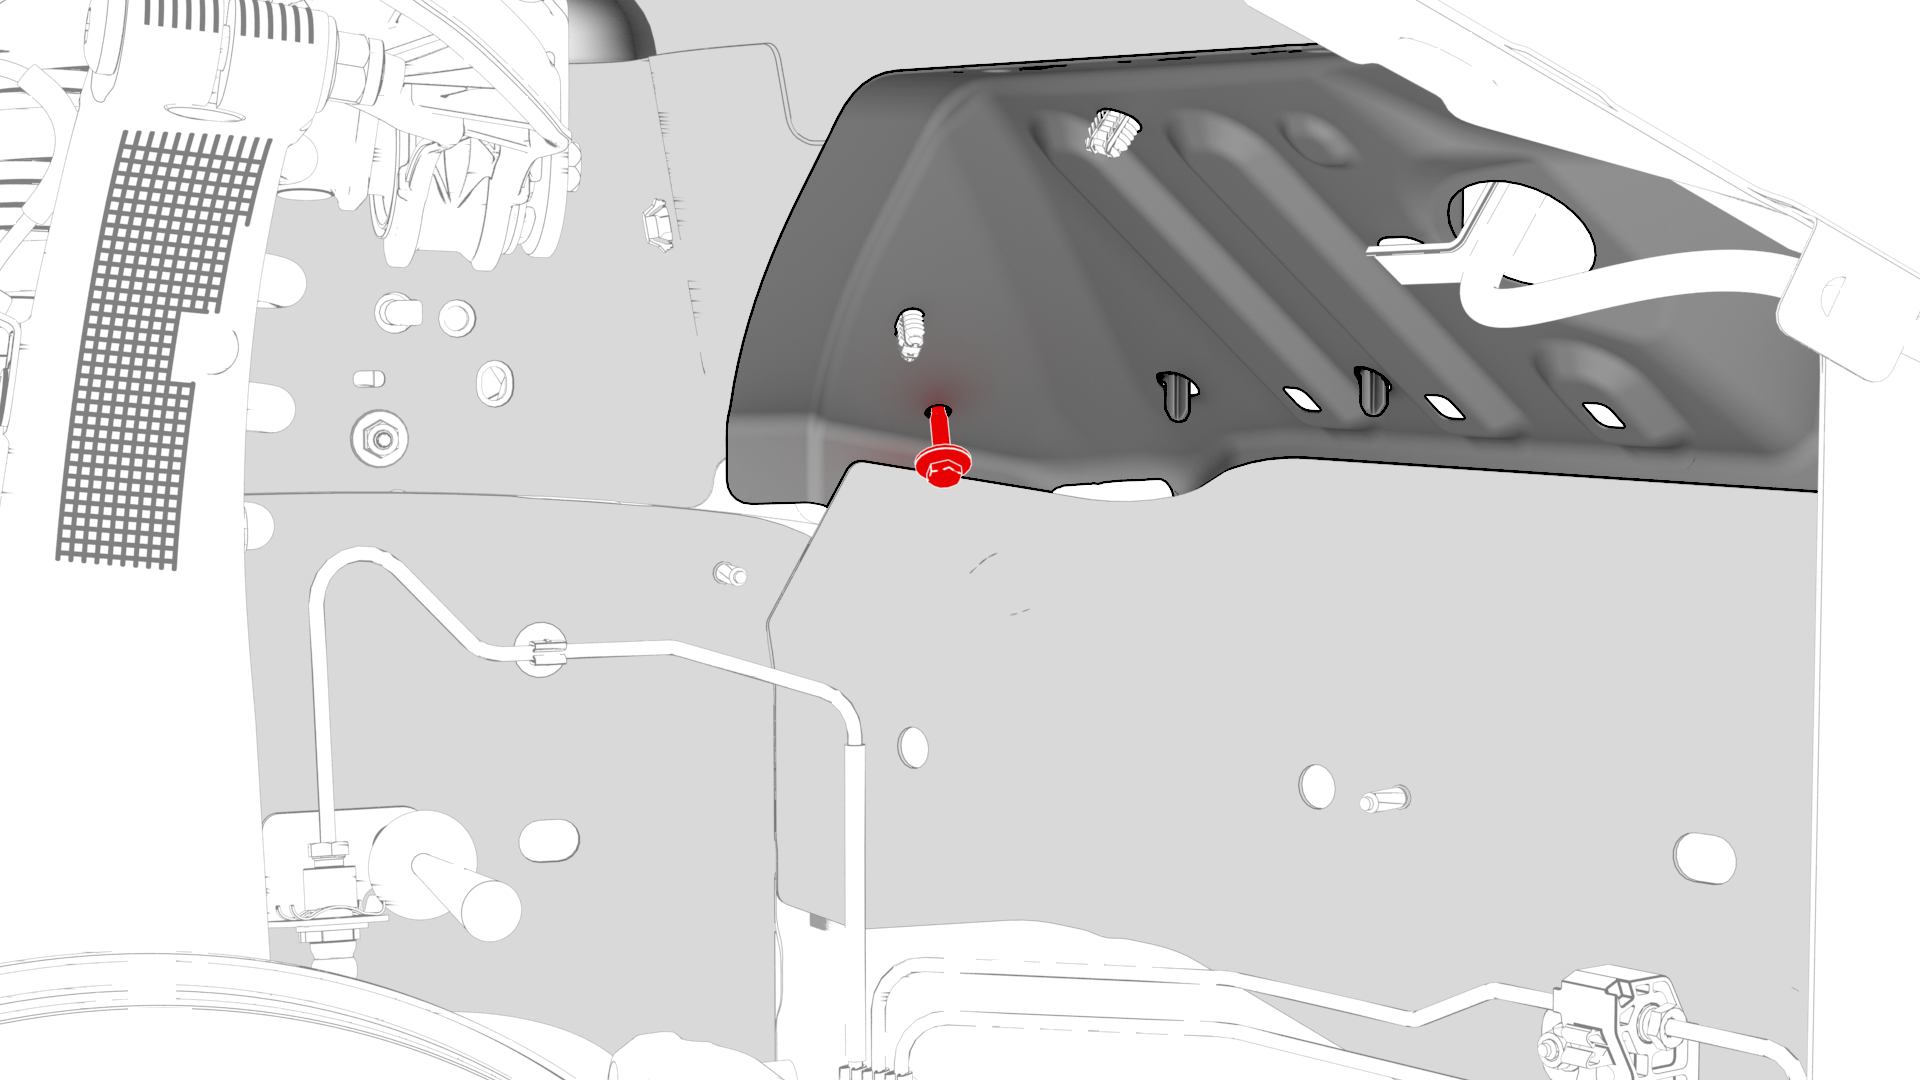
-
Remove the upper bolt that attaches the windshield washer reservoir to the body.Torque 3 Nm
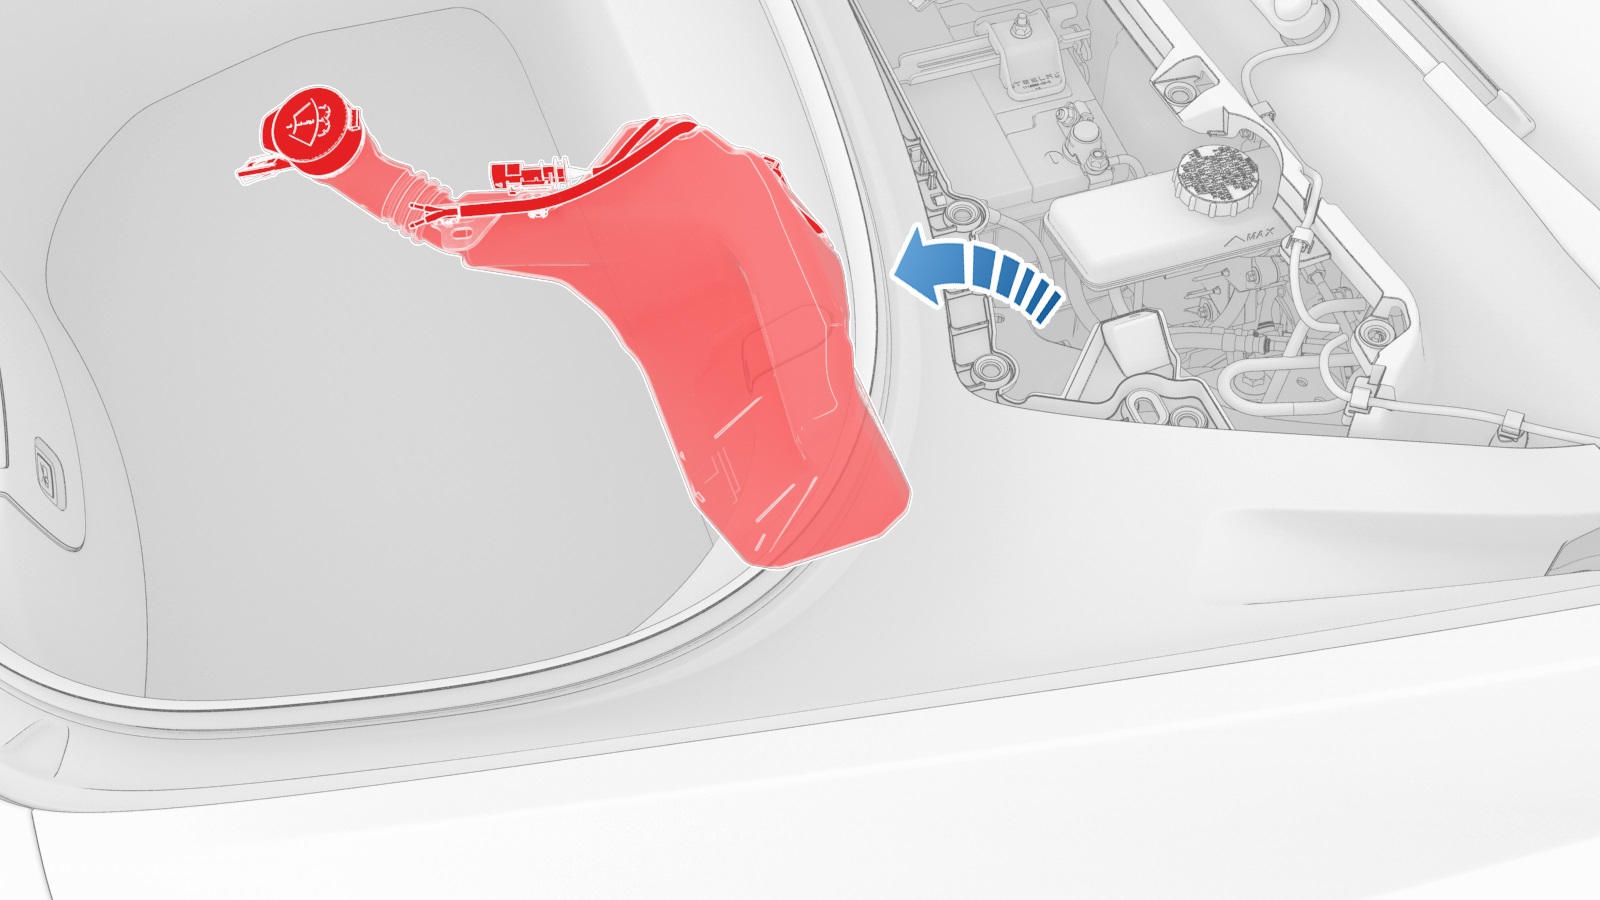
-
Remove the windshield washer reservoir from the vehicle.
-
Lower the vehicle fully and, with assistance, push the vehicle to the work area.
 Warning: Do not push the vehicle faster than 1 mph.
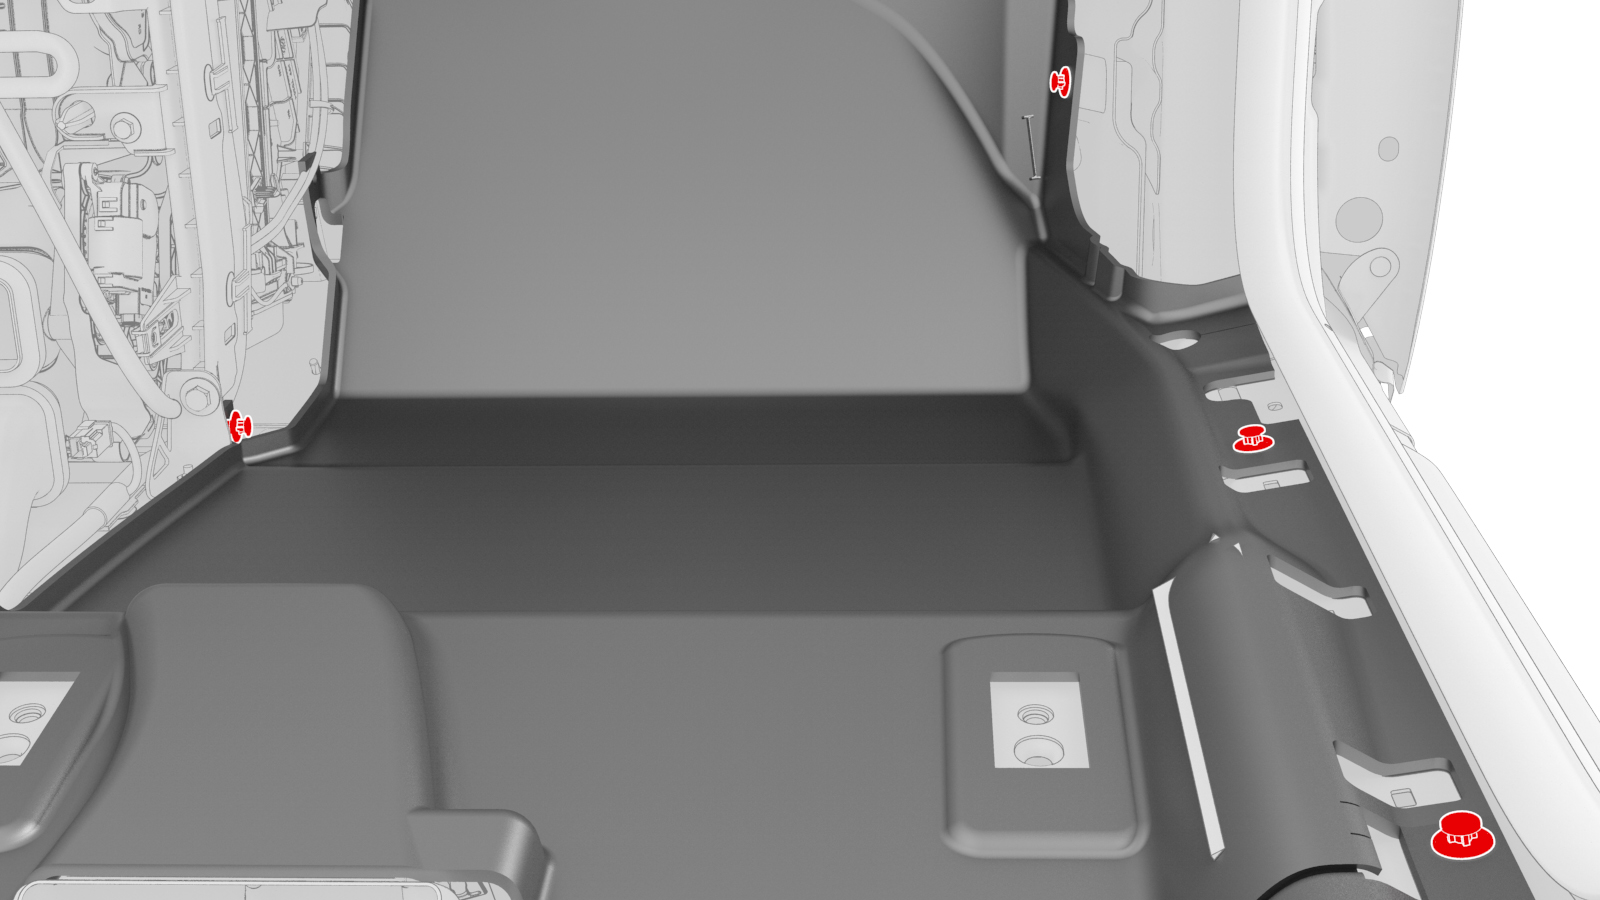
 -
Release the clips that attach the RH front carpet to the vehicle, and then remove the carpet.
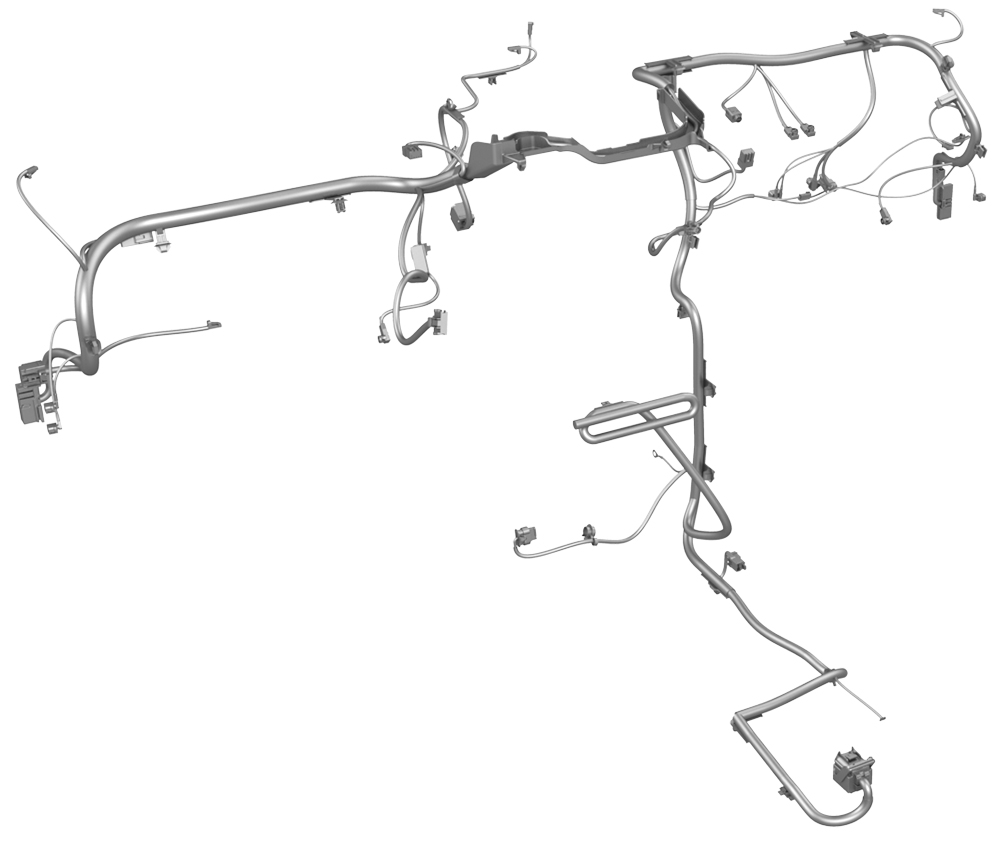
-
Remove the instrument panel harness from the cross car beam.
| 1 | Remove the rear underhood apron. See Underhood Apron - Rear (Remove and Replace). | ||
| 2 | Remove the cabin intake duct. See Duct - Cabin Intake (Remove and Replace). | ||
| 3 | Remove the hood latch cover. See Cover - Hood Latch (Remove and Replace). | ||
| 4 | Remove the underhood storage unit carpet. See Carpet - Underhood Storage (Remove and Install). | ||
| 5 | Remove the underhood storage unit. See Underhood Storage Unit (Remove and Replace). | ||
| 6 | Remove the wiper arms. See Wiper Arms (Remove and Replace). | ||
| 7 | Remove the wiper motor. See Wiper Motor (Remove and Replace). | ||
| 8 | Release the clip that attaches the electrical harness to the windshield washer reservoir. | |
| 9 | Disconnect the electrical connector from the windshield washer reservoir. | |
| 10 | Open all 4 doors and lower all 4 windows. | ||
| 11 | Remove the 2nd row lower seat cushion. See Seat Cushion - Lower - 2nd Row (Remove and Replace). | ||
| 12 | Move the LH and RH front seats fully backward. | ||
| 13 | Remove the LH and RH instrument panel end caps. See End Cap - Instrument Panel - LH (Remove and Replace) | ||
| 14 | Remove the LH and RH mid A-pillar trim. See Trim - A-Pillar - Middle - LH (Remove and Replace). | ||
| 15 | Remove the LH and RH lower A-pillar trim. See Trim - A-Pillar - Lower - LH (Remove and Replace). | ||
| 16 | Remove the LH and RH upper A-pillar trim. See Trim - A-Pillar - Upper - LH (Remove and Replace). | ||
| 17 | Remove the driver footwell cover. See Cover - Footwell - Driver (Remove and Replace). | ||
| 18 | Remove front passenger footwell cover. See Cover - Footwell - Passenger (LHD) (Remove and Replace). | ||
| 19 | Remove the driver seat and front passenger seat. See Seat - Driver (Remove and Replace). | ||
| 20 | Raise the vehicle. See Raise Vehicle - 2 Post Lift. | ||
| 21 | Place the vehicle into Park. | ||
| 22 | Disconnect 12V power. See 12V Power (Disconnect and Connect). | ||
| 23 | Remove the LH front wheel. See Wheel (Remove and Install). | ||
| 24 | Remove the LH front wheel arch liner. See Wheel Arch Liner - Front - LH (Remove and Replace). | ||
| 25 | Remove the lower bolt that attaches the windshield washer reservoir to the body. Torque 3 Nm | |
| 26 | Install the LH front wheel. See Wheel (Remove and Install). | ||
| 27 | Partially lower the vehicle. | ||
| 28 | Remove the upper bolt that attaches the windshield washer reservoir to the body. Torque 3 Nm | |
| 29 | Remove the windshield washer reservoir from the vehicle. | |
| 30 | Release the LH and RH rear parking brakes, and then reconnect the LH and RH rear brake caliper electrical connectors. See Parking Brake - Caliper - Rear - LH (Release). | ||
| 31 | Lower the vehicle fully and, with assistance, push the vehicle to the work area.Warning: Do not push the vehicle faster than 1 mph. | ||
| 32 | Place wheel chocks to keep the vehicle from moving. | ||
| 33 | Remove the driver knee airbag, if present. See Airbag - Knee - Driver (Remove and Install). | ||
| 34 | Remove the LH footwell duct. See Duct - Footwell - LH (Remove and Replace). | ||
| 35 | Remove the LH and RH center console side panel carpets. See Carpet - Side Panel - Center Console - LH (Remove and Replace). | ||
| 36 | Remove the center console lower rear panel. See Panel - Lower Rear - Center Console (Remove and Replace). | ||
| 37 | Remove the center console. See Center Console (Remove and Install). | ||
| 38 | Remove the front passenger knee airbag, if present. See Airbag - Knee - Front Passenger (Remove and Replace). | ||
| 39 | Remove the LH and RH air wave end caps. See End Cap - Air Wave - LH (Remove and Replace). | ||
| 40 | Remove the main instrument panel decor trim. See Decor Trim - Instrument Panel - Main (Remove and Replace). | ||
| 41 | Remove the glove box. See Glove Box (LHD) (Remove and Replace). | ||
| 42 | Remove the RH footwell duct. See Duct - Footwell - RH (Remove and Replace). | ||
| 43 | Remove the RH air wave duct. See Duct - Air Wave - RH (Remove and Replace). | ||
| 44 | Remove the driver airbag. See Airbag - Driver (Remove and Replace). | ||
| 45 | Remove the steering wheel. See Steering Wheel (Remove and Install). | ||
| 46 | Remove the steering column control module. See Module - Steering Column Control (Remove and Replace). | ||
| 47 | Remove the touchscreen. See Touchscreen (Remove and Replace). | ||
| 48 | Remove the vent finisher. See Finisher - Vent (Remove and Replace). | ||
| 49 | Remove the RH front vent. See Vent - Front - RH (Remove and Replace). | ||
| 50 | Remove the LH front vent. See Vent - Front - LH (Remove and Replace). | ||
| 51 | Remove the instrument panel speaker grille. See Grille - Speaker - Instrument Panel (Remove and Replace). | ||
| 52 | Remove the LH and RH dash speakers. See Speaker - Dash - LH (Remove and Replace). | ||
| 53 | Remove the center dash speaker. See Speaker - Dash - Center (Remove and Replace). | ||
| 54 | Remove the dash tweeter. See Tweeter - Dash (Remove and Replace). | ||
| 55 | With assistance, remove the instrument panel carrier. See IP Carrier (Remove and Install). | ||
| 56 | Remove the LH air wave duct. See Duct - Air Wave - LH (Remove and Replace). | ||
| 57 | Remove the LH front carpet. See Carpet - Front - LH (Remove and Replace). | ||
| 58 | Release the clips that attach the RH front carpet to the vehicle, and then remove the carpet. | |
| 59 | Remove the cross car beam. See Beam - Cross Car (Remove and Replace). | ||
| 60 | Remove the instrument panel harness from the cross car beam. |
Install
Installation procedure is the reverse of removal.