Four Wheel Alignment (Check)
Correction code 3100220031002200
- 1096767-00-ASEAT COVER
- 1145158-00-ABallast Bag, 25lb
- 1071271-00-ACHASSIS HEIGHT MEASURING TOOL
- 1049463-00-ASTEERING WHEEL LEVEL
SPECIAL TOOLS
SEAT COVER (1096767-00-A) |
Ballast Bag, 25lb (1145158-00-A) |
CHASSIS HEIGHT MEASURING TOOL (1071271-00-A) |
STEERING WHEEL LEVEL (1049463-00-A) |
Procedure
-
Disconnect the charging cable from the vehicle.
 Warning: Do not attach the charging cable to the charge port while the vehicle is on the rack.
 -
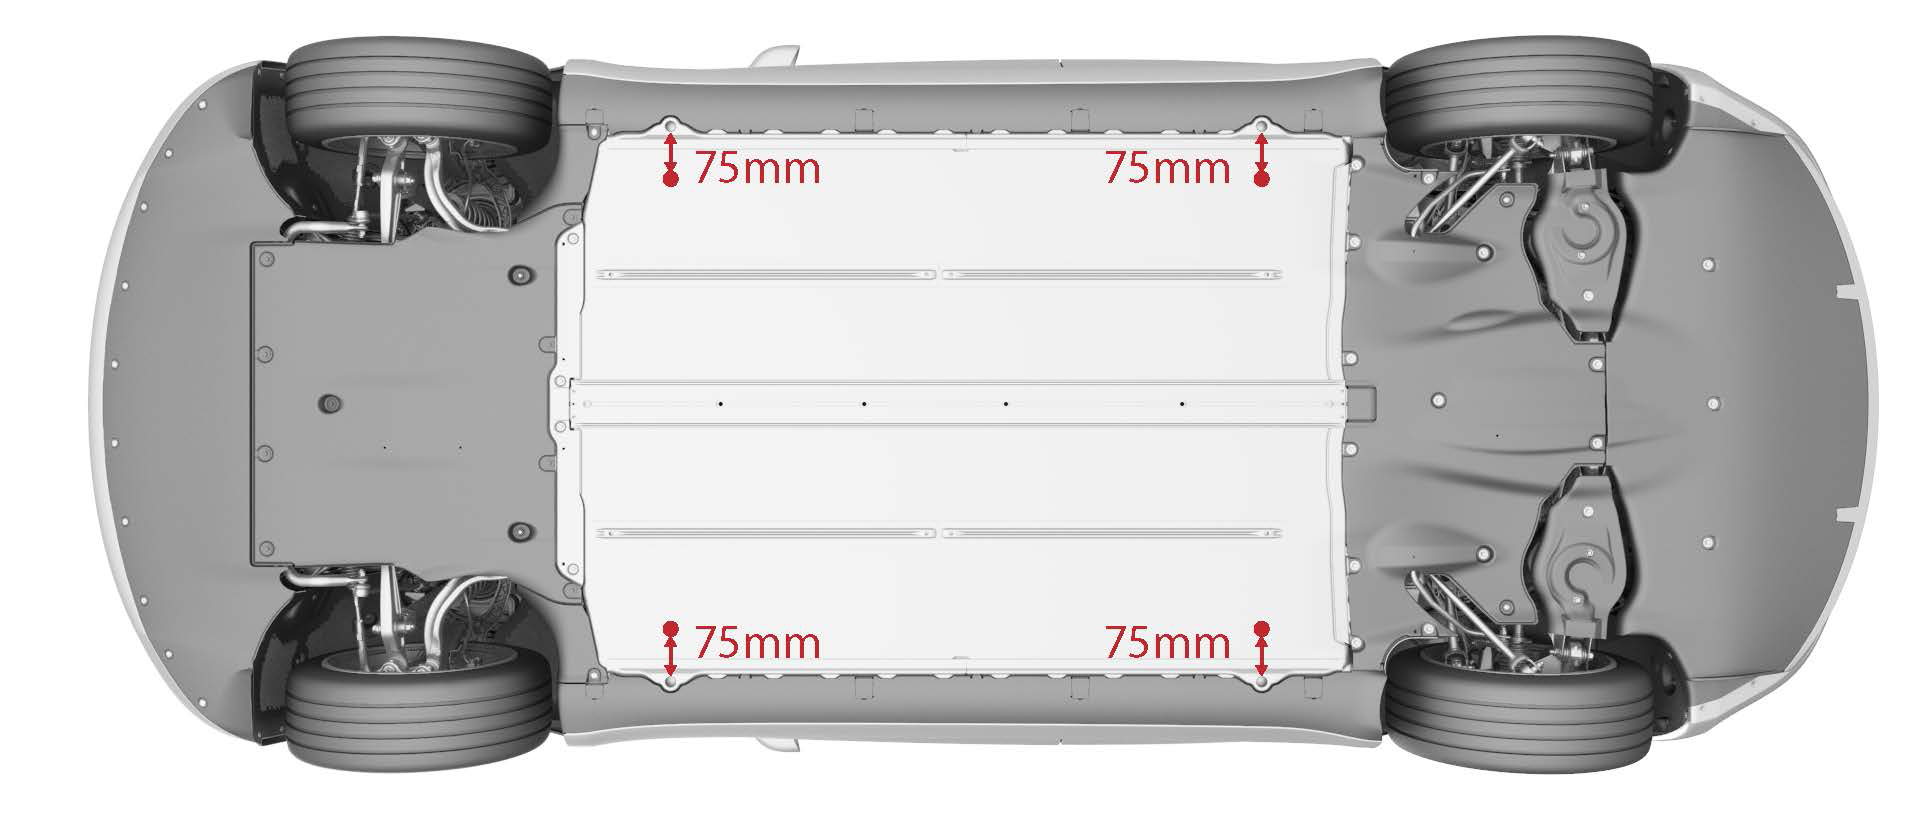
Measure the ride height at 4 locations which are an additional 75 mm towards the centerline from the vehicle lifting points.
| 1 | Make sure the tire pressures are to specification. Note: Use the tire sticker values displayed on the door jam. If unavailable, use these values:
| ||
| 2 | Make sure that the alignment rack slip/turn plates are locked. | ||
| 3 | Disconnect the charging cable from the vehicle.Warning: Do not attach the charging cable to the charge port while the vehicle is on the rack. | ||
| 4 | Drive the vehicle onto the alignment rack, and stop the vehicle approximately 6 inches before the turn plates to allow for rolling compensation. | ||
| 5 | Shift into Park. | ||
| 6 | Install wheel chocks. | ||
| 7 | Install seat covers on the driver and front passenger seats. | ||
| 8 | Set 150 pounds of ballast bags onto the driver seat, and 150 pounds of ballast bags onto the front passenger seat. | ||
| 9 | From outside of the vehicle, fasten the driver and front passenger seat belts, and shift into Neutral. | ||
| 10 | Pass a shop towel halfway through the both door strikers, and use a pen to latch the doors. | ||
| 11 | Raise the alignment rack to a working height and slightly lower to lock. | ||
| 12 | Install the alignment heads onto the wheels. | ||
| 13 | Type the vehicle information into the alignment machine. | ||
| 14 | Perform a rolling compensation and manually position the vehicle onto the slip/turn plates. | ||
| 15 | Remove the alignment slip/turn plate pins. | ||
| 16 | Calibrate the ride height tool. | ||
| 17 | Measure the ride height at 4 locations which are an additional 75 mm towards the centerline from the vehicle lifting points. | |
| 18 | Move the front seats fore and aft to set the following ride heights:
| ||
| 19 | Install the brake pedal depressor and steering wheel bubble leveler. | ||
| 20 | Perform a caster sweep, center and set the steering wheel using the bubble leveler and steering wheel holder. | ||
| 21 | Print the vehicle summary and verify that the alignment parameters are within specifications. Note: If the parameters are not within specifications, perform a four wheel alignment adjustment. See Four Wheel Alignment (Check and Adjust).
| ||
| 22 | Remove the alignment heads from the wheels. | ||
| 23 | Remove the brake pedal depressor. | ||
| 24 | Install the alignment slip/turn plate pins. | ||
| 25 | Lower the alignment rack to the ground. | ||
| 26 | Unlatch the driver's door, shift into Park, and remove the steering wheel bubble leveler. | ||
| 27 | Unbuckle the seat belts and remove the ballast bags from the vehicle. | ||
| 28 | Remove the seat covers from the seats. | ||
| 29 | Remove the wheel chocks. | ||
| 30 | Remove the vehicle from the alignment rack. | ||
| 31 | Perform a test drive and verify vehicle operation. |